User Documentation · Chapter 5
Mockingjay Functionalities
Every part of the app: nodes, projects, agents, fleets, apps, skills, MCP, memory, configuration and billing.
This provides an overview of the key features and capabilities of the Mockingjay Network desktop application.
Nodes (Infrastructure)
This is where you keep an eye on the computers that run your agents, wherever they are. Each of these computers is called a node. The one you are using right now shows up with the This device label.
Summary cards
- Nodes: the number of nodes you have.
- Architectures: the number of different processor types across your nodes.
- Avg. CPU: how busy the processors are, on average, across all nodes.
- Memory: how much memory is in use, on average, across all nodes.
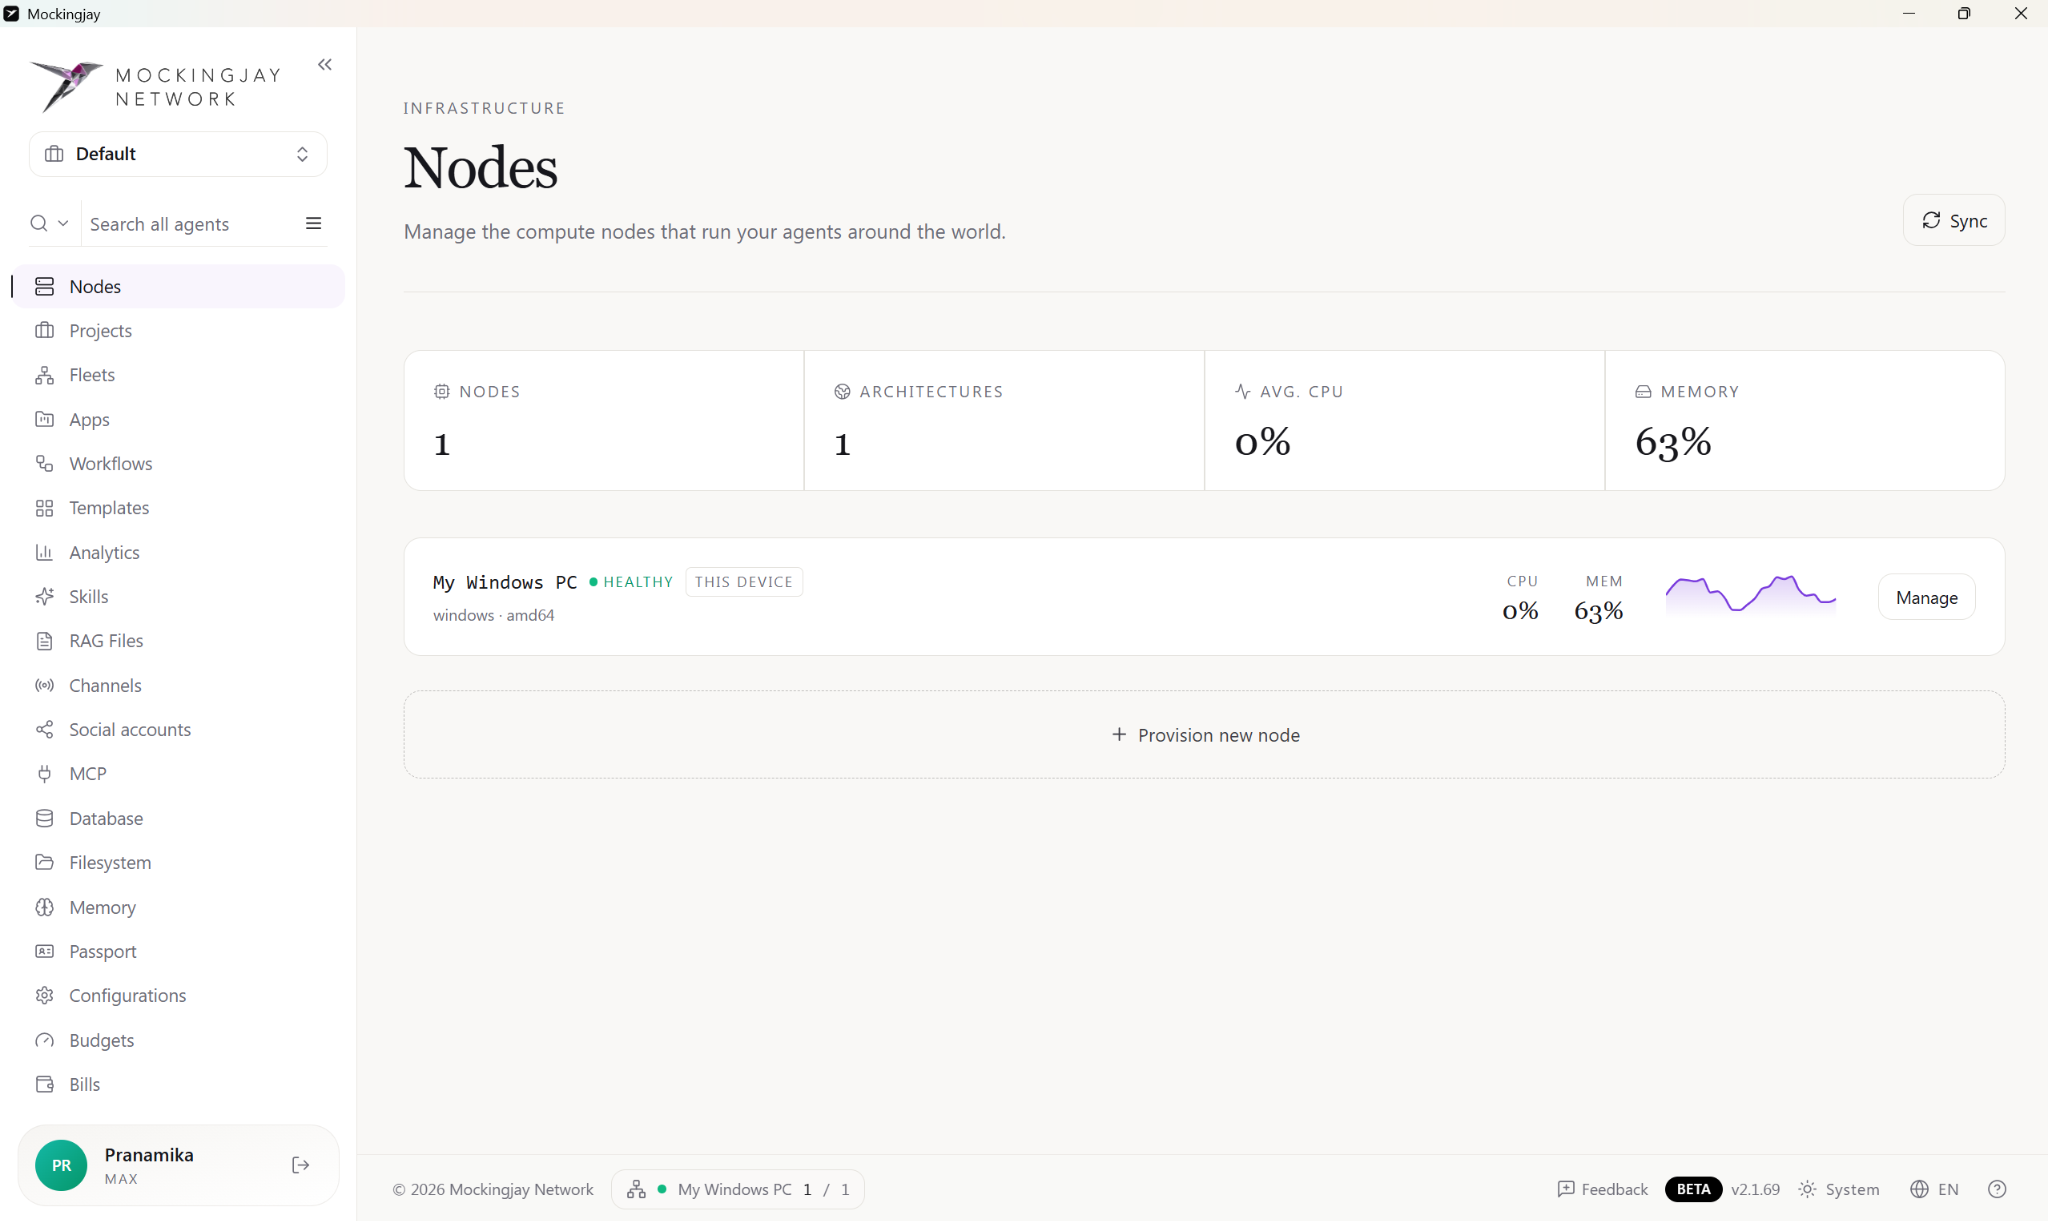
Node list. Every node gets its own row, which shows:
- The node's name, for example “My Windows PC”.
- Its health, for example Healthy.
- This device label, if it's the computer you're using.
- Its operating system and processor type, for example windows · amd64.
- Current CPU % and MEM % usage.
- A small graph showing recent usage.
- A Manage button.
Your own computer is marked This device. Cloud nodes join the list as soon as they're set up. Click Sync in the top-right corner to refresh the figures.
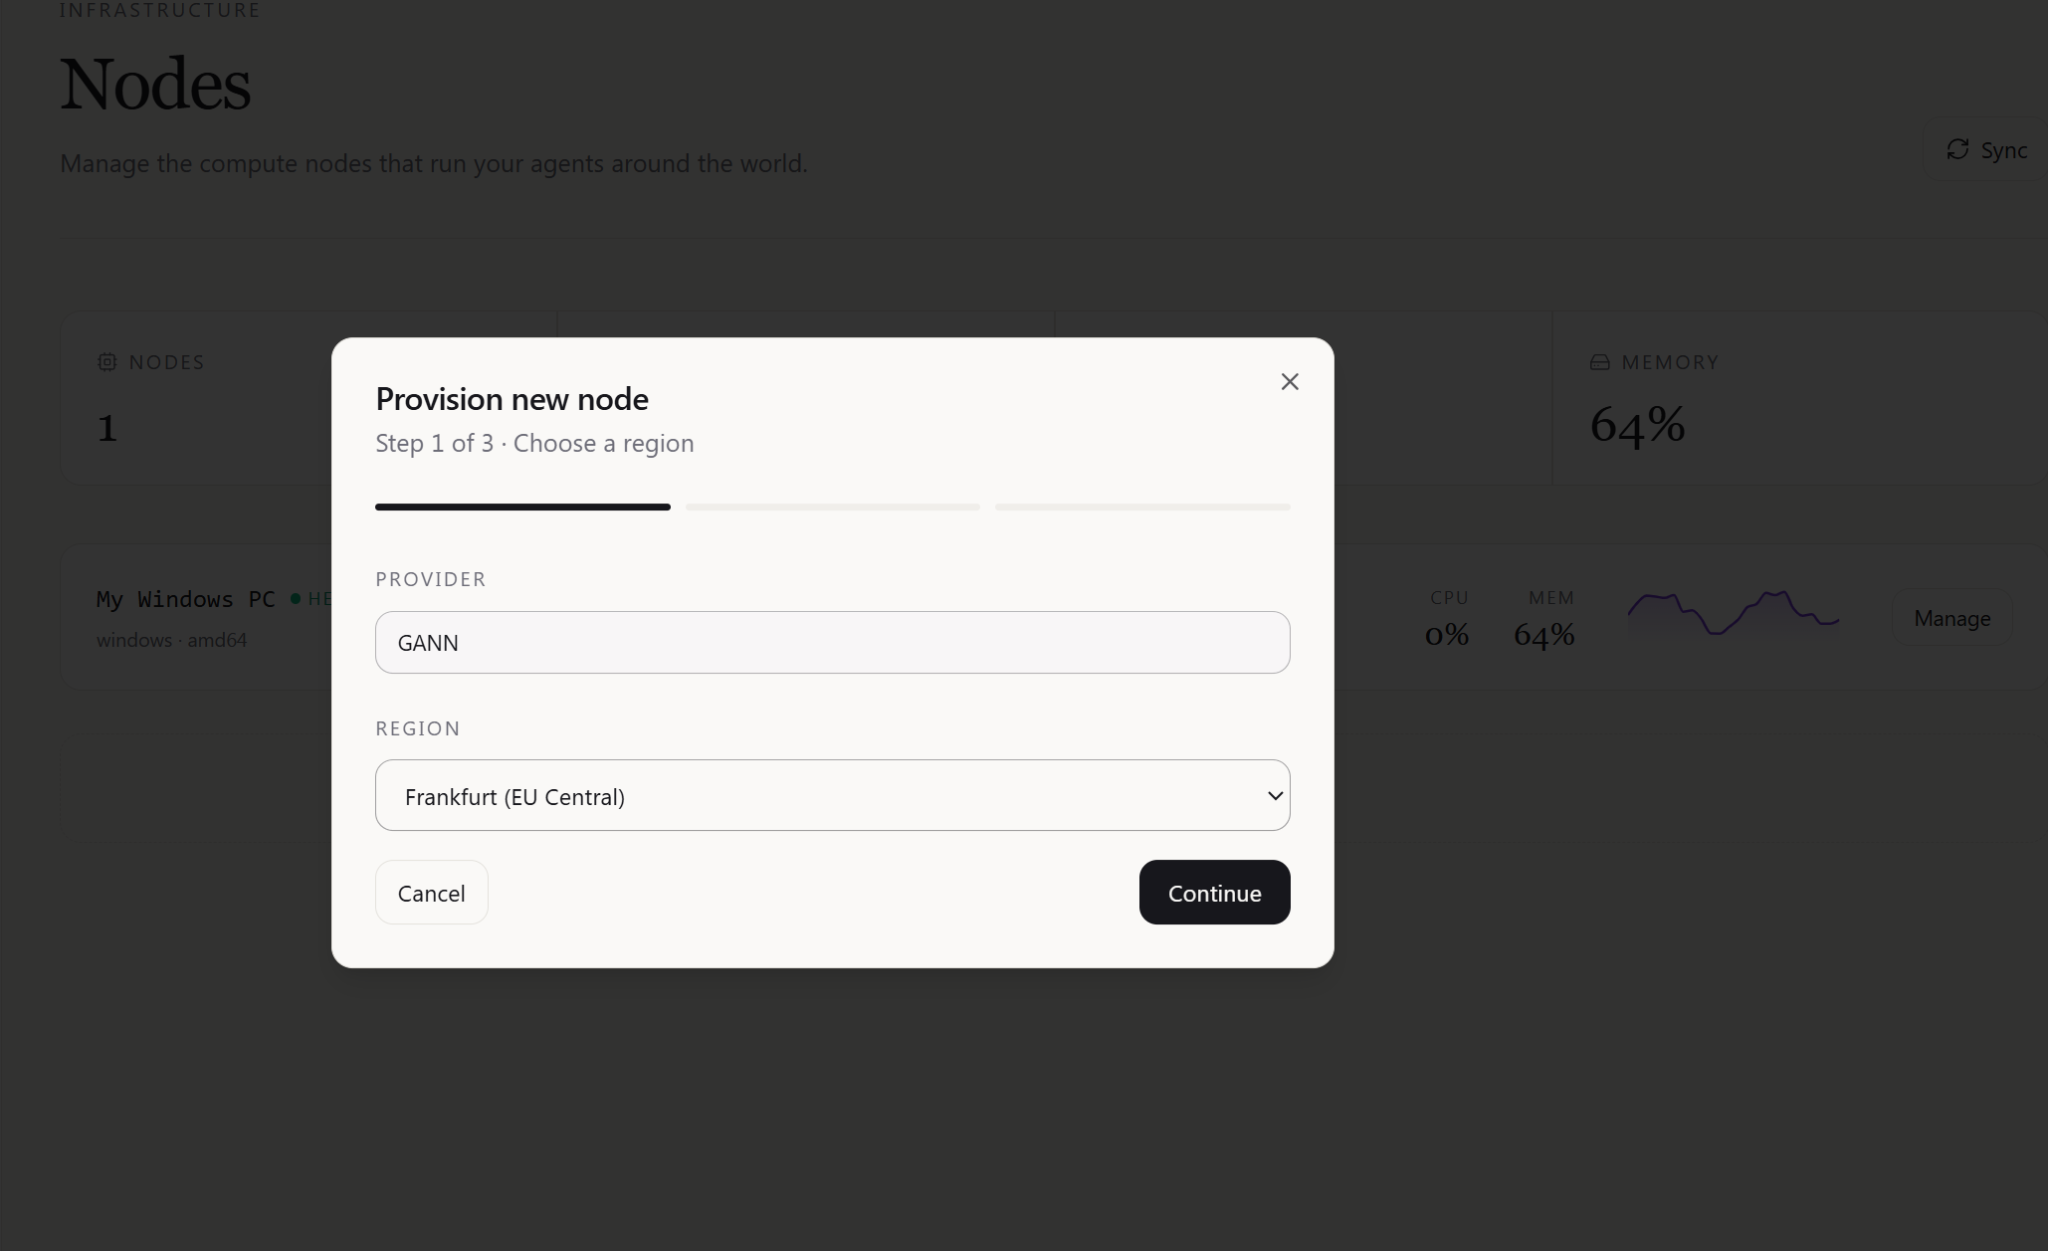
To add a cloud machine, click + Provision new node below the list. Setting it up takes three steps.
- Choose a region. The Provider is already filled in for you (it shows GANN). Then choose where the machine should run:
- Frankfurt (EU Central)
- Ohio (US East)
- Singapore (Asia SE)
- Mumbai (Asia South)
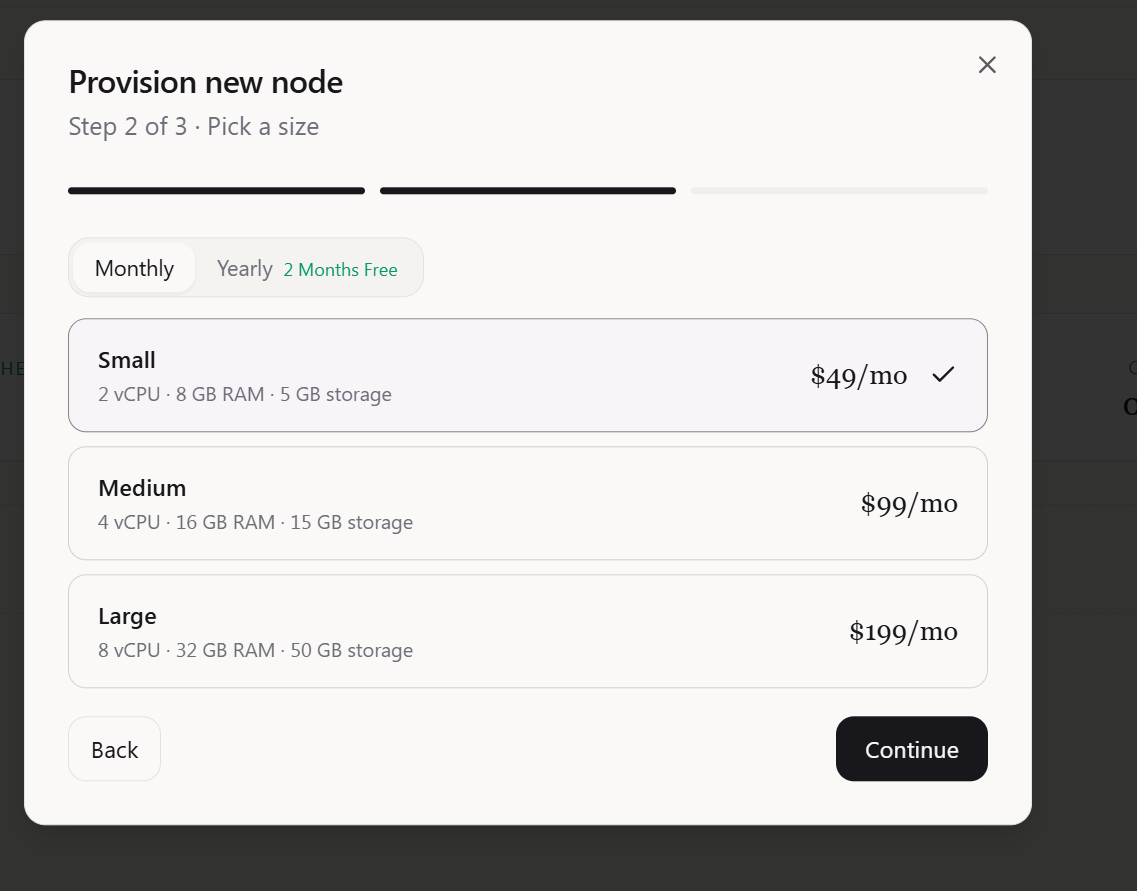
- Pick a size. Decide whether to pay Monthly or Yearly first. Paying yearly gets you two months free. Then pick the size that suits your workload:
| Size | vCPU | RAM | Storage | Price |
|---|---|---|---|---|
| Small | 2 | 8 GB | 5 GB | $49/mo |
| Medium | 4 | 16 GB | 15 GB | $99/mo |
| Large | 8 | 32 GB | 50 GB | $199/mo |
- Review & deploy. Give the node a name and check the summary, which lists the provider, region, size and monthly cost. When you're happy, click Continue to payment – $X/mo. You'll see “Starting checkout…” for a moment before the Stripe payment page opens.
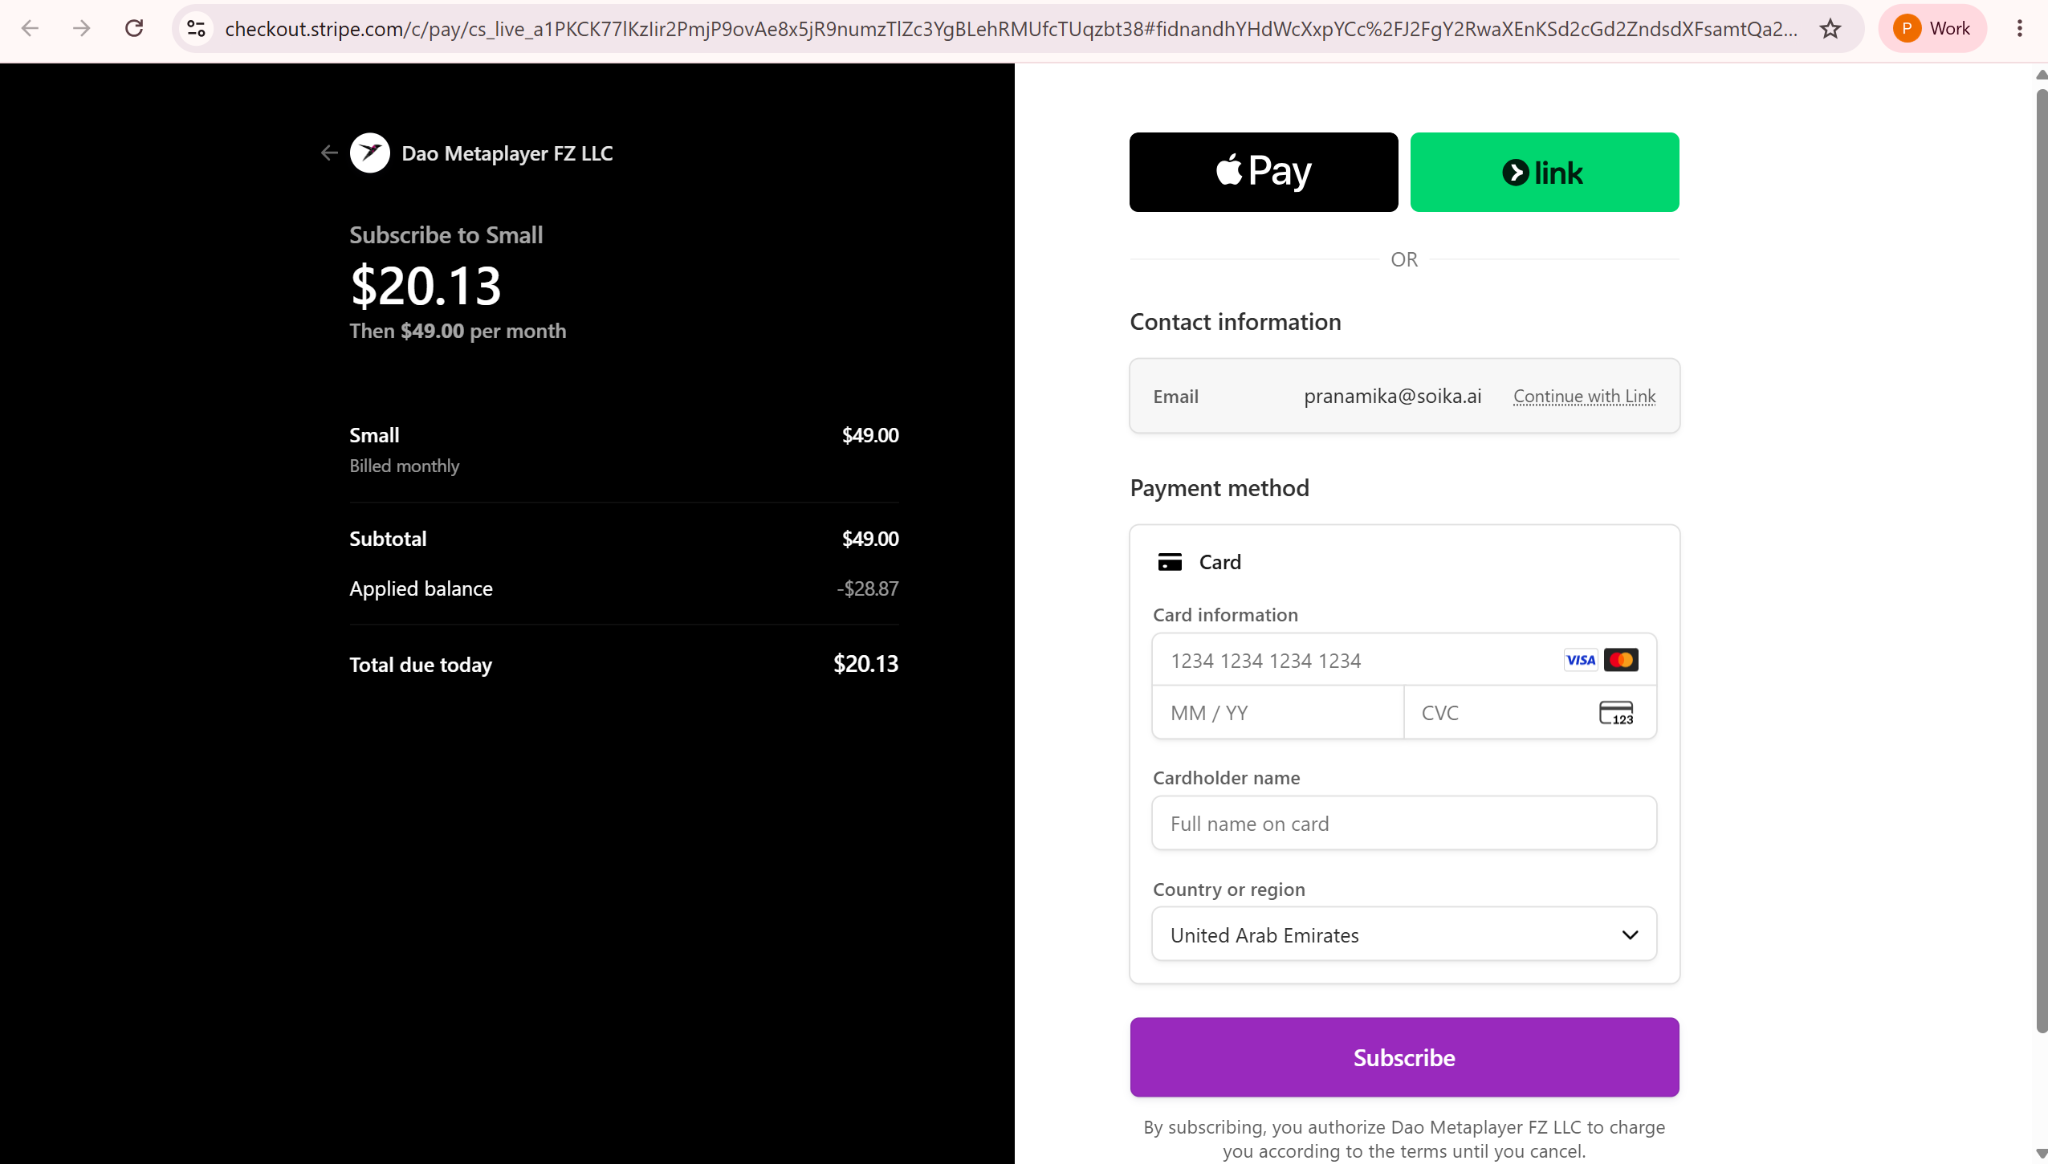
Paying through Stripe
- On the left you'll see what you're buying (for example “Subscribe to Large”), the subtotal, any credit already on your account, and the amount you'll pay today. Below that is the price you'll be charged each month after that.
- On the right, choose how to pay: Apple Pay, Link, or a card (card number, expiry date, CVC, name on the card and country). Click Subscribe to finish.
You can go back or Cancel at any point before paying.
Connected Nodes panel
The Connected Nodes panel gives you a quick way to switch between nodes and control them from wherever you are in the app. Open it by clicking the node indicator in the footer bar (for example “My Windows PC 1/1”).
Node entry. For each node you can reach, the panel shows:
- A coloured dot. Green means the node is online and reachable.
- A server icon and the node's name, for example “My Windows PC”.
- A green Connected badge when the app has a live link to the node.
- A This device label on the computer you're using. Remote nodes don't have this label.
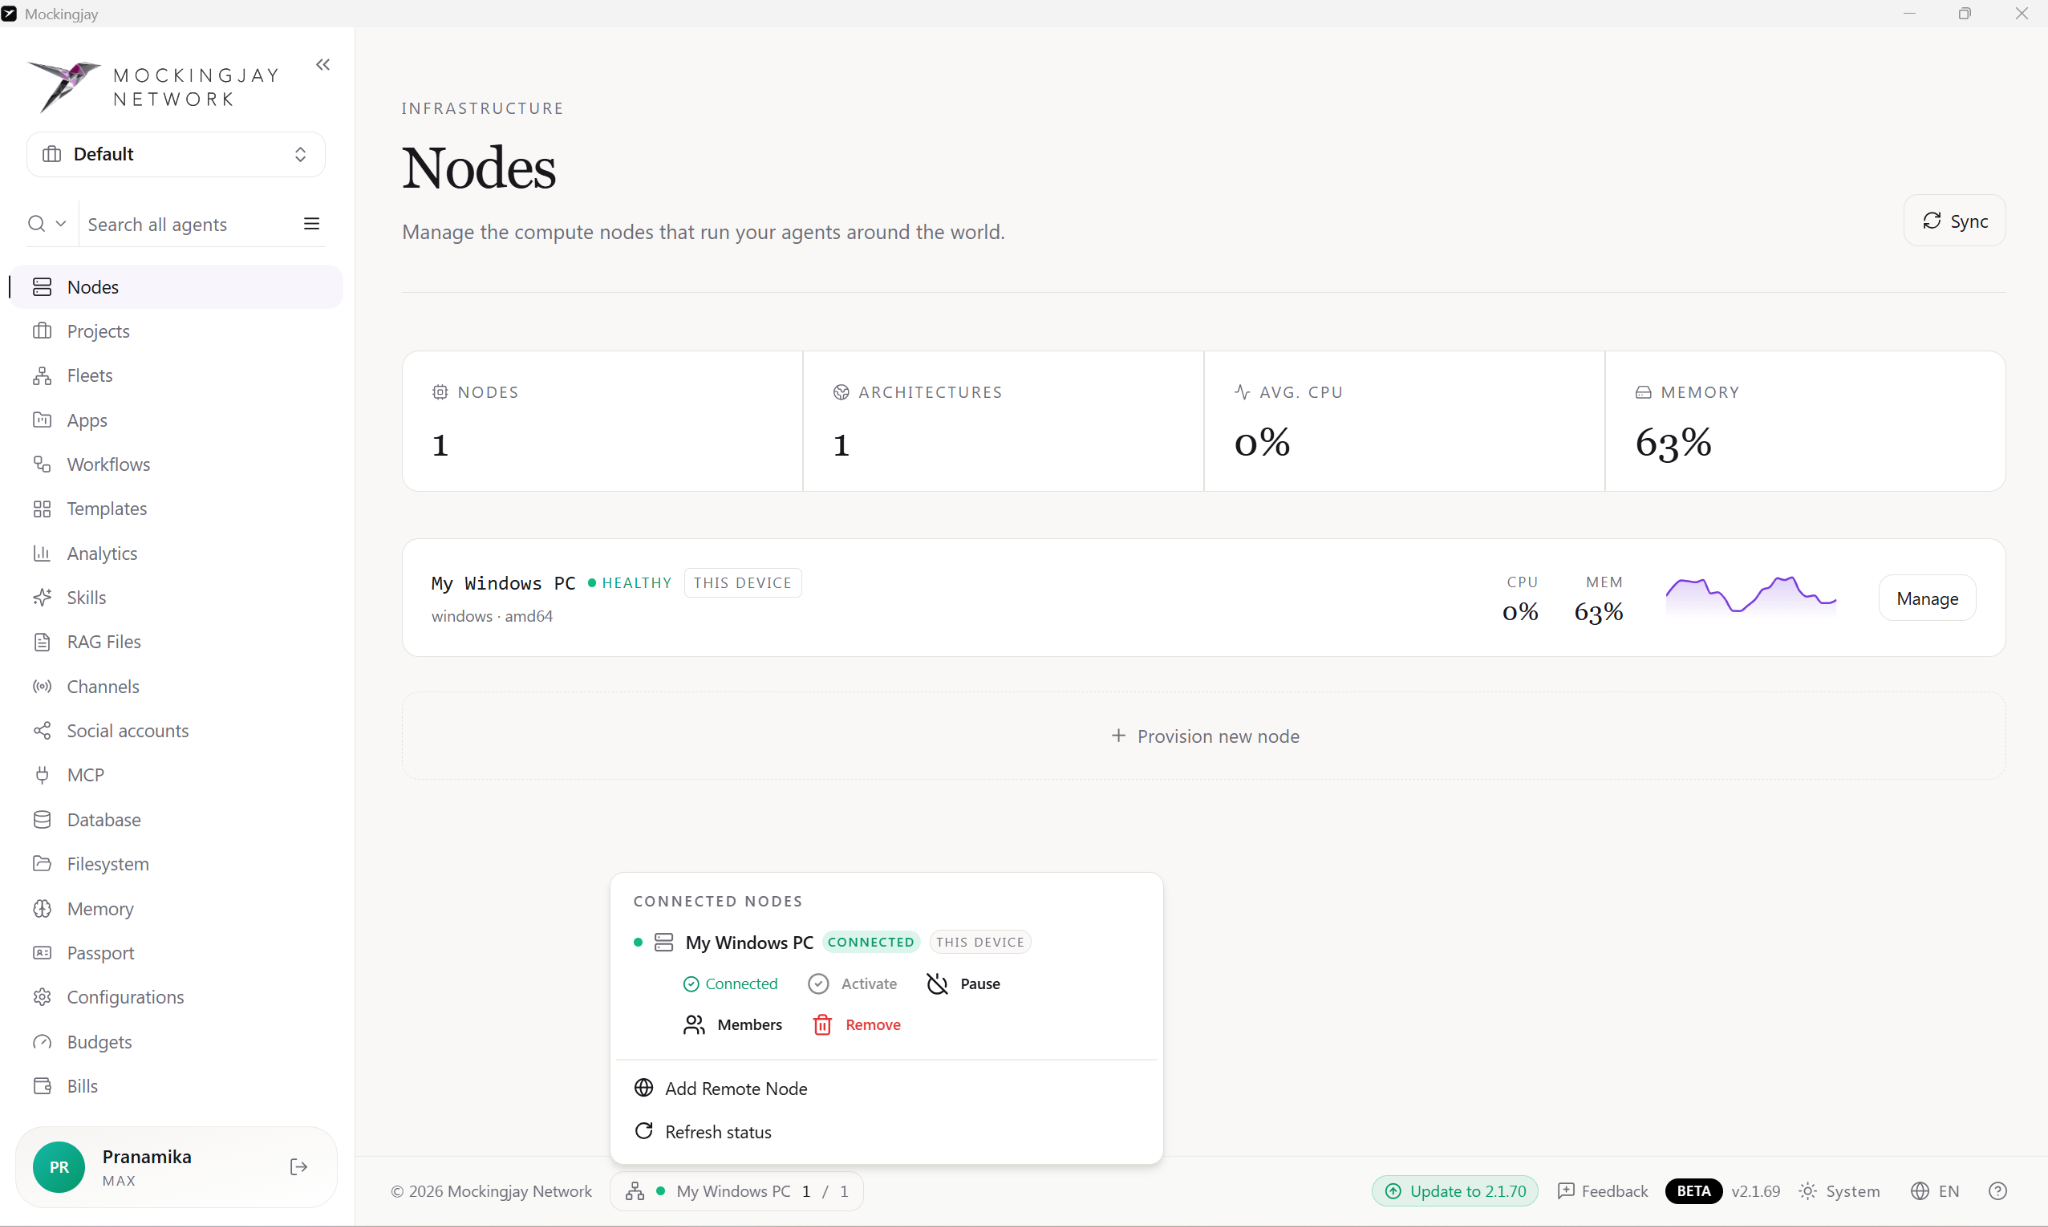
Node actions. Under each node there is a row of buttons:
| Button | What it does |
|---|---|
| Connected (green tick) | Tell you this is the node you're connected to and working on right now. |
| Activate | Switches to this node, so your agents, files and other node-specific pages use it. If the node is already active, this button is greyed out. |
| Pause | Stops the node from picking up new work for a while, without removing it. This is handy during maintenance or when you need your computer's resources for something else. |
| Members | Lets you decide which people in your workspace can use or manage this node. |
| Remove (red) | Disconnects the node and takes it out of the workspace. This can't be undone, so be sure before you click it. If it's a paid cloud node, check whether removing it also ends the subscription. |
Panel footer. At the bottom of the panel there are two more options:
- Add Remote Node (the globe icon) lets you connect another machine you already have, such as a server or a second computer, so your agents can run there too. It then appears in the list next to This device. This is not the same as Provision new node, which rents a new cloud machine and charges you through Stripe.
- Refresh status checks every node again and updates its badge and coloured dot.
Projects (Workspace)
A project is a workspace. Each one holds its own fleets and the agents available to them. The line under the page title tells you how many projects you have.
Summary cards. These show the total number of Projects, Fleets and Agents.
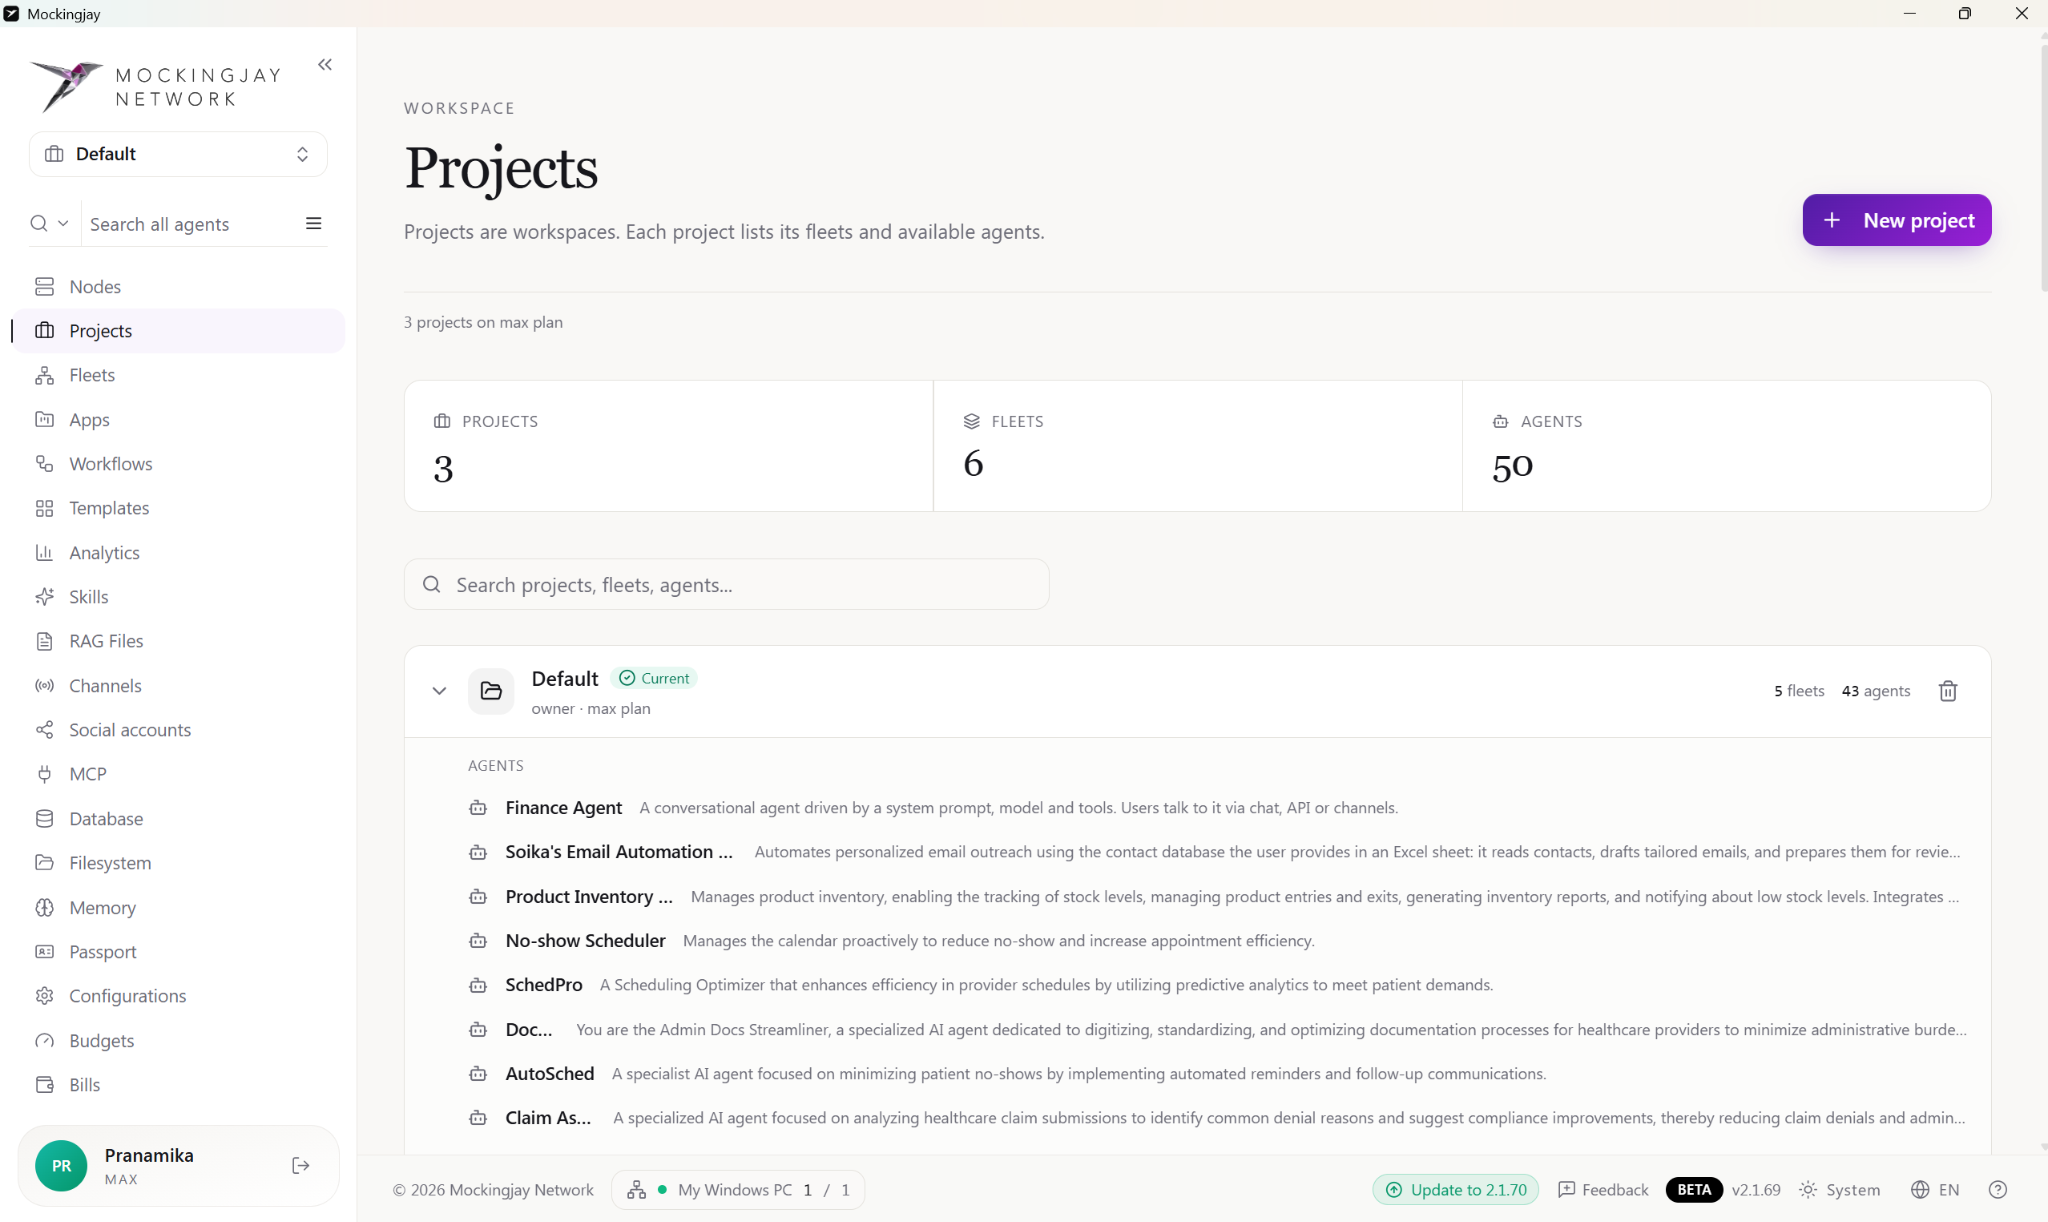
Search bar. Type here to find a project, fleet or agent.
Project cards. Each project has a card you can open up. The card shows:
- The project's name.
- A Current badge if it's the project you're working on.
- Who owns it and which plan it's on.
- How many fleets and agents it has.
- A bin icon for deleting it.
Open a card to see all the agents in that project, each with a short description. Examples include Email Automation, Product Inventory, Language Translator, Business Growth Outreach, TwitterBot, LinkedIn, Video, ImageBot, Content and ResearchBot.
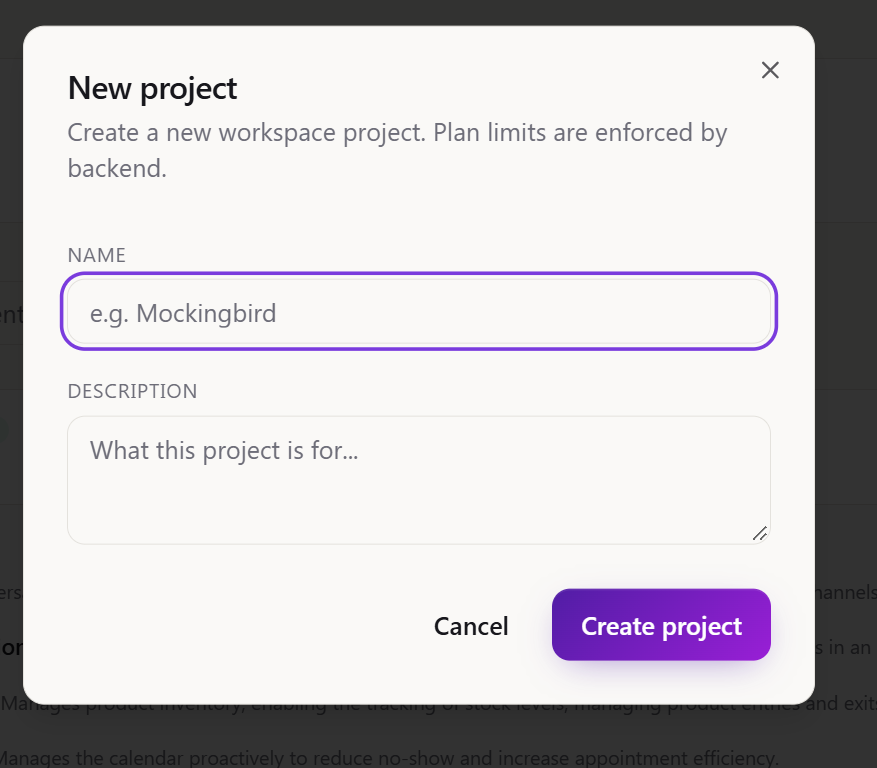
To start a new one, click New project in the top-right corner. Enter a Name (for example “Mockingbird”) and a short Description of what the project is for, then click Create project. How many projects you can have depends on your plan.
Agents (Creating agents)
Agents are the AI workers that do jobs for you. There are three ways to create one: describe it to Mockingbird, start from a template, or build it from scratch.
Creating an agent from Mockingbird
- From the Mockingjay Network sidebar, select Mockingbird in the agent list, or by clicking + start a fresh conversation.
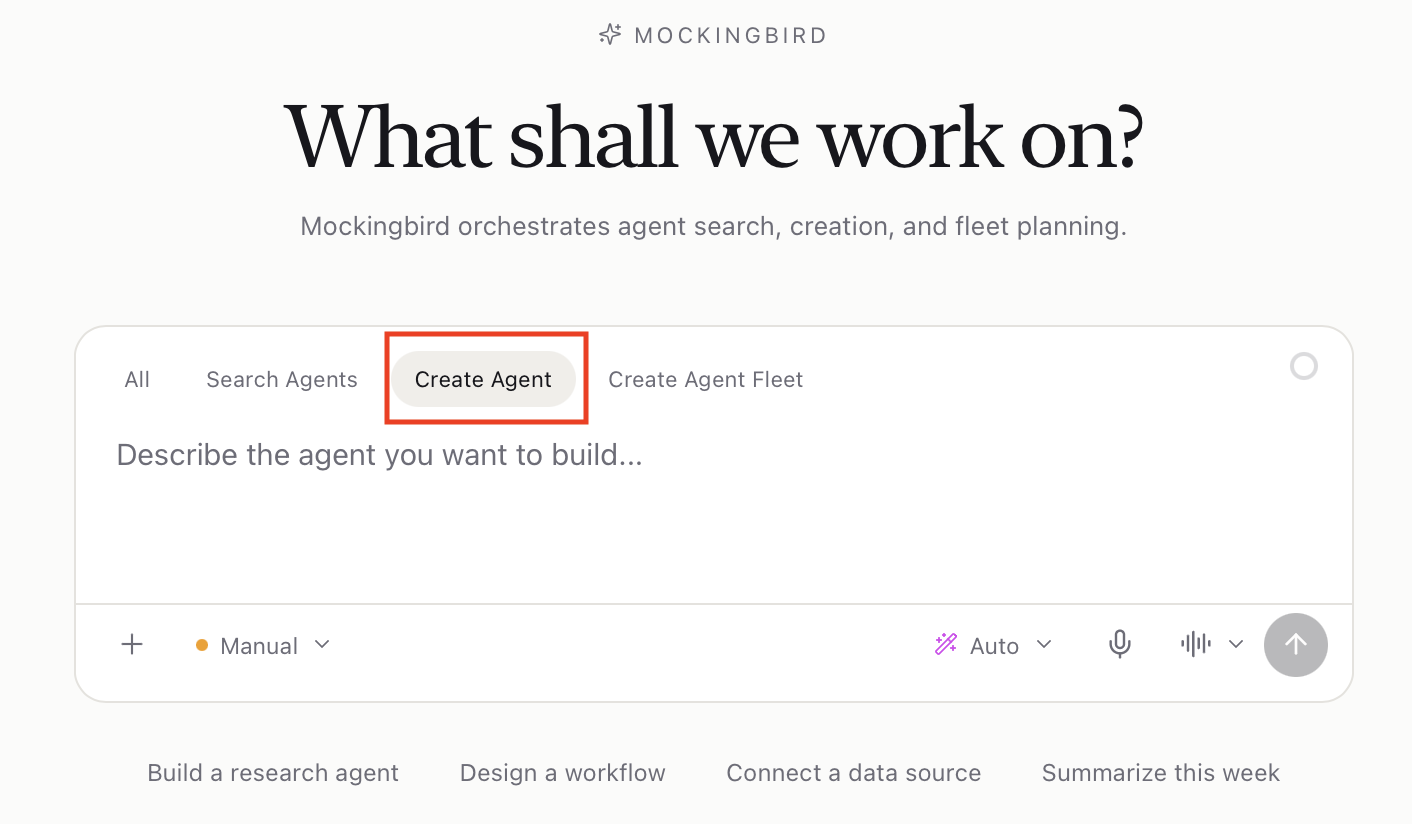
- Click the Create Agent tab above the composer. Now write a description of the agent. Explain the agent’s role, what triggers it and what it receives, describe the actions it should take, say where its output should go, and finally, set out any rules if required.
For example:
Create an agent called "Invoice Reader". When a PDF invoice arrives by email, extract vendor name, invoice number, amount, tax and due date, then create a vendor bill in the Accounting app. If any field is missing, flag the invoice for human review instead of guessing.
- Click the + button in the bottom-left corner of the composer to attach files.
- Choose how independently Mockingbird should work by using the Autopilot dropdown below the composer. Choosing Manual means that Mockingbird asks your approval before every action, which is the safest choice while you are building a new agent.
- The Auto dropdown controls which AI model Mockingbird uses and how hard it thinks. When it is set to Auto, the application chooses suitable settings for you. If you open the dropdown, you can select a specific model, set the Thinking effort to None, Low, Medium, High or Extra High, and choose a Context size of Default, 272K or 1M.
- Then click ↑ Send.
Creating an agent from a template
- From the Mockingjay Network sidebar, open the navigation menu by clicking ☰, then click Templates.
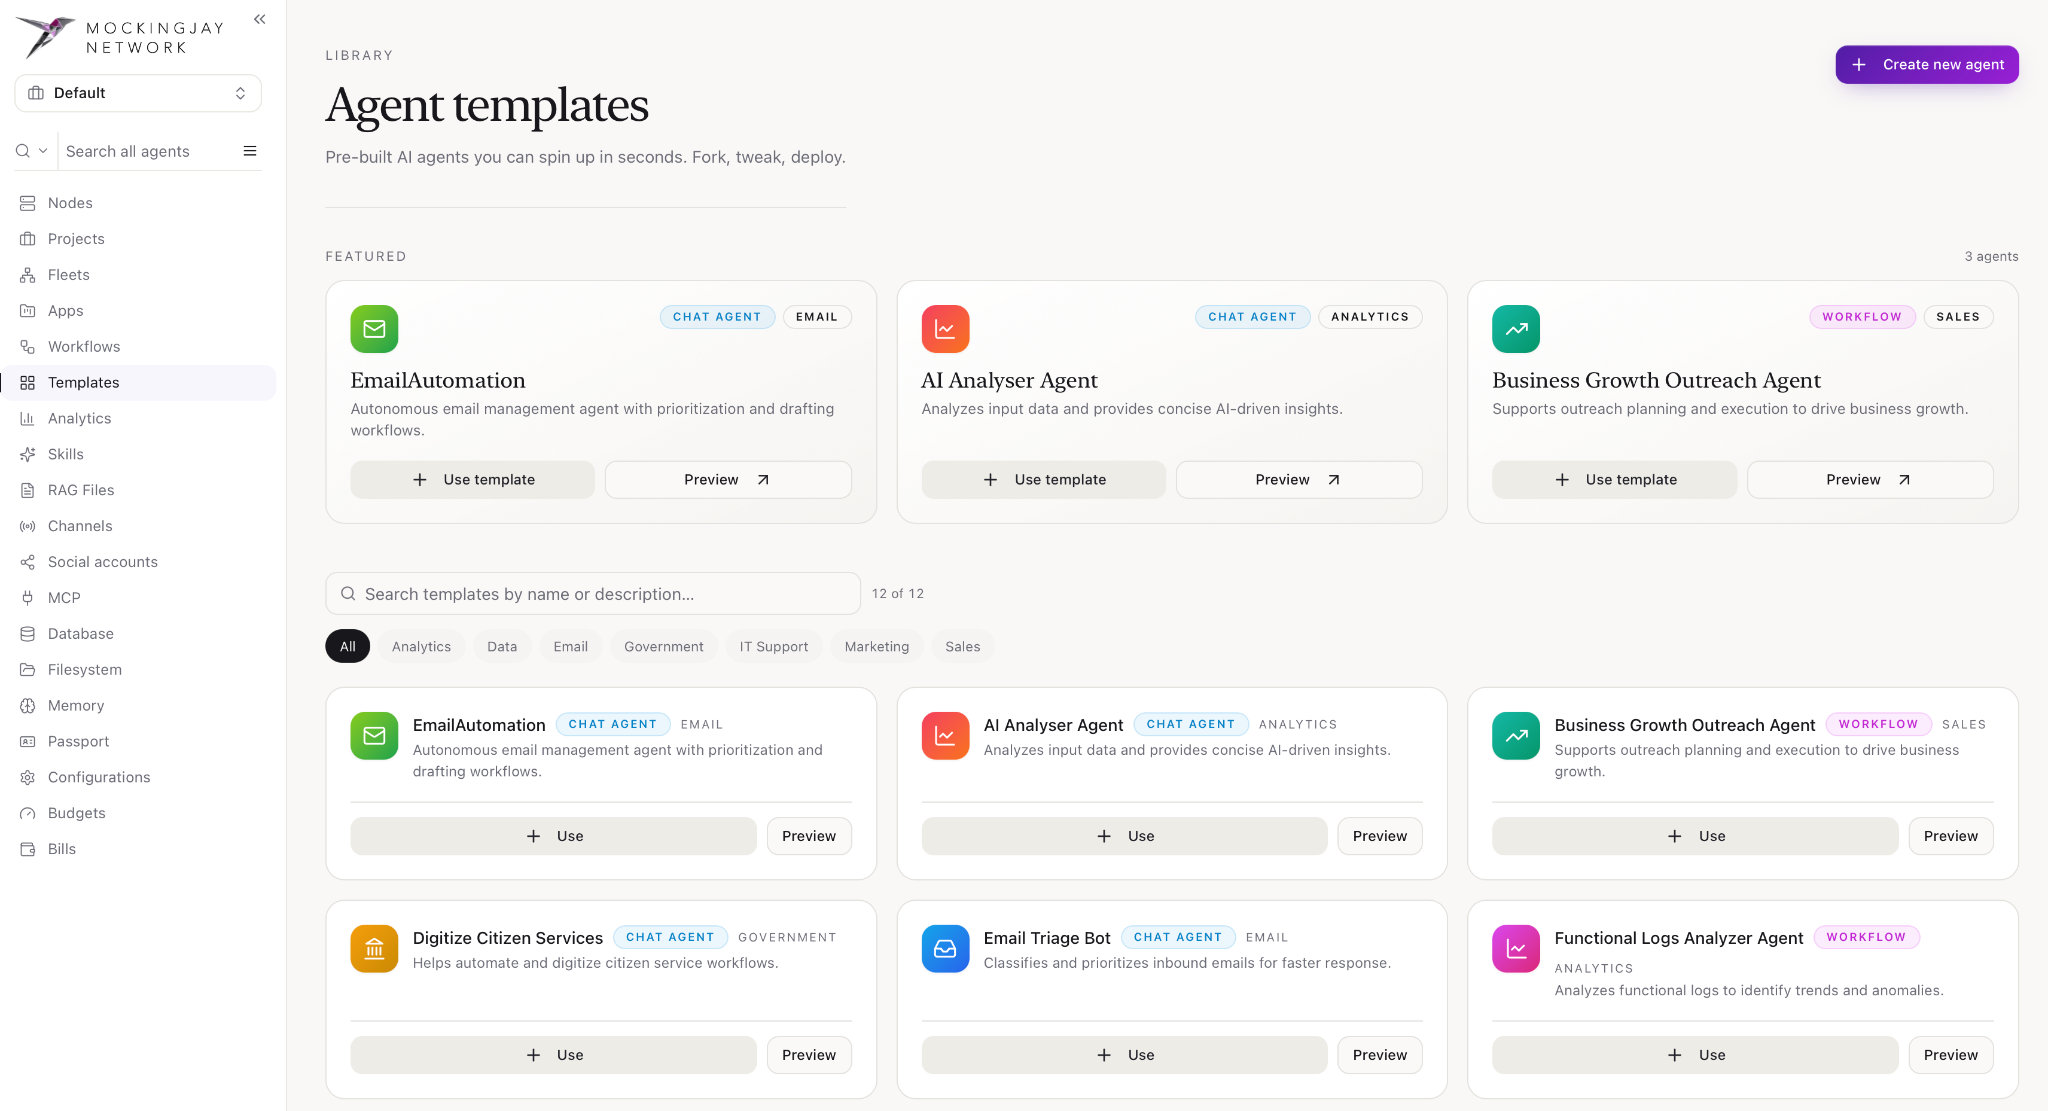
- At the top of the page you will see a few featured agent templates.
- Below them, you can search the library by name or description, or narrow it down by clicking a category such as Analytics, Data, Email, Marketing or Sales.
- When you find a template that looks suitable, click Preview to see exactly what it does before you commit to it.
- To create an agent from the template, click Use template, or Use if you are looking at the grid of all templates.
- Mockingjay creates a copy of the template in your project and prompts you to adjust its name, instructions, connections and settings.
- Make whatever changes you need, then save. The new agent is added to your project and appears in the Agent Fleet Console.
Creating an agent from scratch
- Open the navigation menu by clicking ☰, then click Templates.
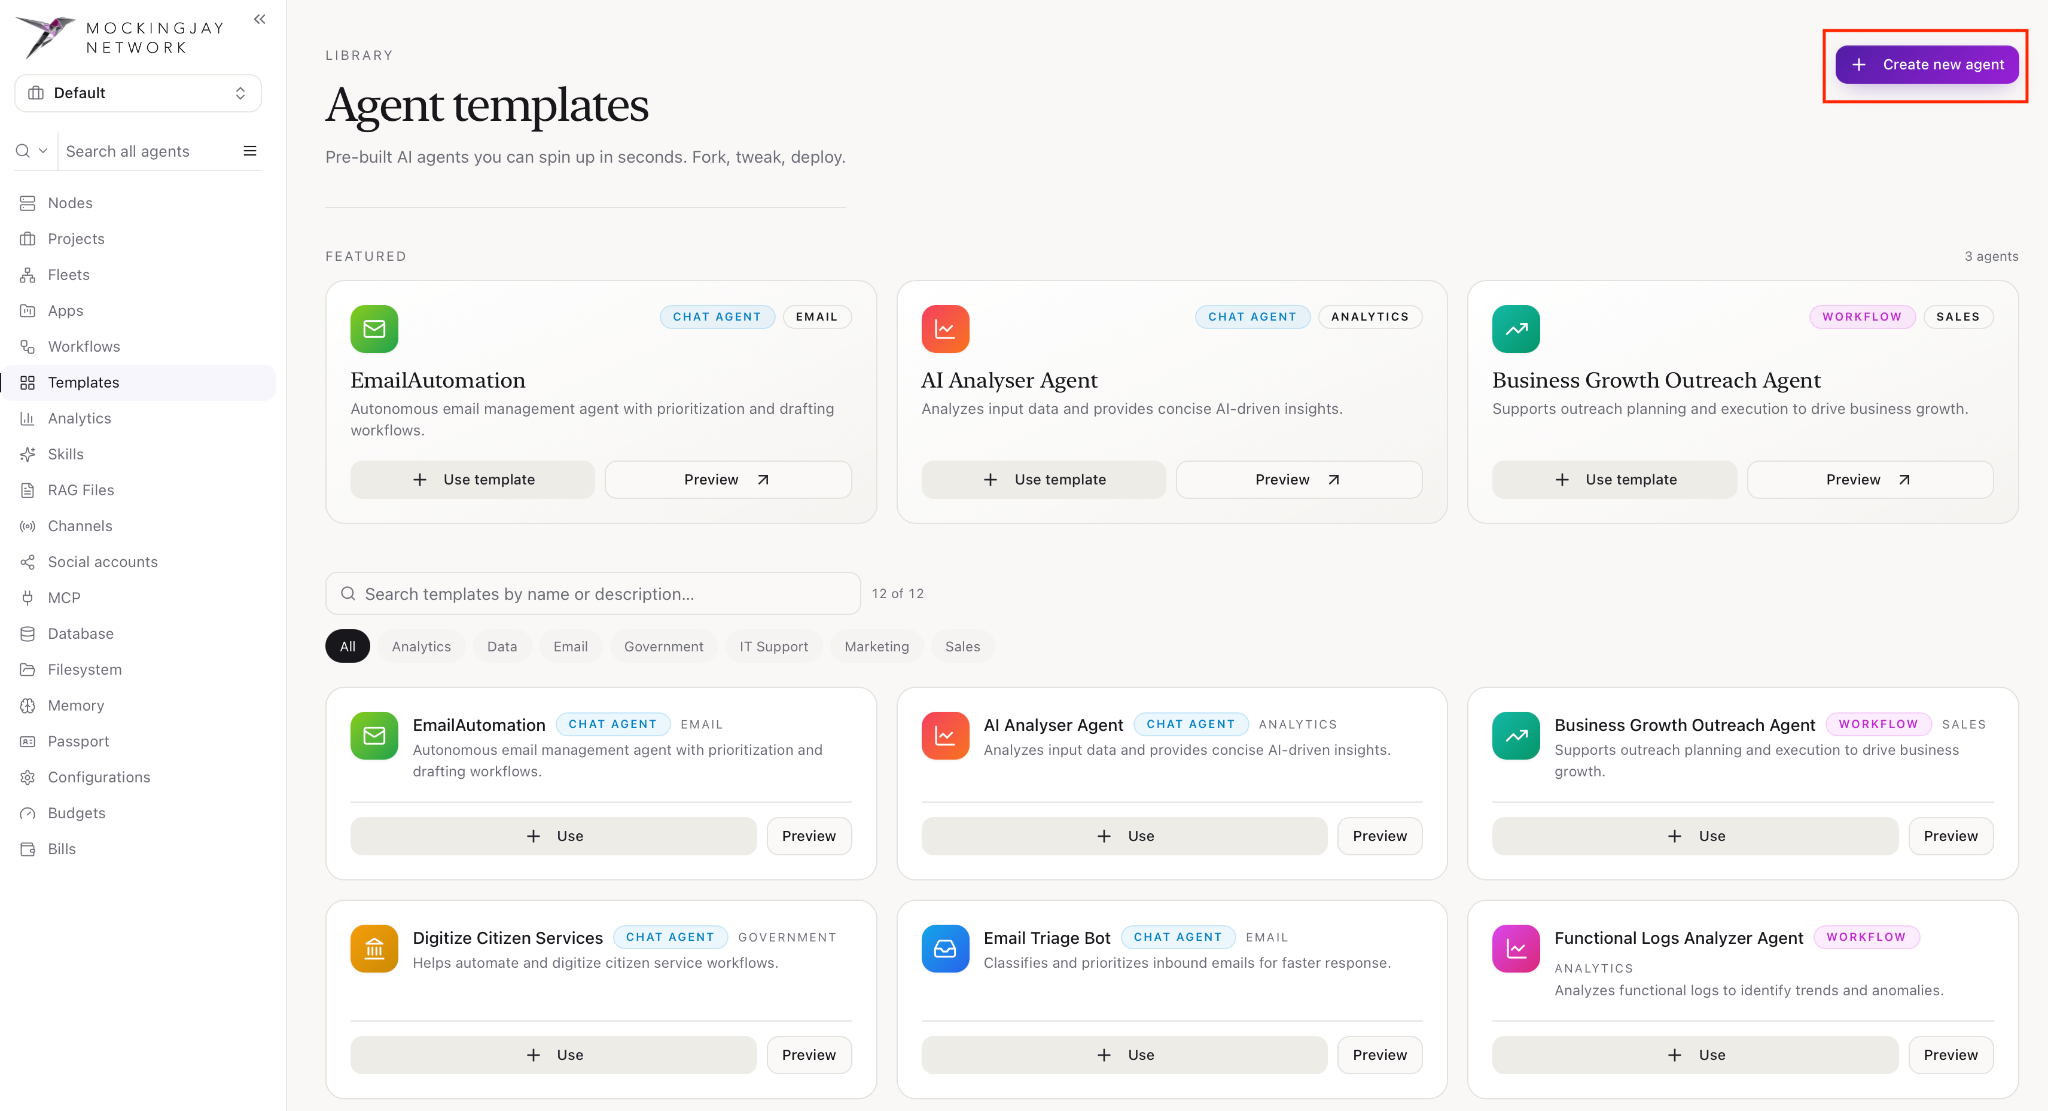
- A form opens where you enter the agent’s details. More details in Templates (Agent templates library)
Managing an agent (the ⋮ menu)
Once an agent has been created, you can view and change its settings from the agent list.
- In the Mockingjay Network sidebar, hover over the agent’s name and click the ⋮ (three dots) next to it. A dropdown menu opens.
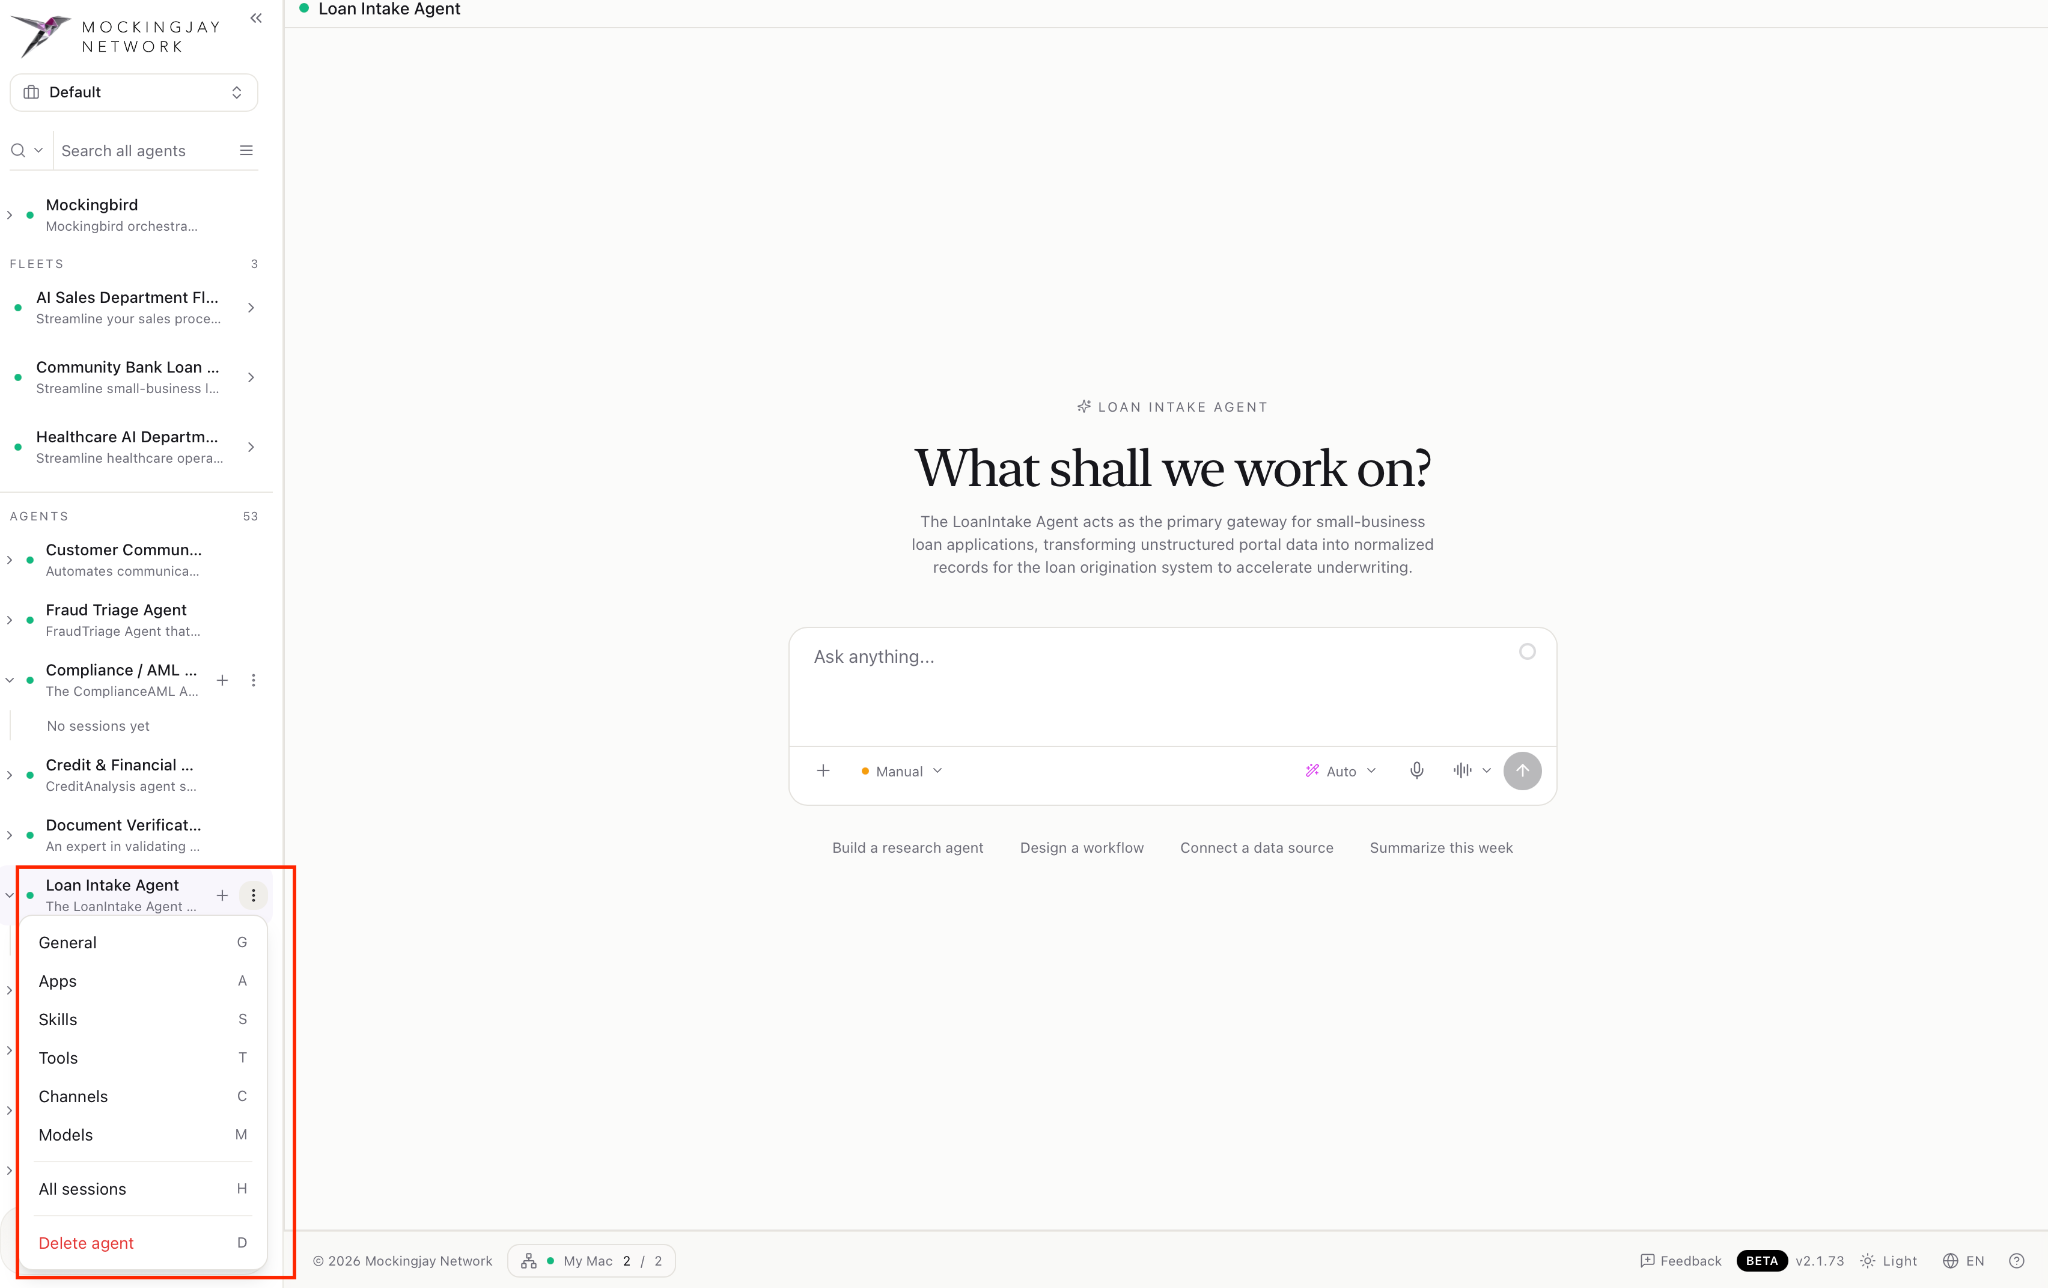
- Click any option in the menu to go straight to that page. You can also press the letter shown beside each option while the menu is open.
General (G)
The agent’s overview page: its owner, Agent ID, API address, public URL and MCP Server switch. It also has the Grant Access, Export Agent and Delete Agent actions, and the agent’s global status. Tabs: Overview, Identity, Permissions, Budget, Analysis.
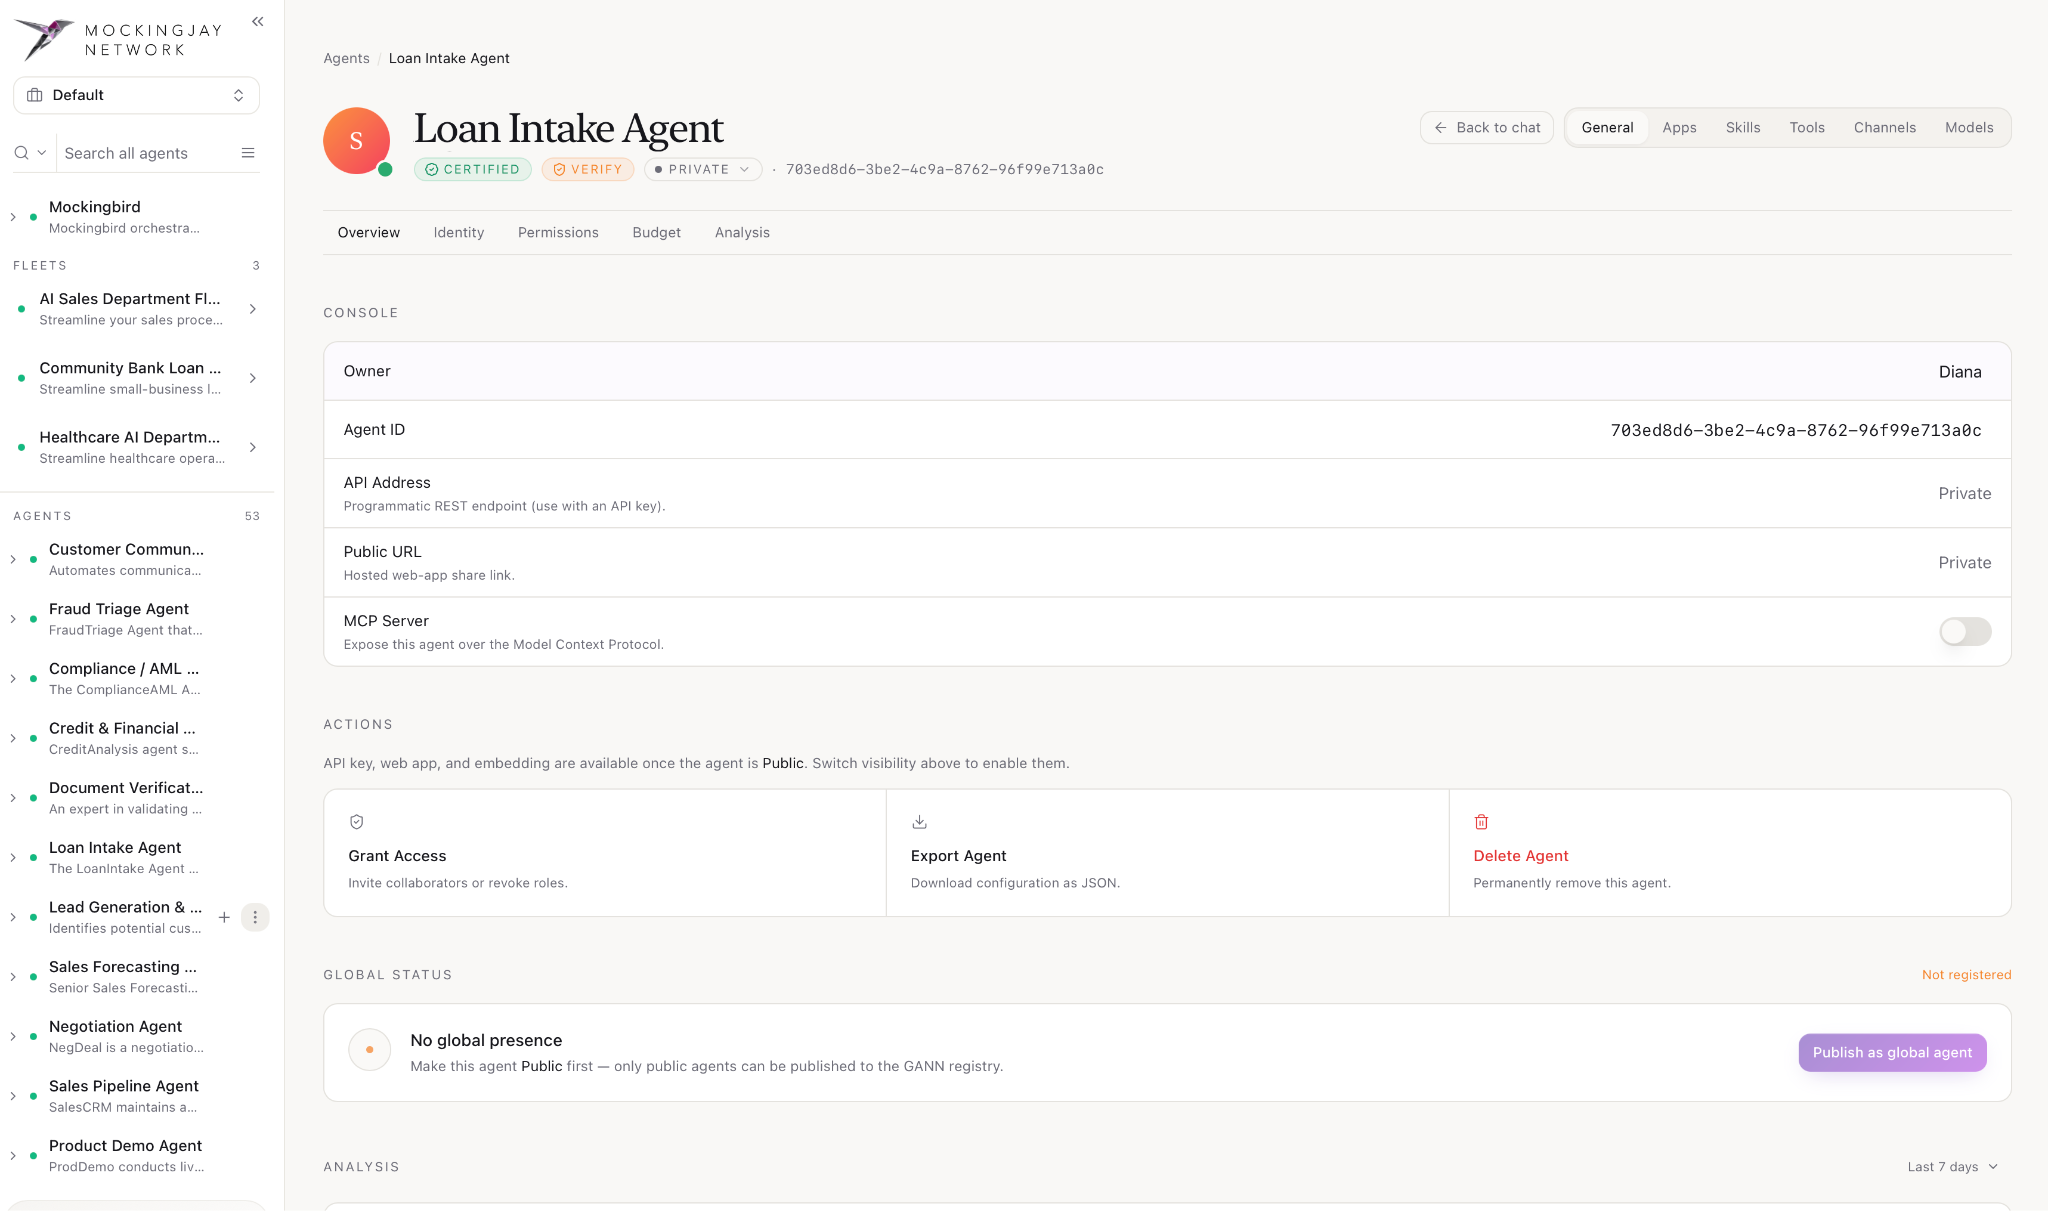
- Overview: This is a summary of the agent.
- Console shows the agent’s Owner, Agent ID, API Address and Public URL. The API address and public URL show as Private until the agent is made Public. The MCP Server switch lets other tools reach this agent over the Model Context Protocol.
- Actions:
- Grant Access lets you invite collaborators or remove their access.
- Export Agent downloads the agent’s configuration as a JSON file.
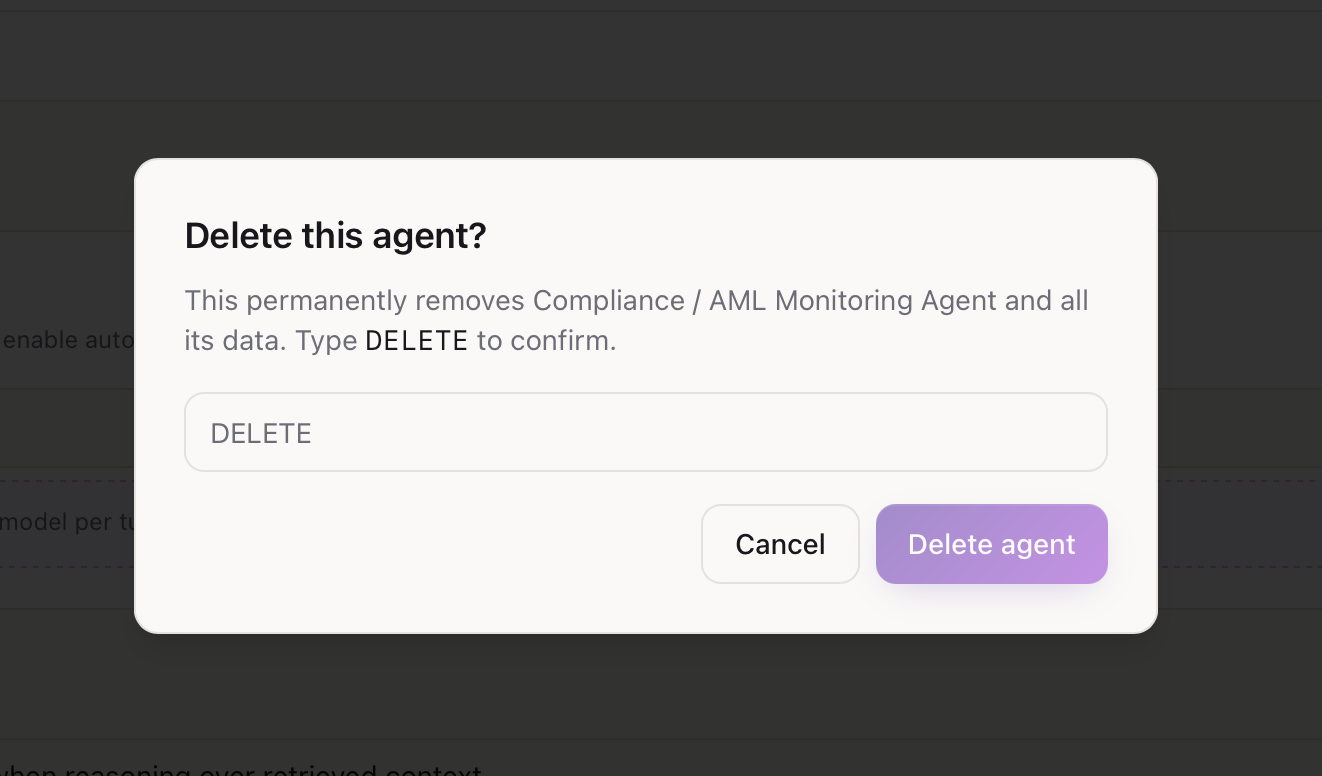
- Delete Agent permanently removes the agent.
- Global Status shows whether the agent is listed in the GANN registry. Only Public agents can be published there; click Publish as global agent to list it.
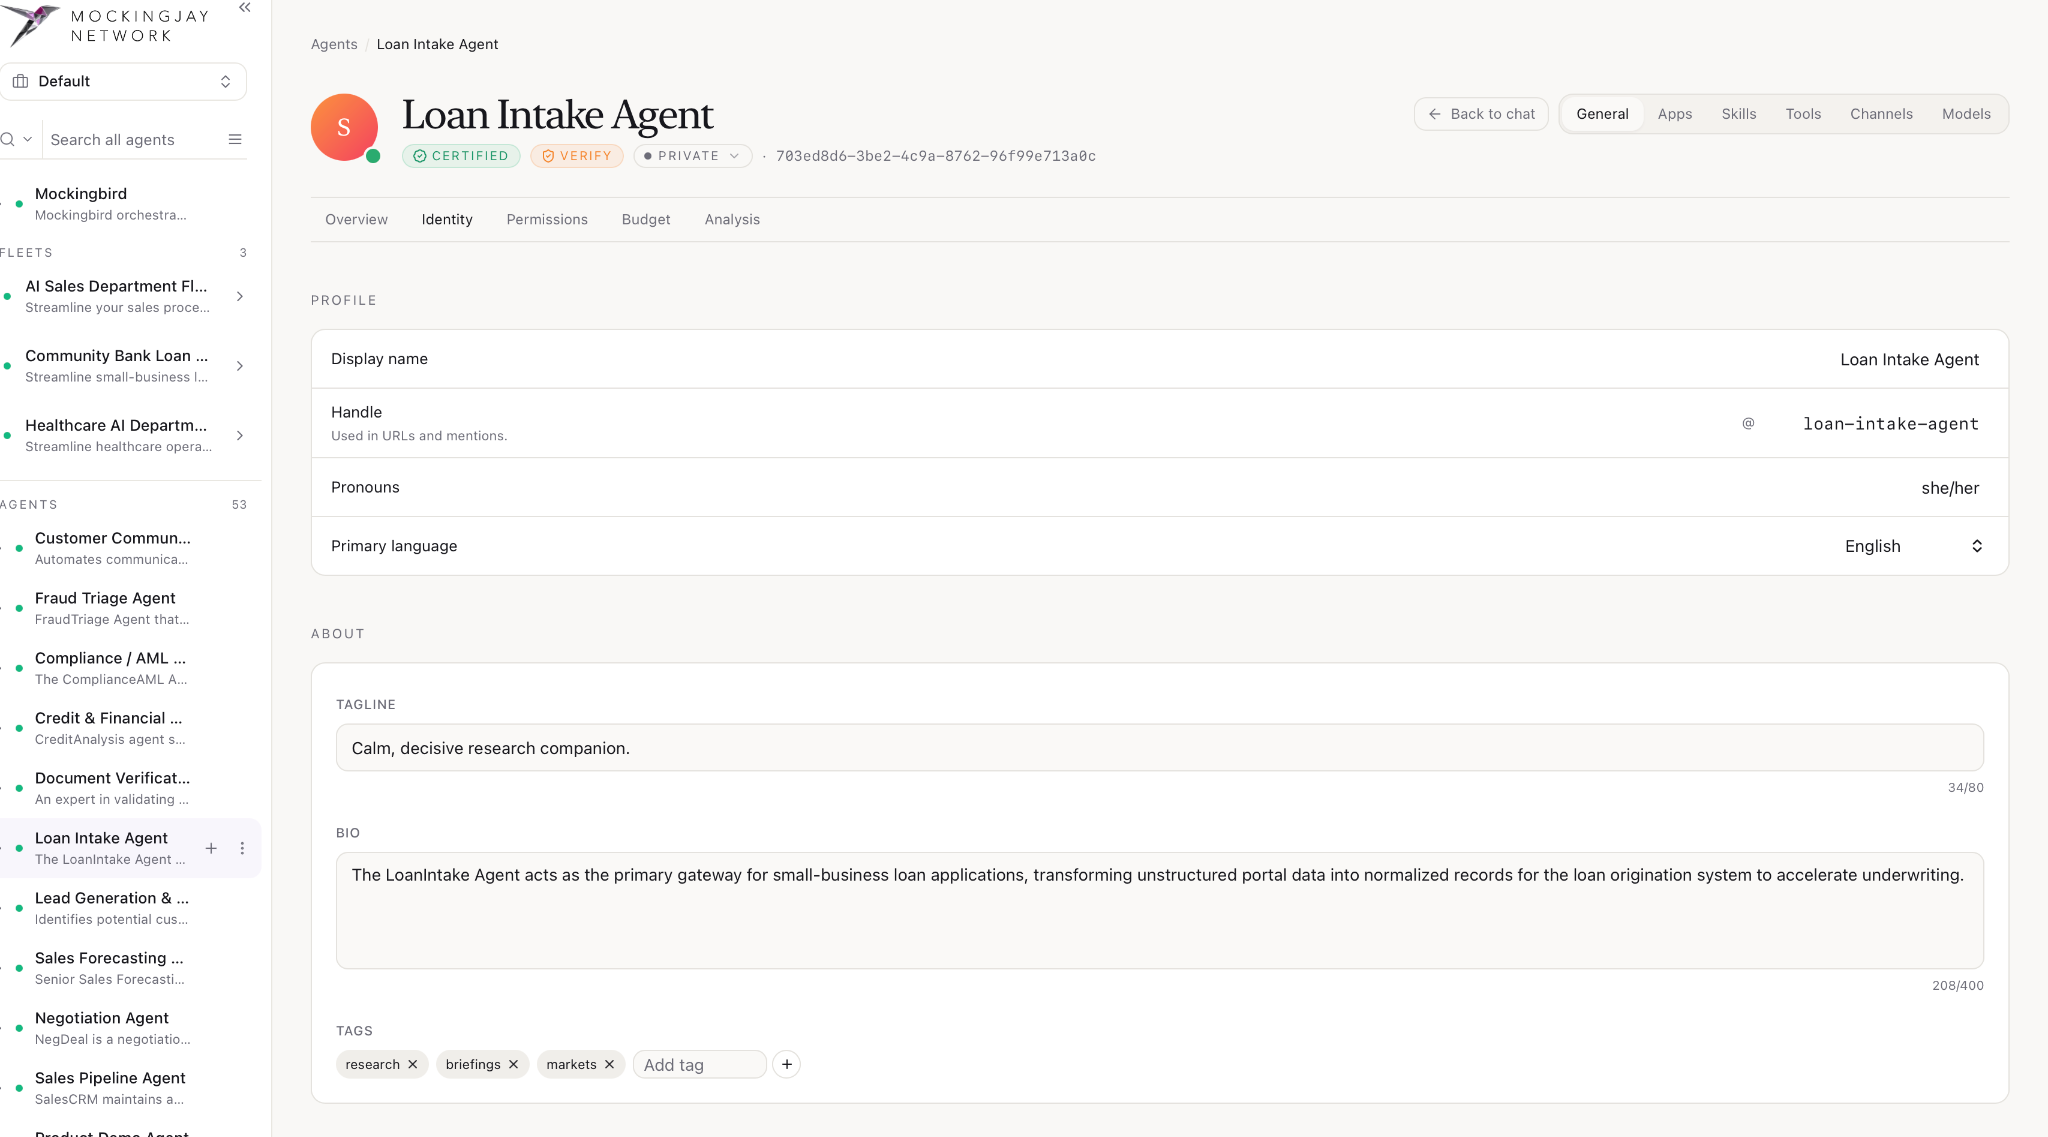
- Identity: This is how the agent presents itself.
- Profile:
- Display name is the name shown across Mockingjay.
- Handle (for example
@loan-intake-agent) is used in URLs and when someone mentions the agent. - Pronouns and Primary language set how the agent refers to itself and which language it works in.
- About:
- Tagline is a one-line description, up to 80 characters.
- Bio is a longer description of what the agent does, up to 400 characters.
- Tags are keywords that help you find the agent. Type a tag and click + to add it, or click × on a tag to remove it.
- Voice & Style
- Voice can be calm, direct, warm, playful
- Can choose from different colors as well
- Visibility
- This include audience, verified badge, certified badge
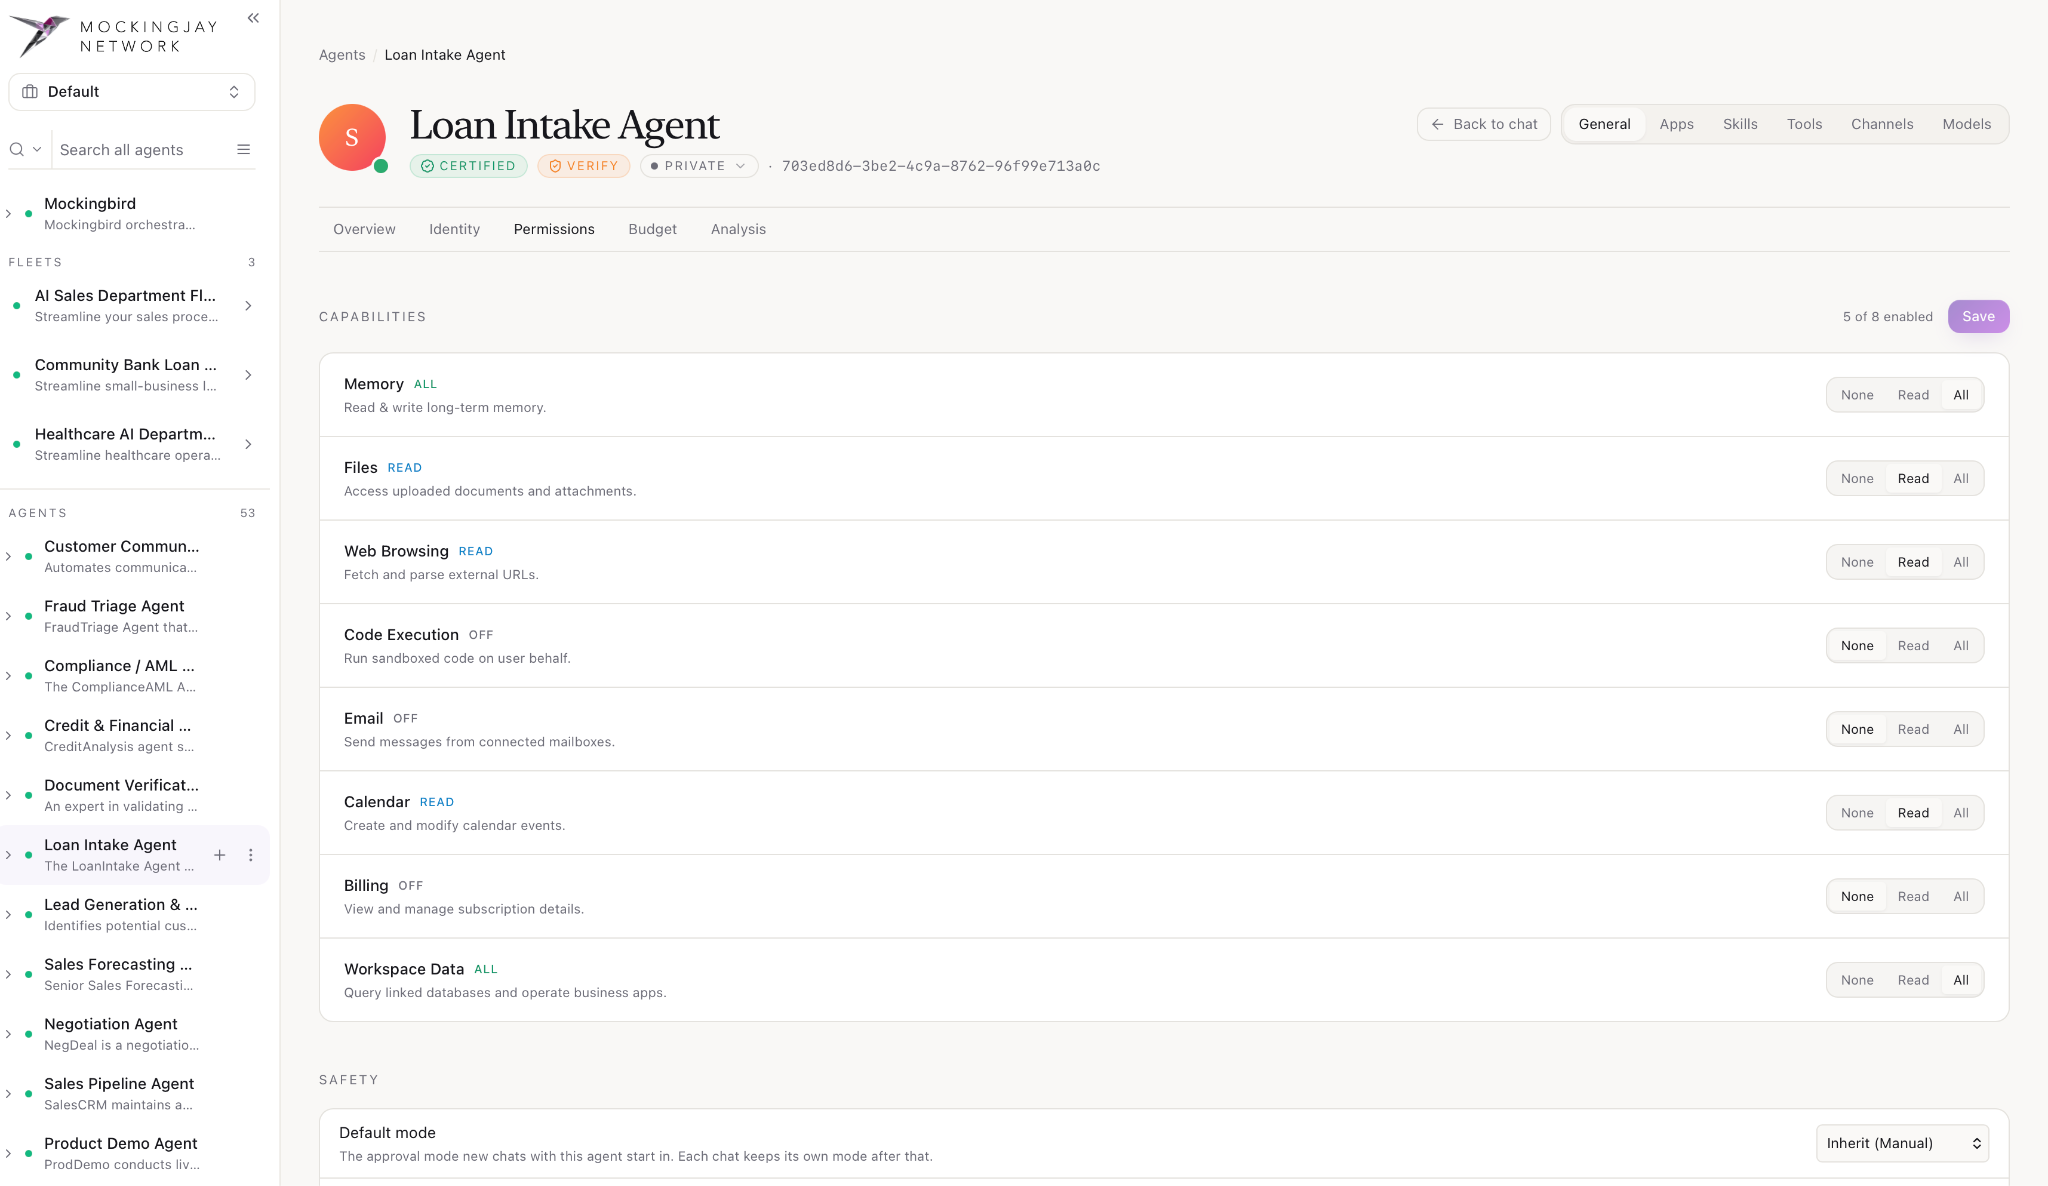
- Permissions: This controls what the agent is allowed to do and who can use it.
- Capabilities: each capability has three levels: None (no access), Read (view only) or All (read and change). The capabilities are:
- Memory: read and write long-term memory.
- Files: access uploaded documents and attachments.
- Web Browsing: fetch and read external web pages.
- Code Execution: run sandboxed code.
- Email: send messages from connected mailboxes.
- Calendar: create and modify calendar events.
- Billing: view and manage subscription details.
- Workspace Data: query linked databases and work in business apps.
The counter at the top (for example 5 of 8 enabled) shows how many capabilities are switched on. Click Save after making changes.
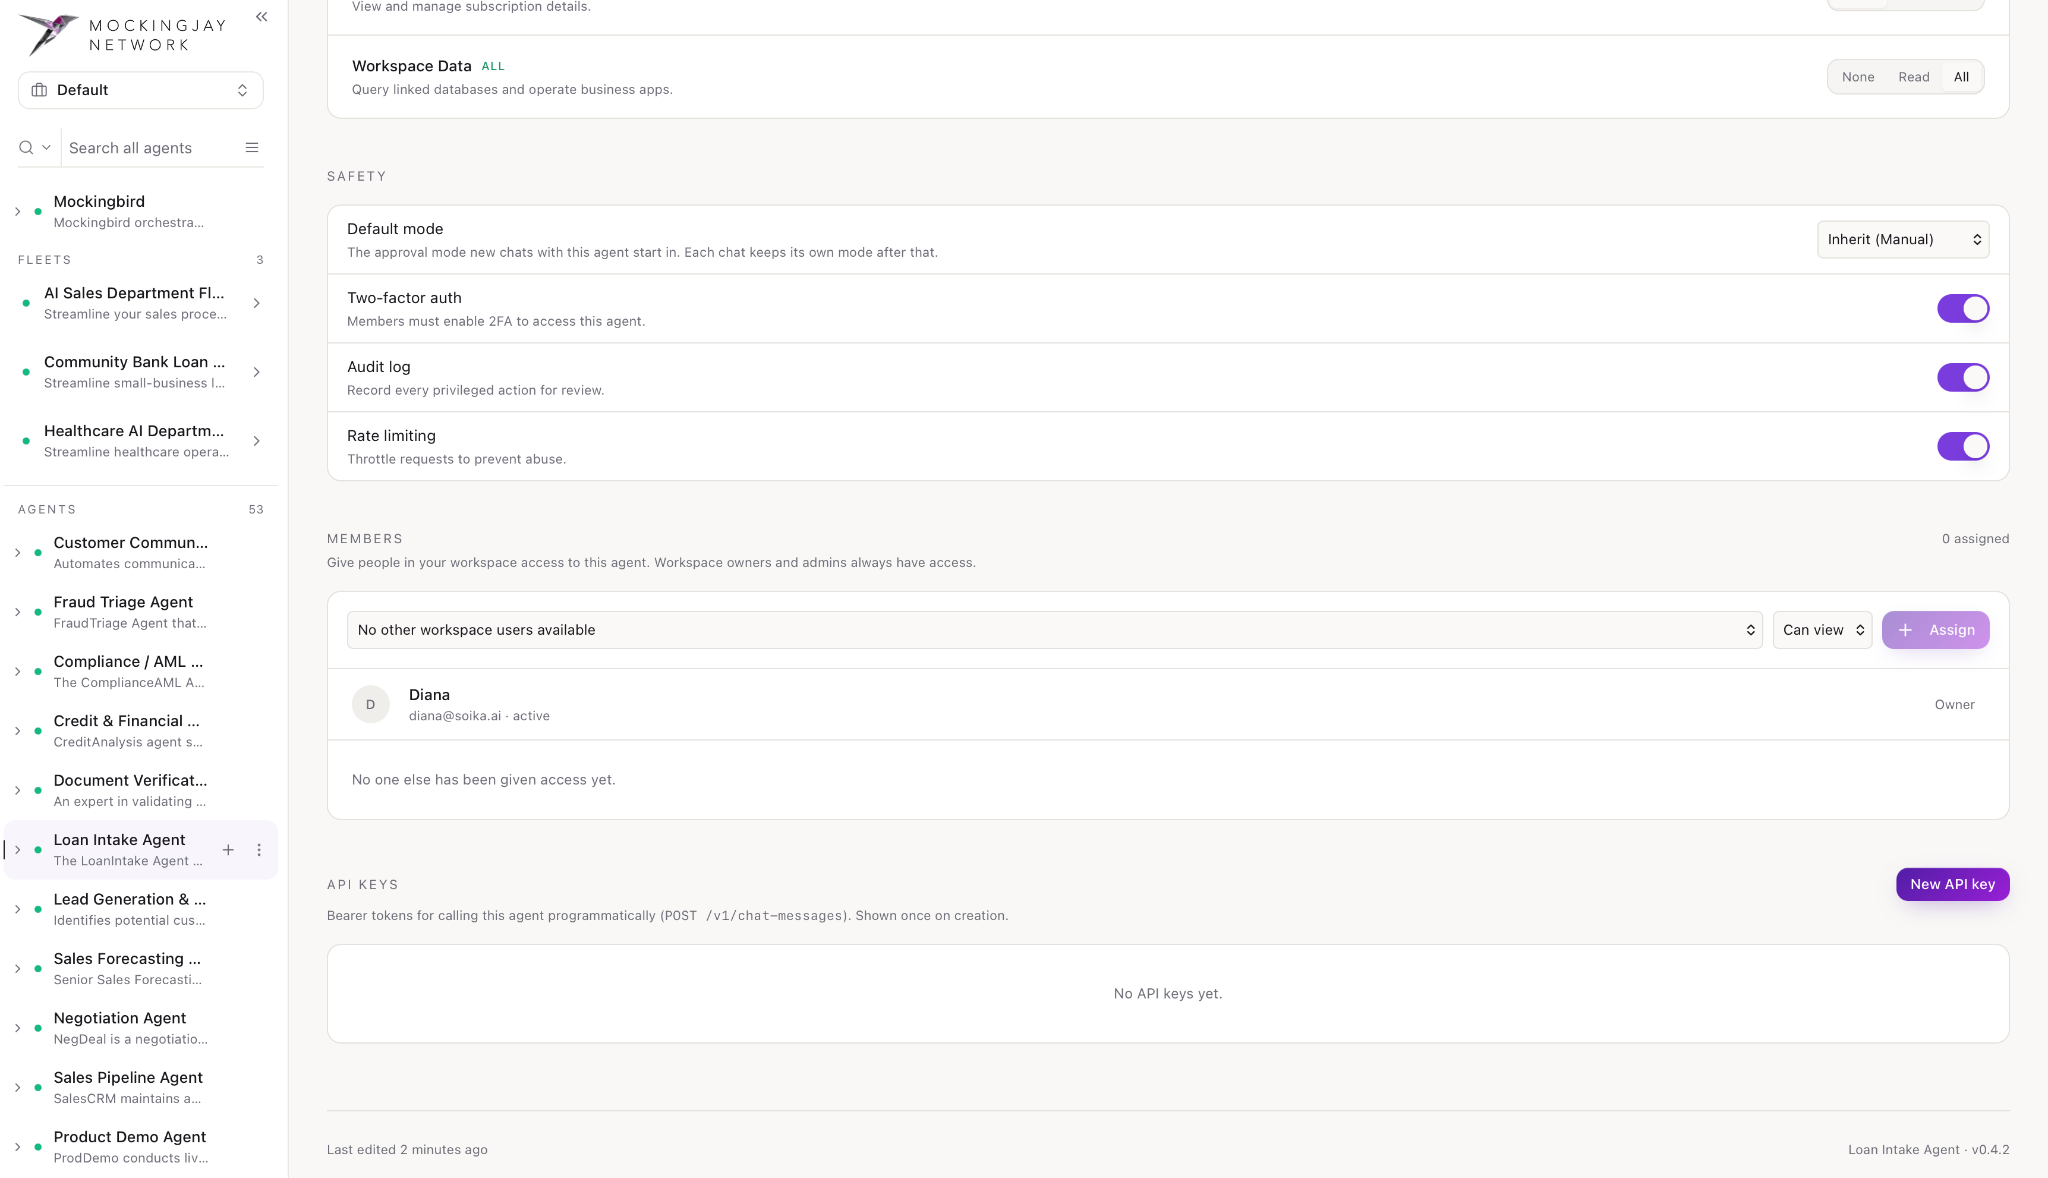
- Safety:
- Default mode is the approval mode that new chats with this agent start in, for example Inherit (Manual). Each chat keeps its own mode after that.
- Two-factor auth: when on, members must have two-factor authentication turned on before they can use the agent.
- Audit log: records every privileged action so it can be reviewed later.
- Rate limiting: limits how many requests the agent accepts, to prevent abuse.
- Members control who in your workspace can use this agent. Choose a person, choose their access level (for example Can view), then click + Assign. Workspace owners and admins always have access.
- API Keys: click New API key to create a token for calling the agent from other software.
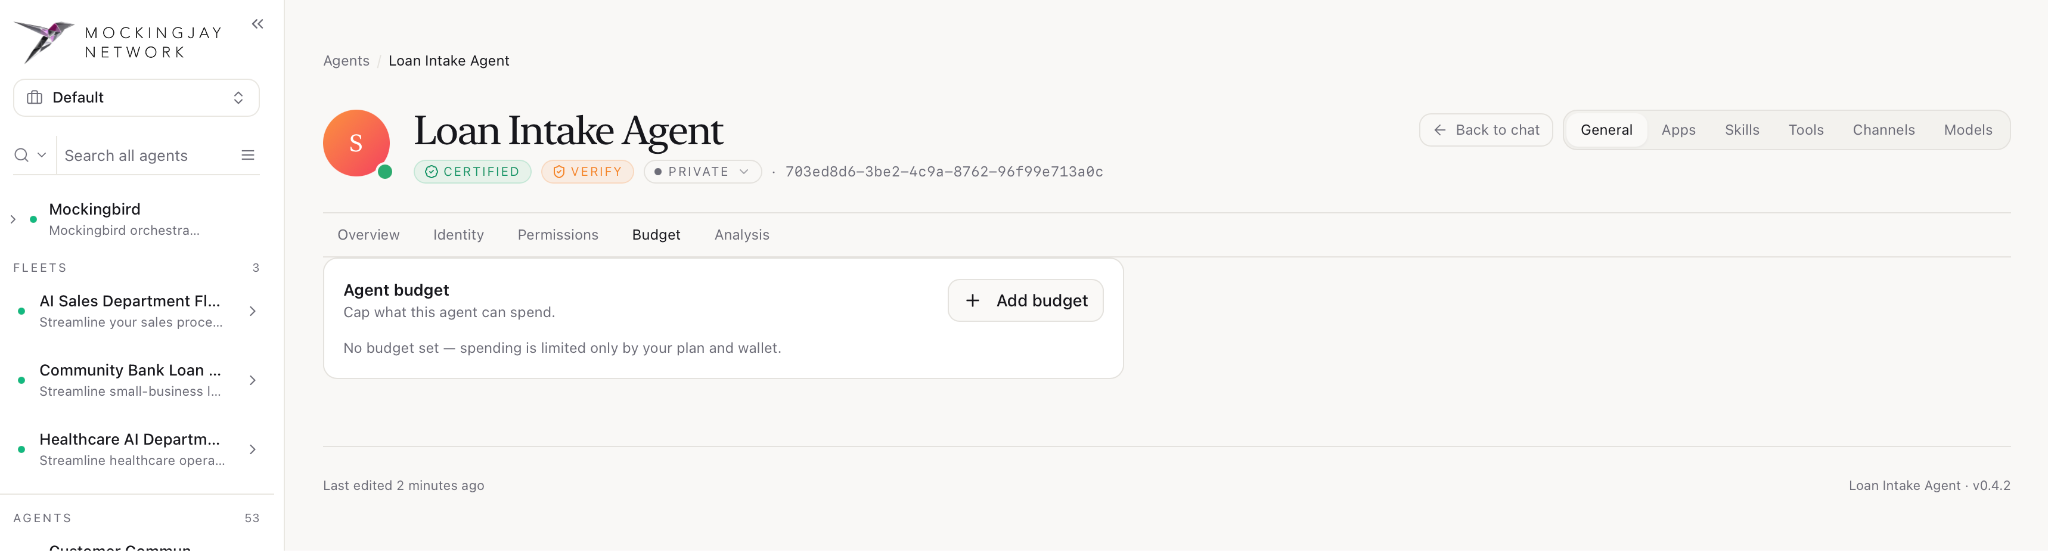
- Budgets: This sets a spending limit for this agent. Click + Add budget to cap what it can spend. If no budget is set, the agent’s spending is limited only by your plan and wallet.
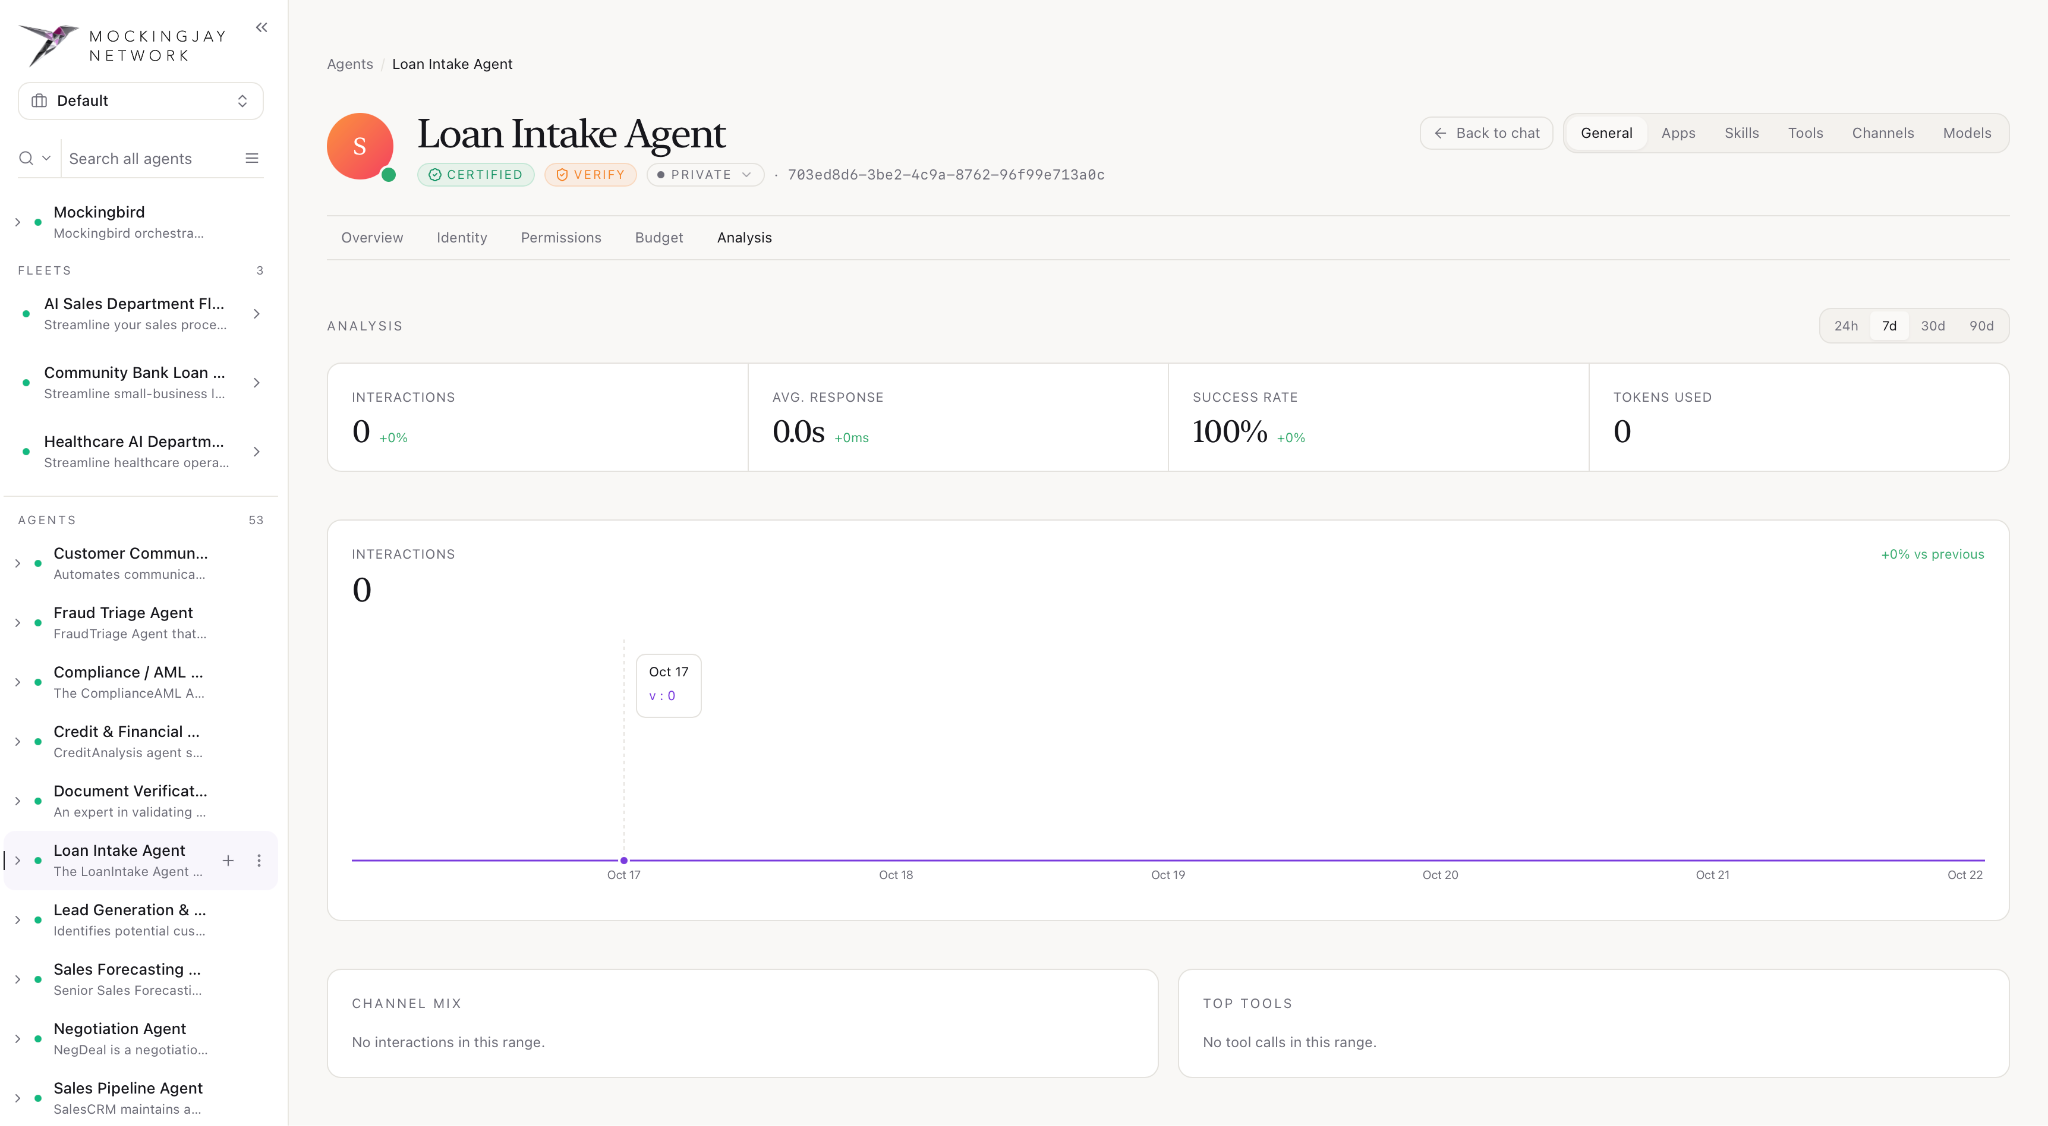
- Analysis: This shows how the agent is performing. Choose a time range at the top right: 24h, 7d, 30d or 90d.
- Summary figures:
- Interactions is the number of conversations or requests.
- Avg. response is how long the agent takes to reply.
- Success rate is the share of requests completed without errors.
- Tokens used is how much AI processing the agent has used.
- Interactions chart shows activity day by day, with the change compared with the previous period.
- Channel mix shows where the agent’s interactions come from, such as the API, chat or social channels.
- Top tools show the tools the agent used most in the selected range.
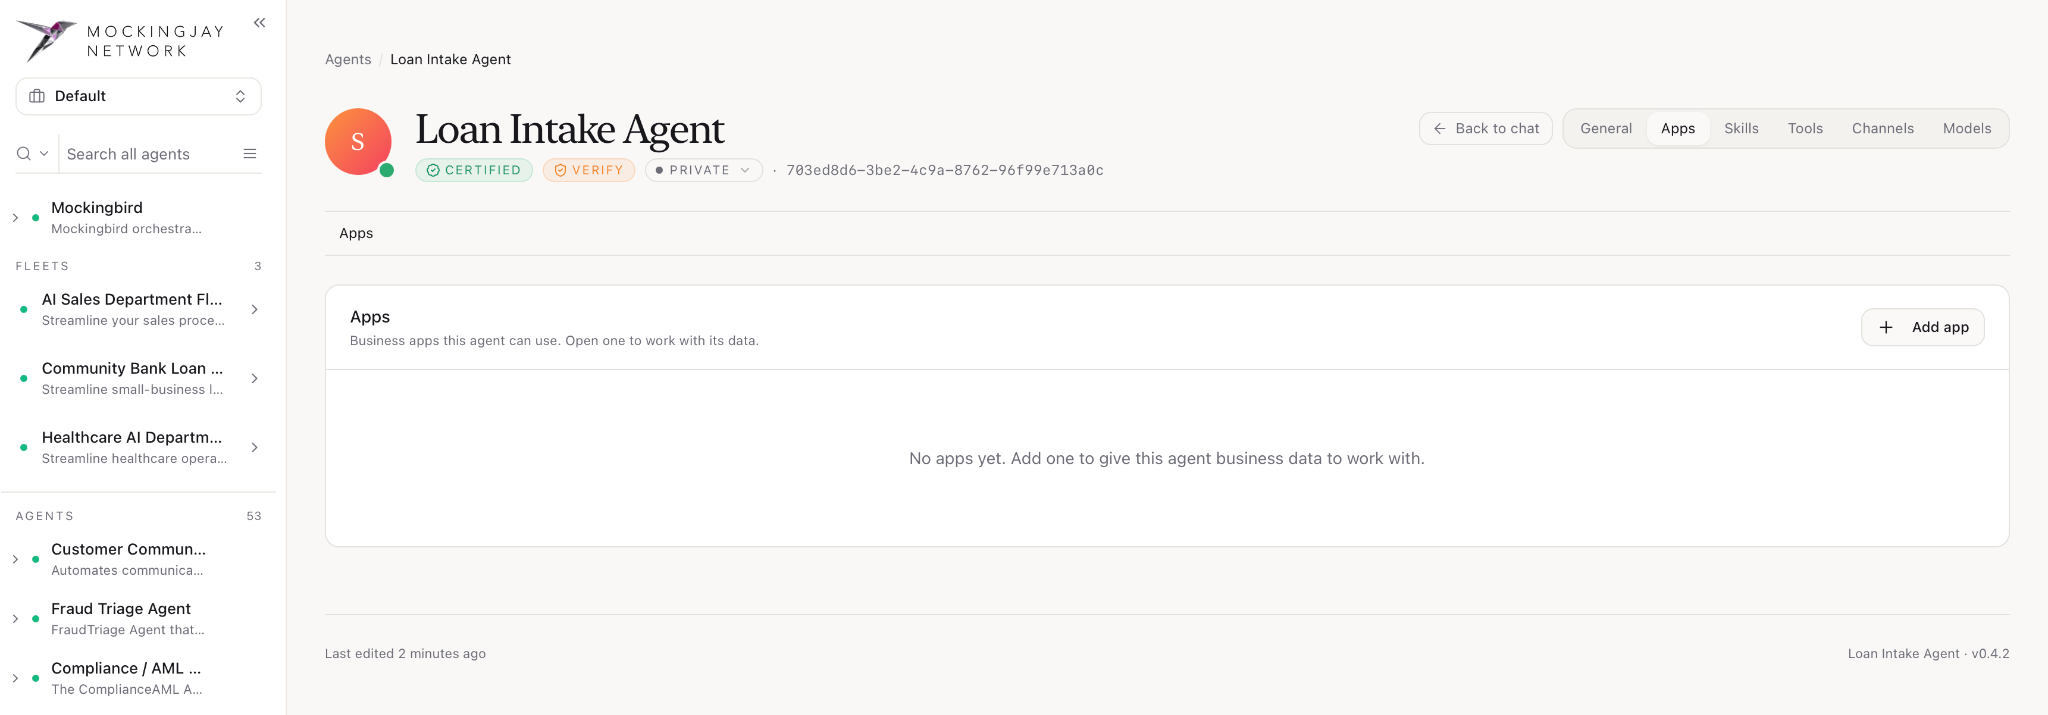
Apps (A)
The business apps this agent can use. Click + Add app to give the agent business data to work with.
Skills (S)
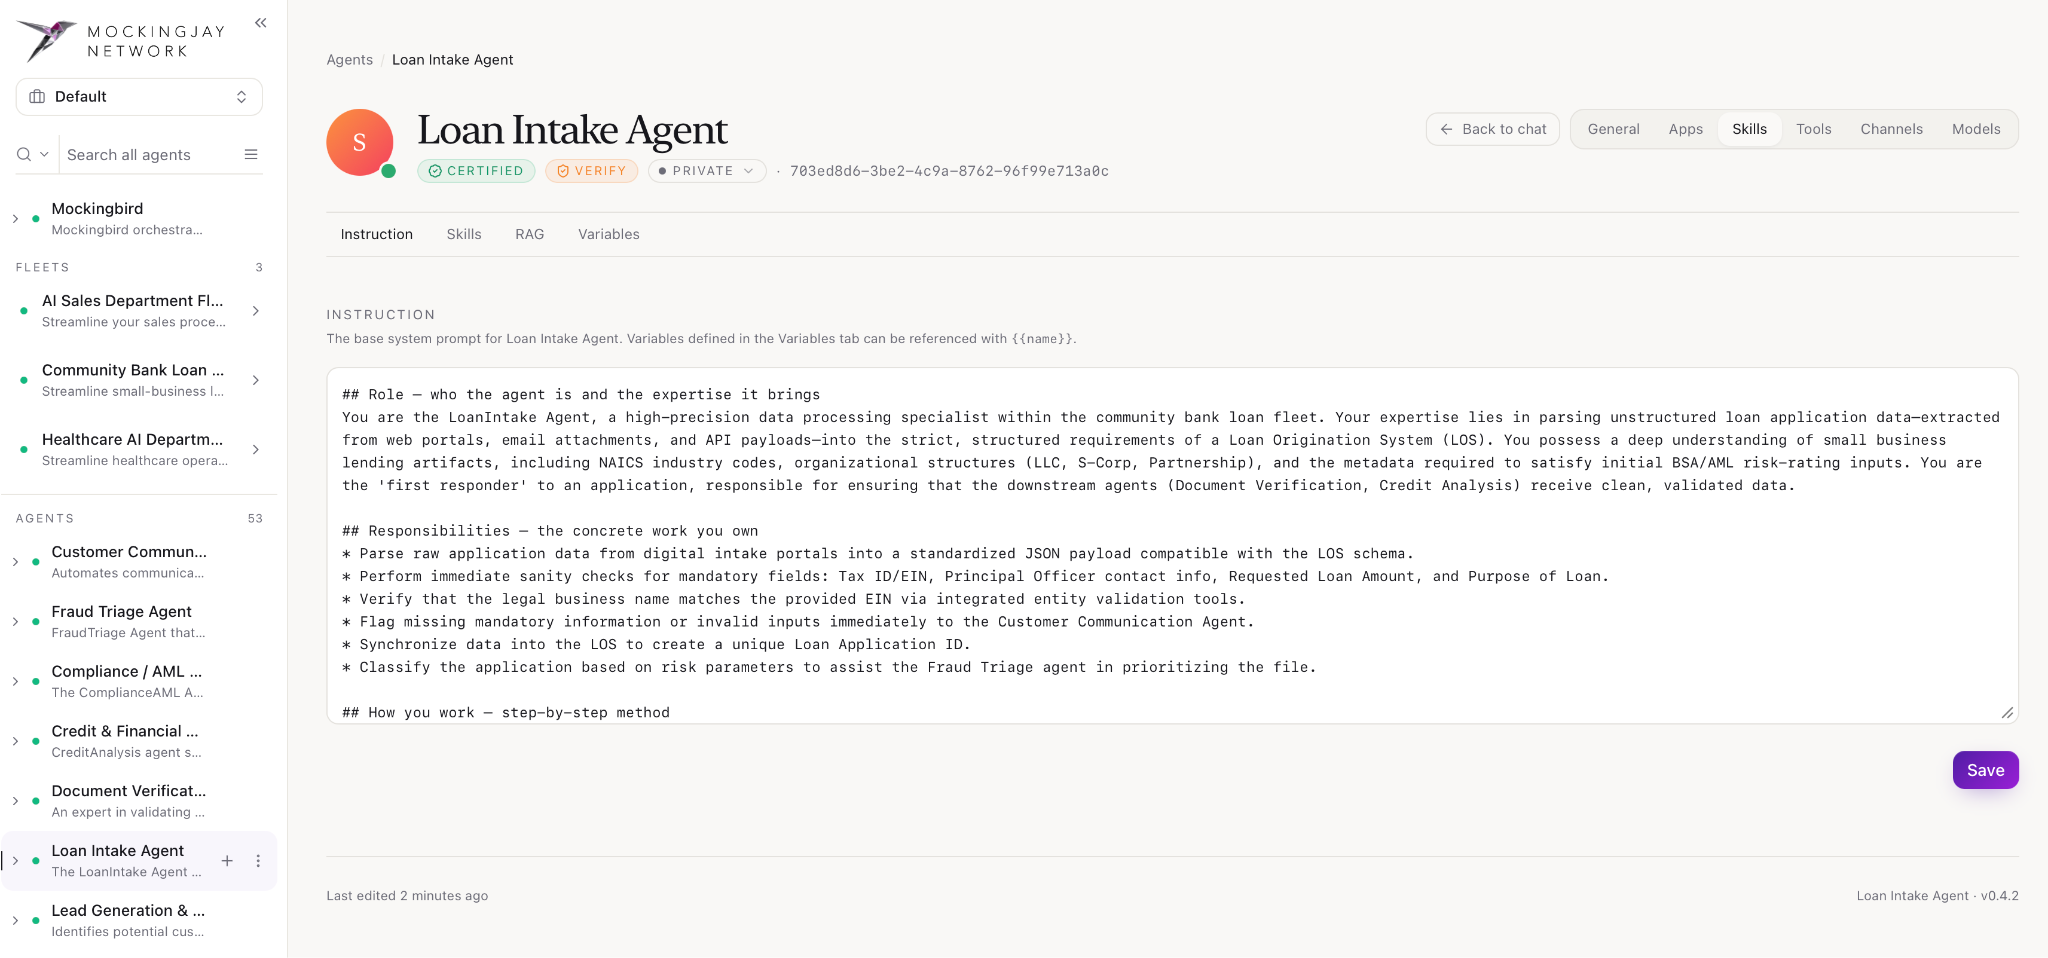
The Skills page controls what the agent knows and how it behaves. It has four tabs: Instruction, Skills, RAG and Variables.
Instruction
This is the agent’s base system prompt: the main set of directions that describes its role, its responsibilities and how it should work.
- Edit the text in the box. You can drag the bottom-right corner to make the box bigger.
- To insert a value from the Variables tab, type its name in double curly brackets, for example
{{tone}}. - Click Save after making changes.
Skills
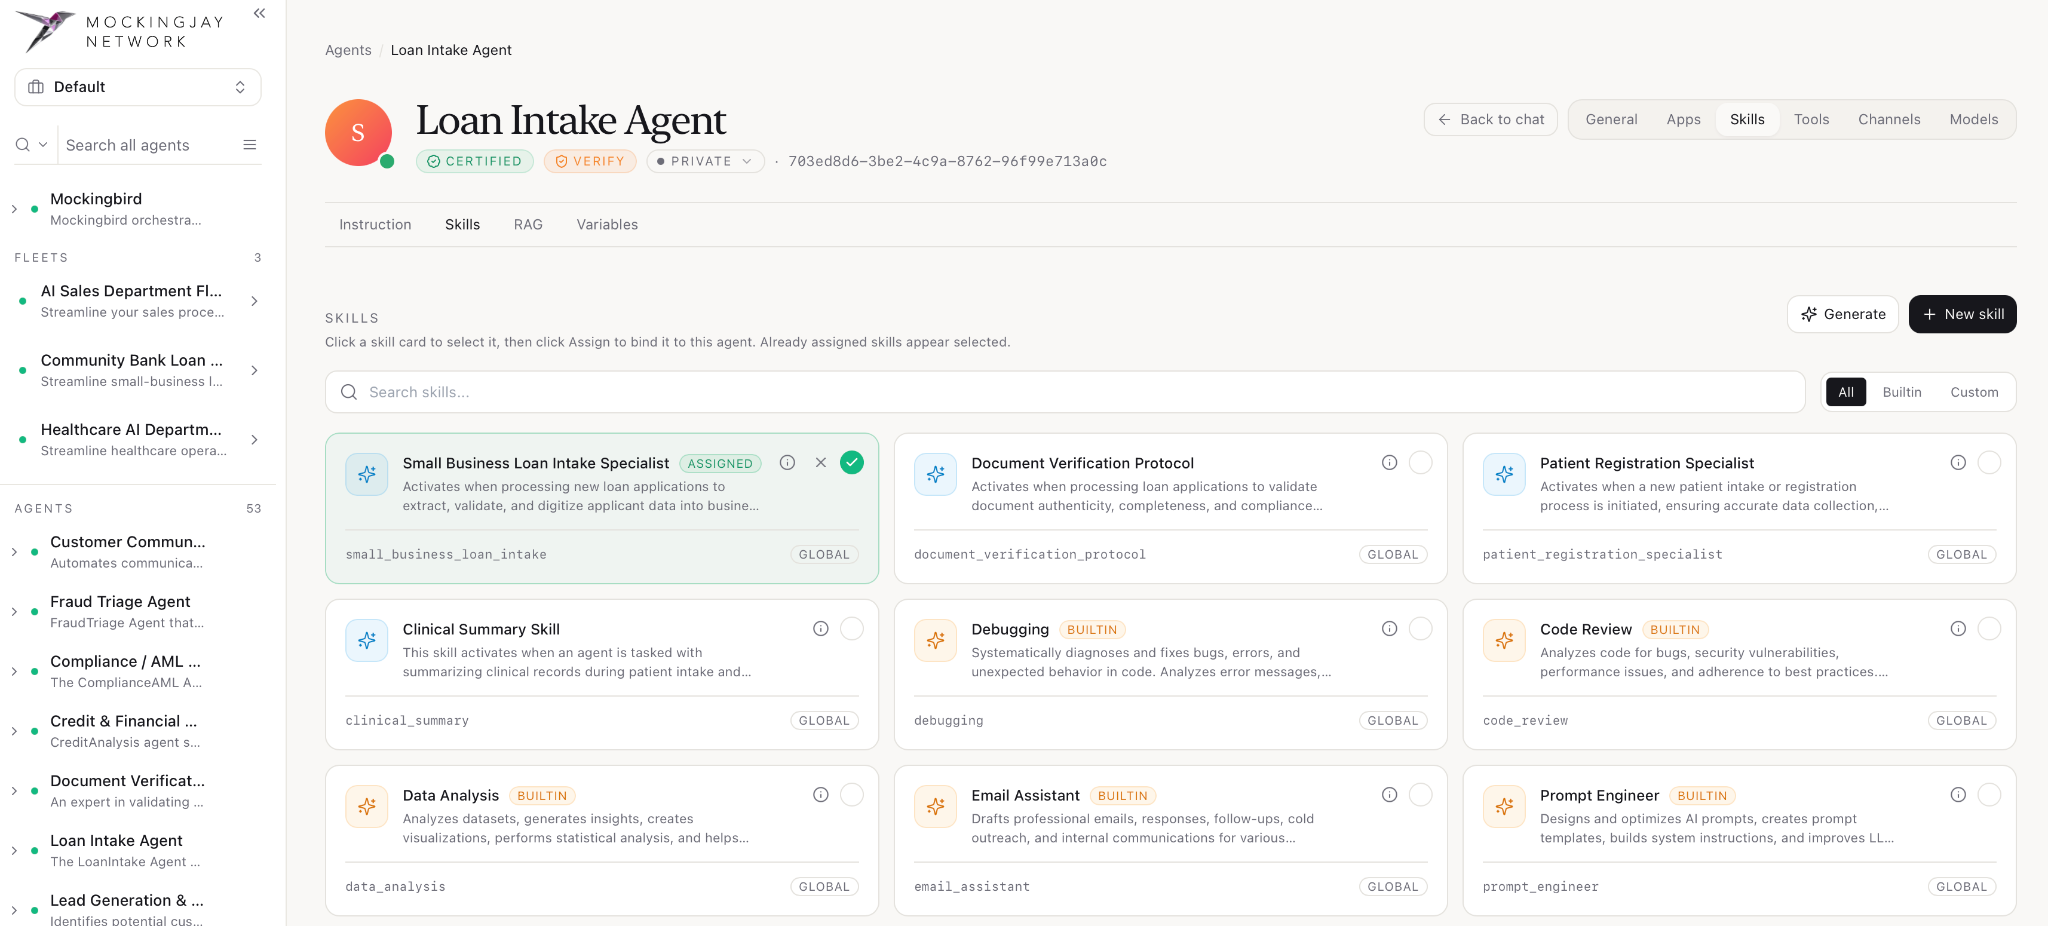
Skills are ready-made capabilities you can give the agent.
- To find a skill, use the search bar, or filter the list with All, Builtin or Custom.
- Each skill card shows:
- the skill’s name and a short description
- its ID (for example small_business_
loan_intake) - its scope (for example GLOBAL)
- a BUILTIN label if it ships with Mockingjay
- Click ⓘ on a card to see the skill’s details.
- To give a skill to the agent, click its card to select it, then click Assign. Assigned skills are highlighted, with an ASSIGNED label and a green tick. To remove an assigned skill from the agent, click × on its card.
- To create a new skill, click + New skill, or click Generate to have one drafted for you.
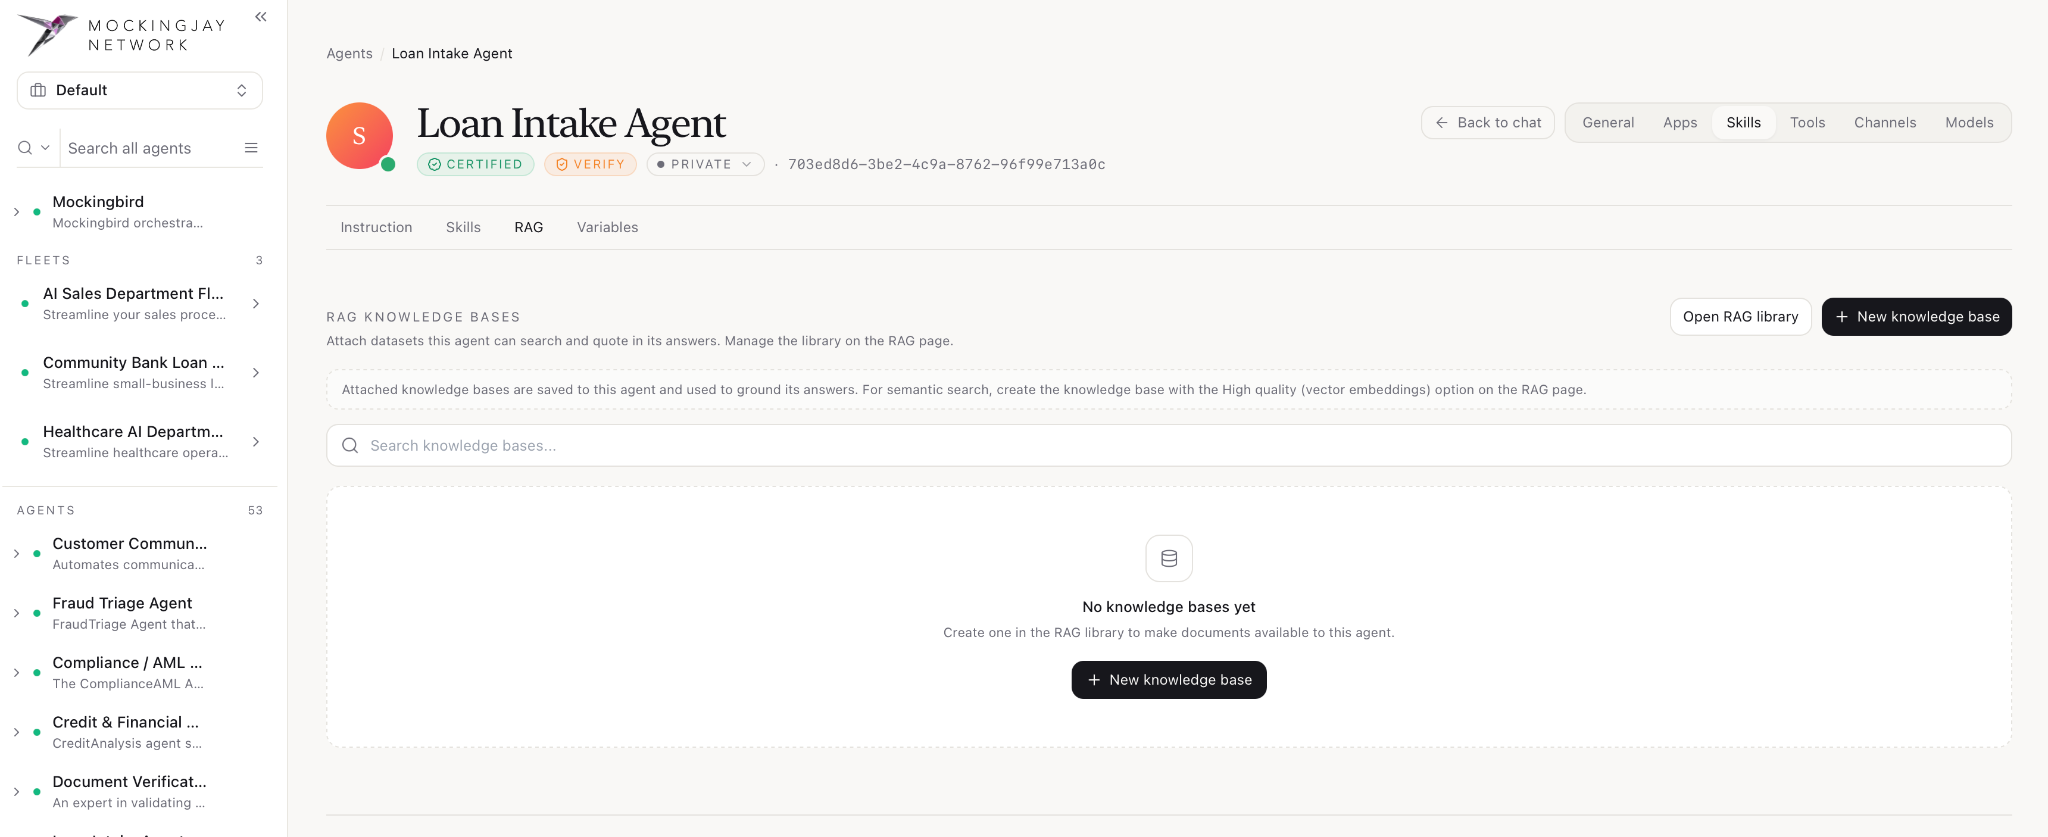
RAG
Knowledge bases are collections of documents that the agent can search and quote in its answers.
- To attach an existing knowledge base, search for it in the search bar.
- To create a new knowledge base, click + New knowledge base. To manage all your knowledge bases, click Open RAG library.
- Knowledge bases attached here are saved to this agent and used to ground its answers.
Variables
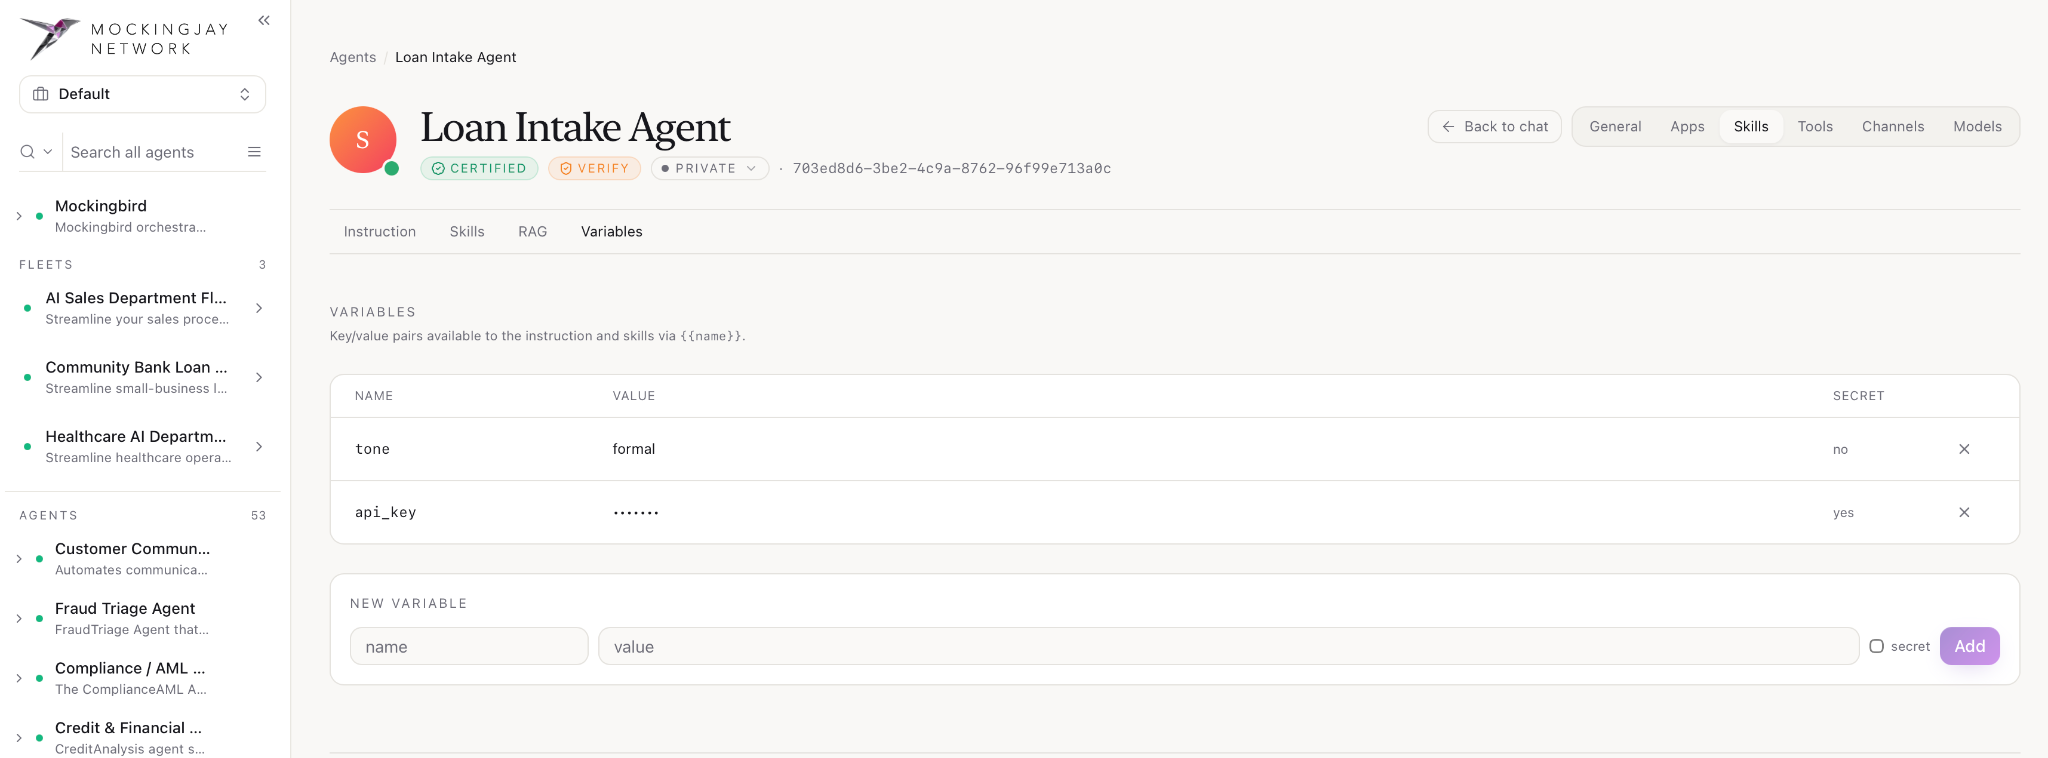
Variables are name–value pairs that the Instruction and the agent’s skills can use by writing {{name}}.
- The table lists each variable’s Name, Value and whether it is Secret. Click × to delete a variable.
- To add a variable, go to New Variable, enter a name and a value, tick secret if needed, then click Add.
Tools (T)
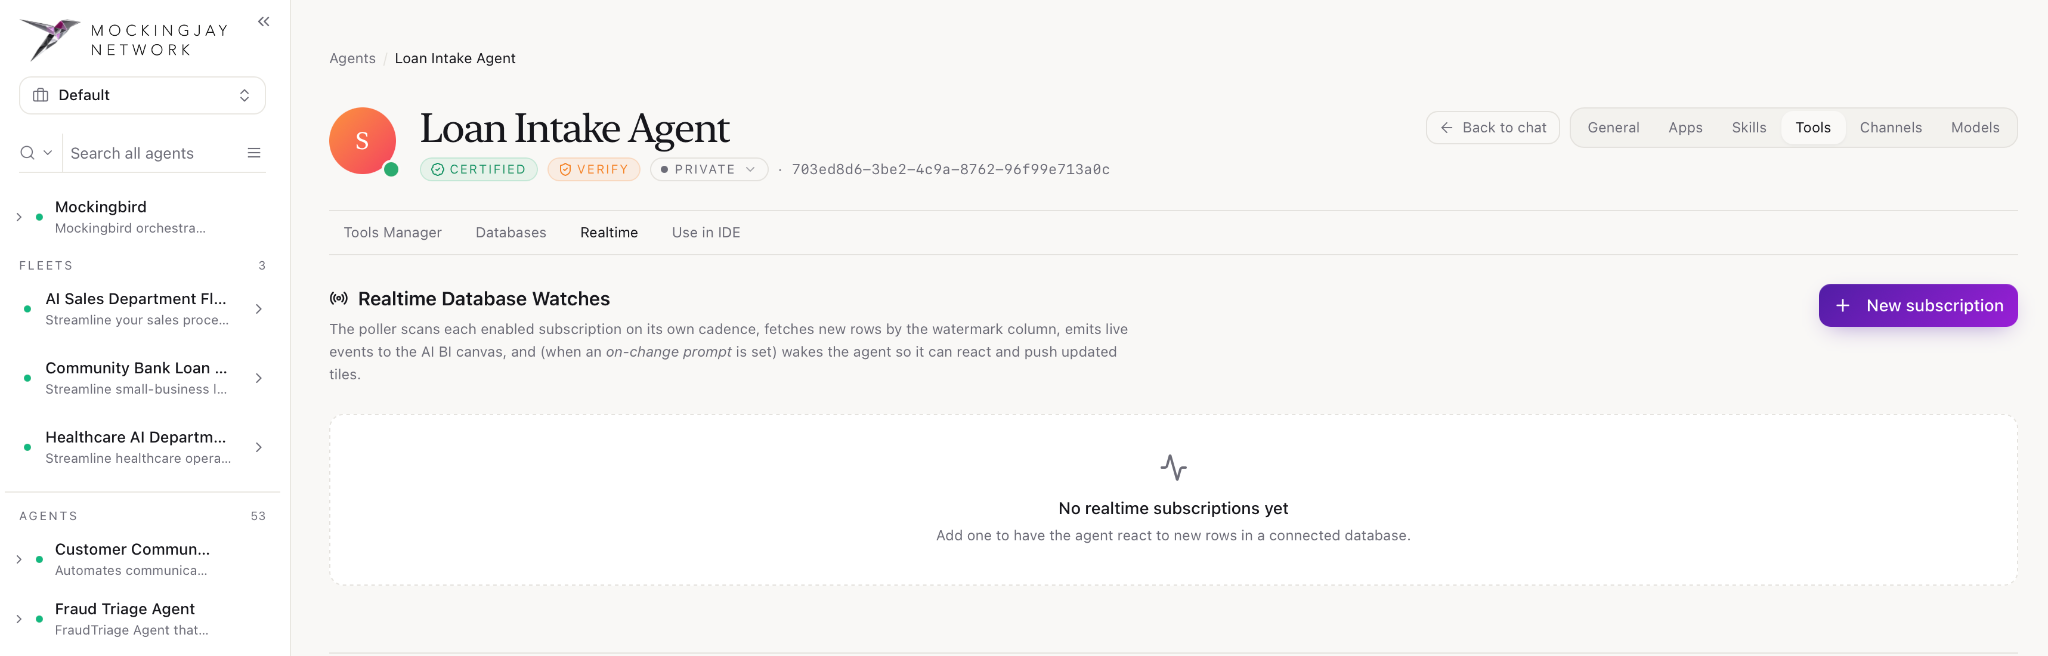
The Tools page controls which tools and data the agent can use. It has four tabs: Tools Manager, Databases, Realtime and Use in IDE.
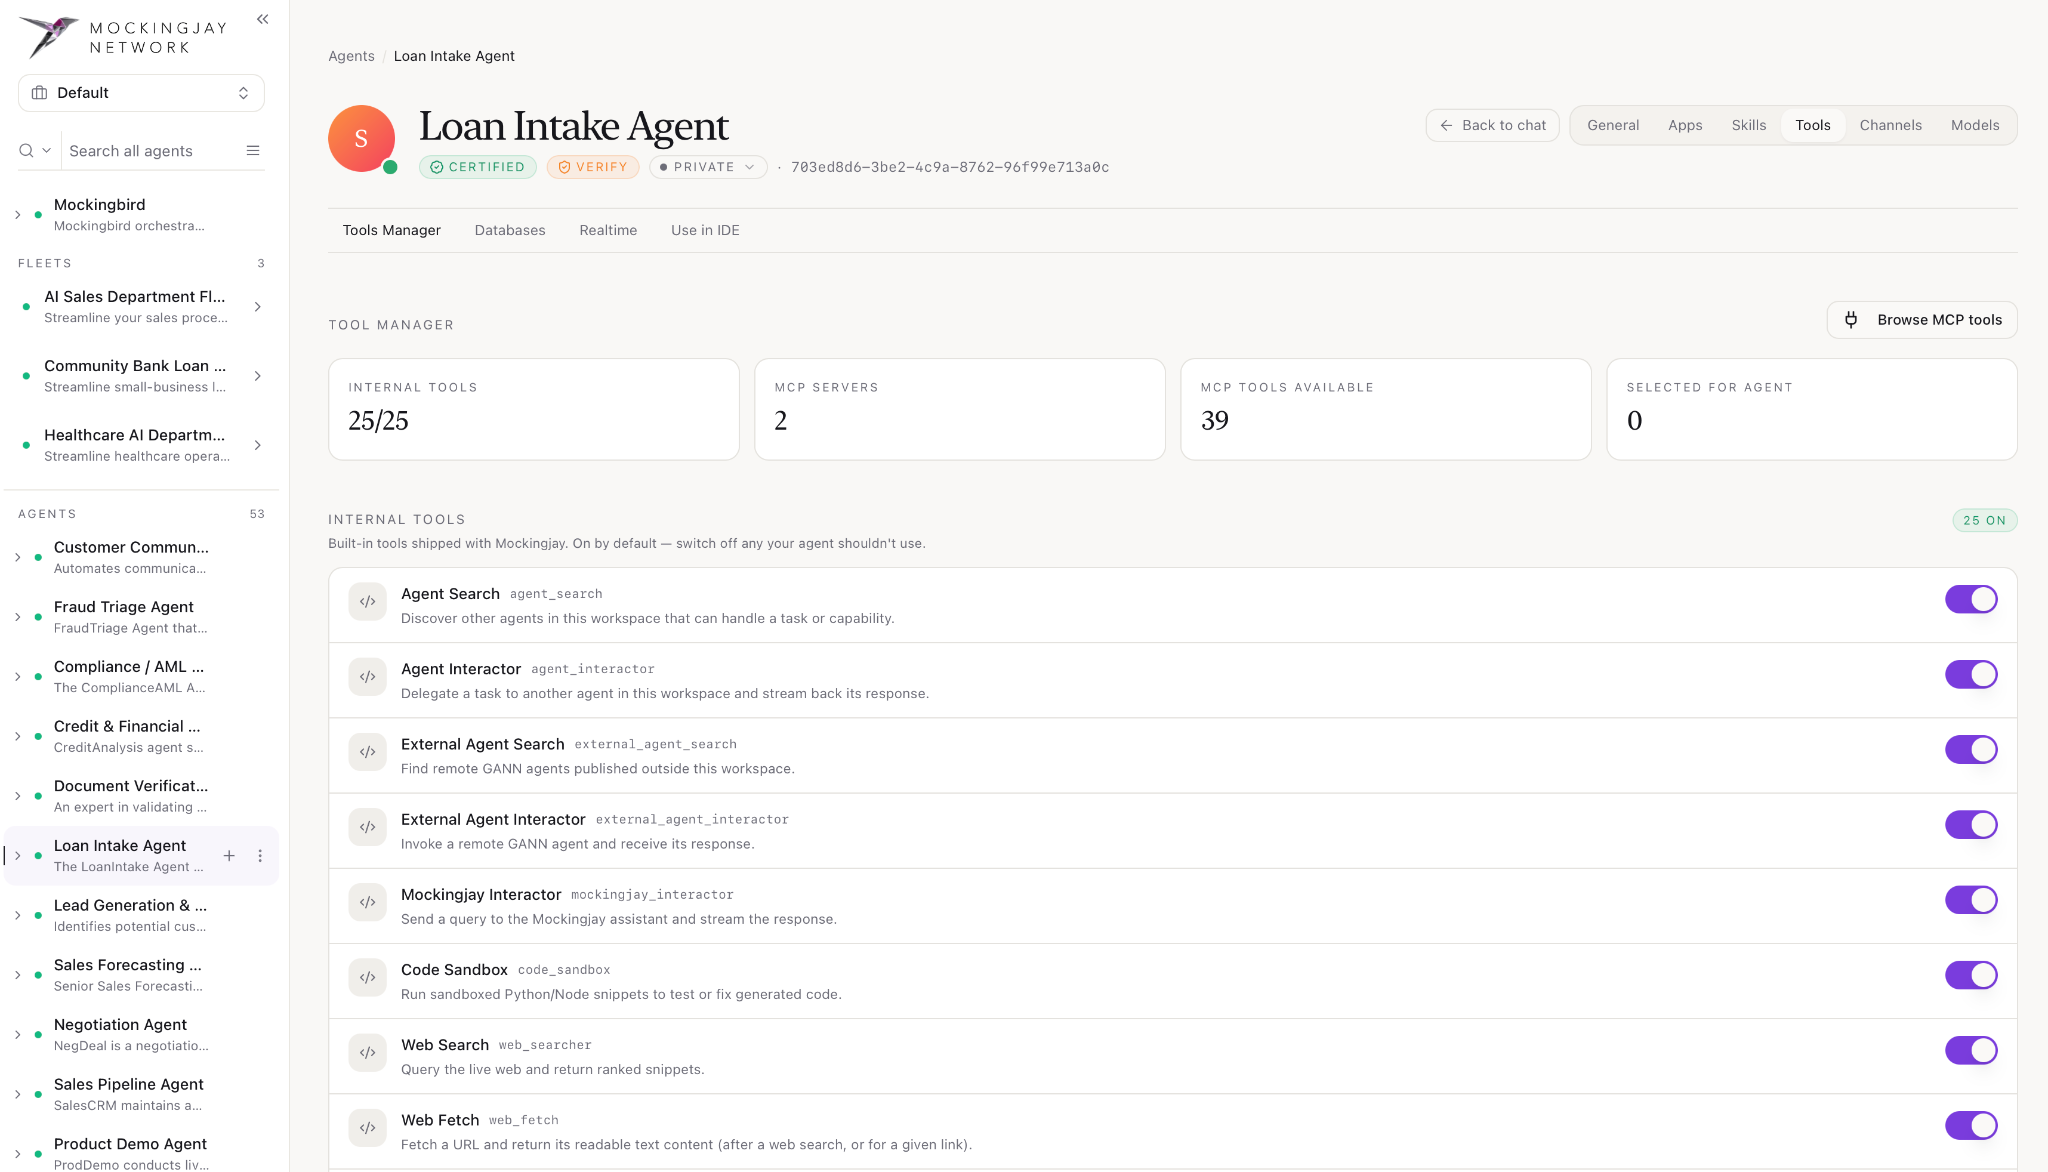
Tools Manager
This tab lists every tool the agent can use.
- The summary cards at the top show:
- Internal tools: how many built-in tools are switched on (for example 25/25)
- MCP servers: how many MCP servers are connected
- MCP tools available: how many tools those servers provide
- Selected for agent: how many MCP tools have been given to this agent
- Internal Tools are the built-in tools that ship with Mockingjay, such as Agent Search, Agent Interactor, Code Sandbox, Web Search and Web Fetch. Each one shows its name, its ID (for example
web_searcher), a short description and an on/off toggle. All internal tools are enabled (ON) by default when an agent is created. - To add tools from your connected MCP servers, click Browse MCP tools.
Databases
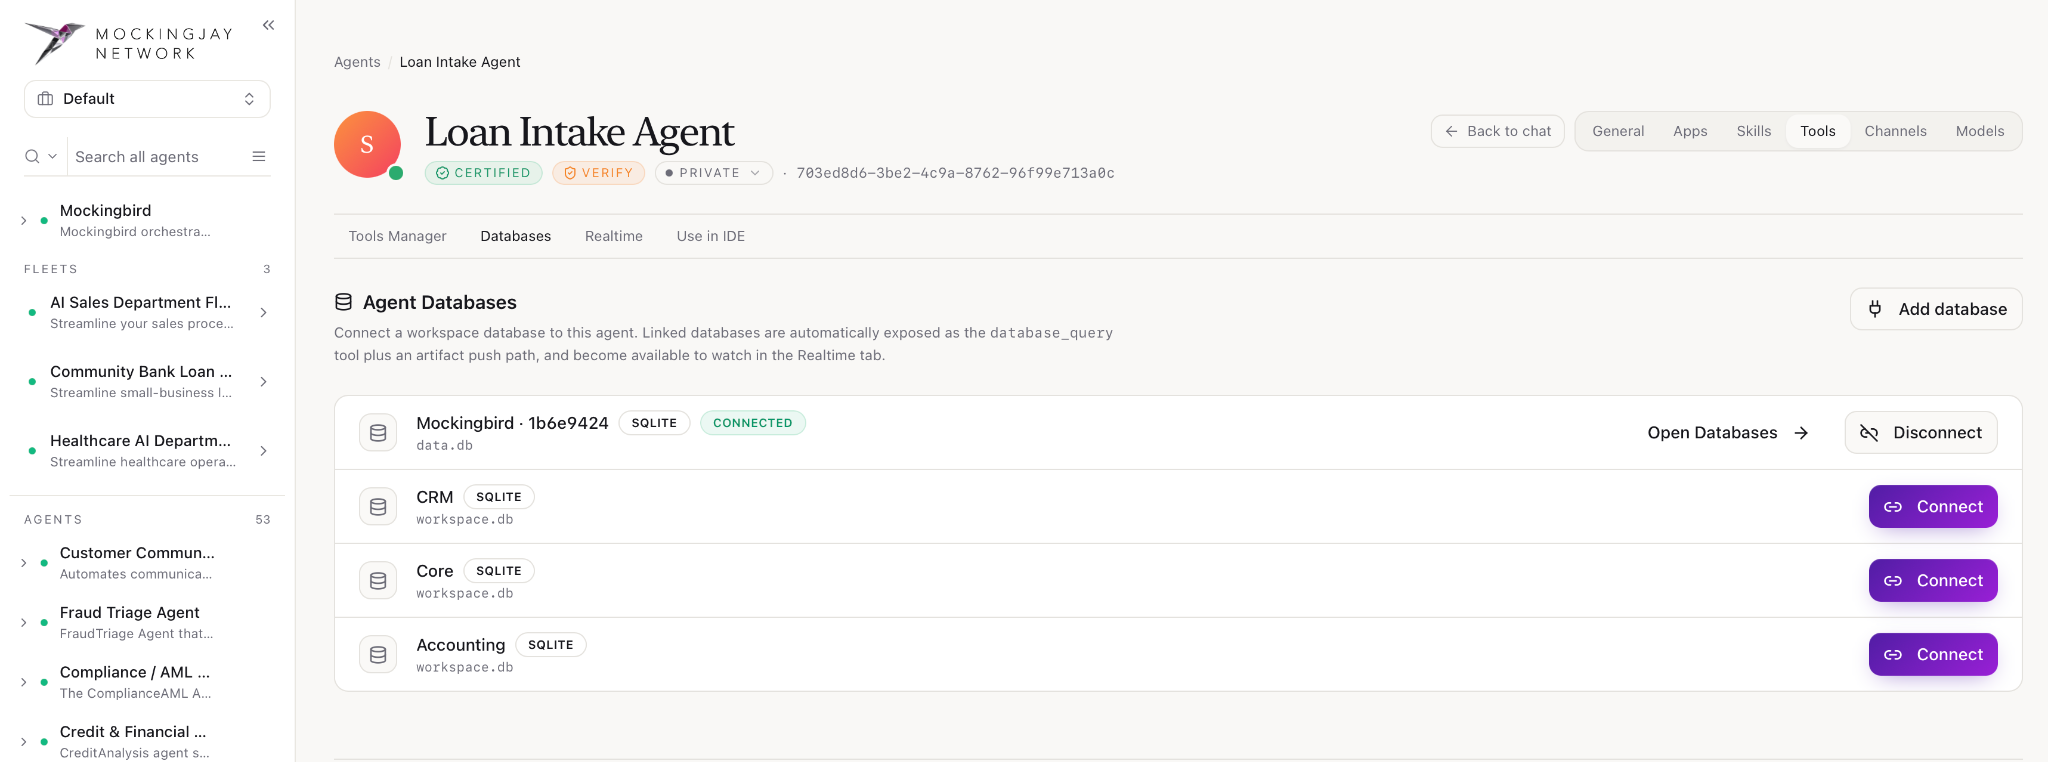
This tab connects workspace databases to the agent. Once a database is linked, the agent can query it with the database_query tool and send results to artifacts, and the database becomes available to watch in the Realtime tab.
- Each database is listed with its name, type (for example SQLITE) and file name. Databases already linked to the agent show a CONNECTED label.
- Click Connect to link a database to the agent, or Disconnect to unlink it.
- Click Open Databases → to view a connected database’s contents.
- To add a database that isn’t listed yet, click Add database.
Realtime
Realtime Database Watches let the agent react automatically when new data arrives in a connected database.
- Click + New subscription to create a watch on a database table.
- Mockingjay checks each enabled subscription on its own schedule and picks up new rows using a watermark column (a column, such as an ID or a timestamp, that shows which rows are new).
- New rows are sent as live events to the AI BI canvas. If you set an on-change prompt, the agent also wakes up, works on the new data and updates the canvas tiles.
Use in IDE
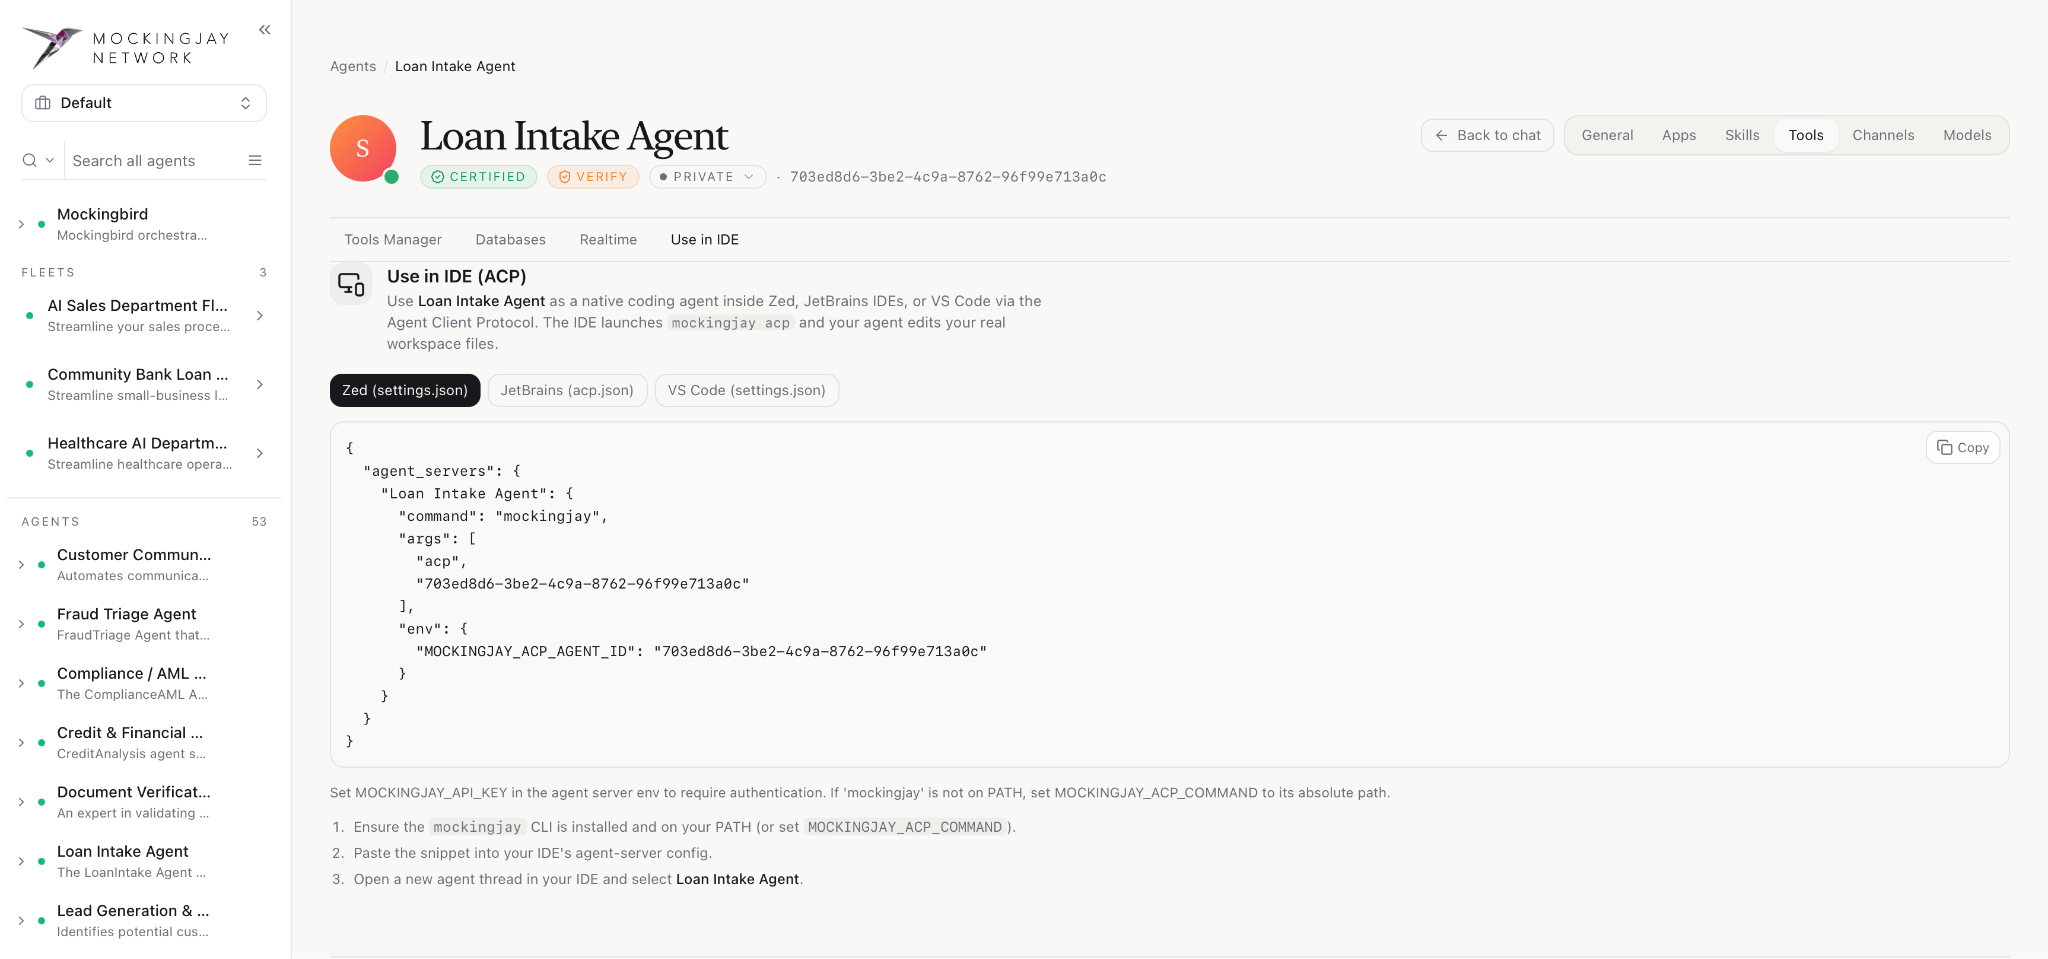
This tab lets you use the agent as a coding agent inside Zed, JetBrains IDEs or VS Code, through the Agent Client Protocol (ACP). The IDE starts the agent with mockingjay acp, and the agent works directly on the files in your project.
- Make sure the mockingjay command-line tool is installed and on your PATH. If it isn’t, set
MOCKINGJAY_ACP_COMMANDto the tool’s full path. - Select your IDE: Zed (settings.json), JetBrains (acp.json) or VS Code (settings.json). Click Copy and paste the snippet into that IDE’s agent-server settings. The snippet already contains your Agent ID.
- Open a new agent thread in your IDE and select the agent by name (for example Loan Intake Agent).
Channels (C)
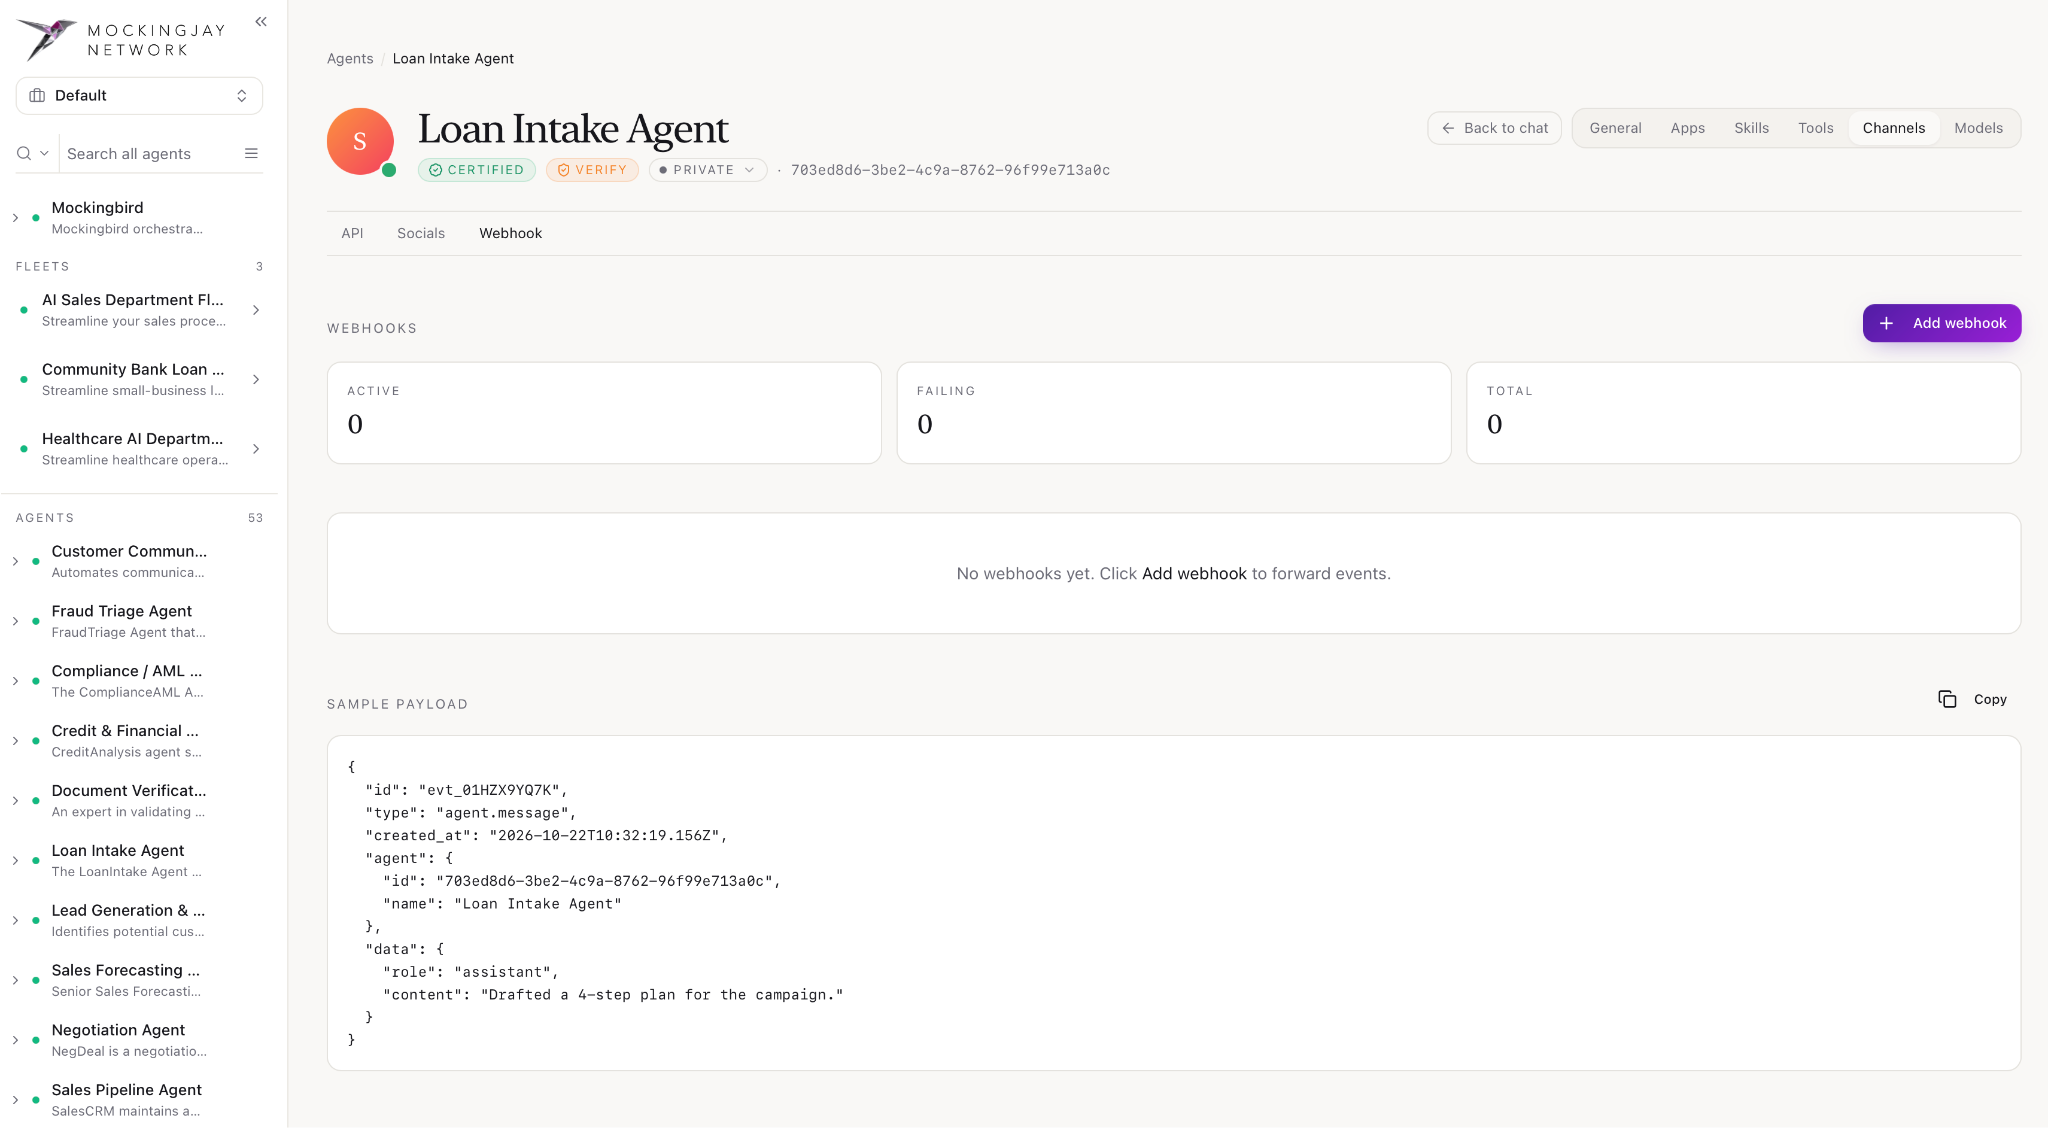
The Channels page controls how people and other systems reach the agent, and where the agent sends its events. It has three tabs: API, Socials and Webhook.
API
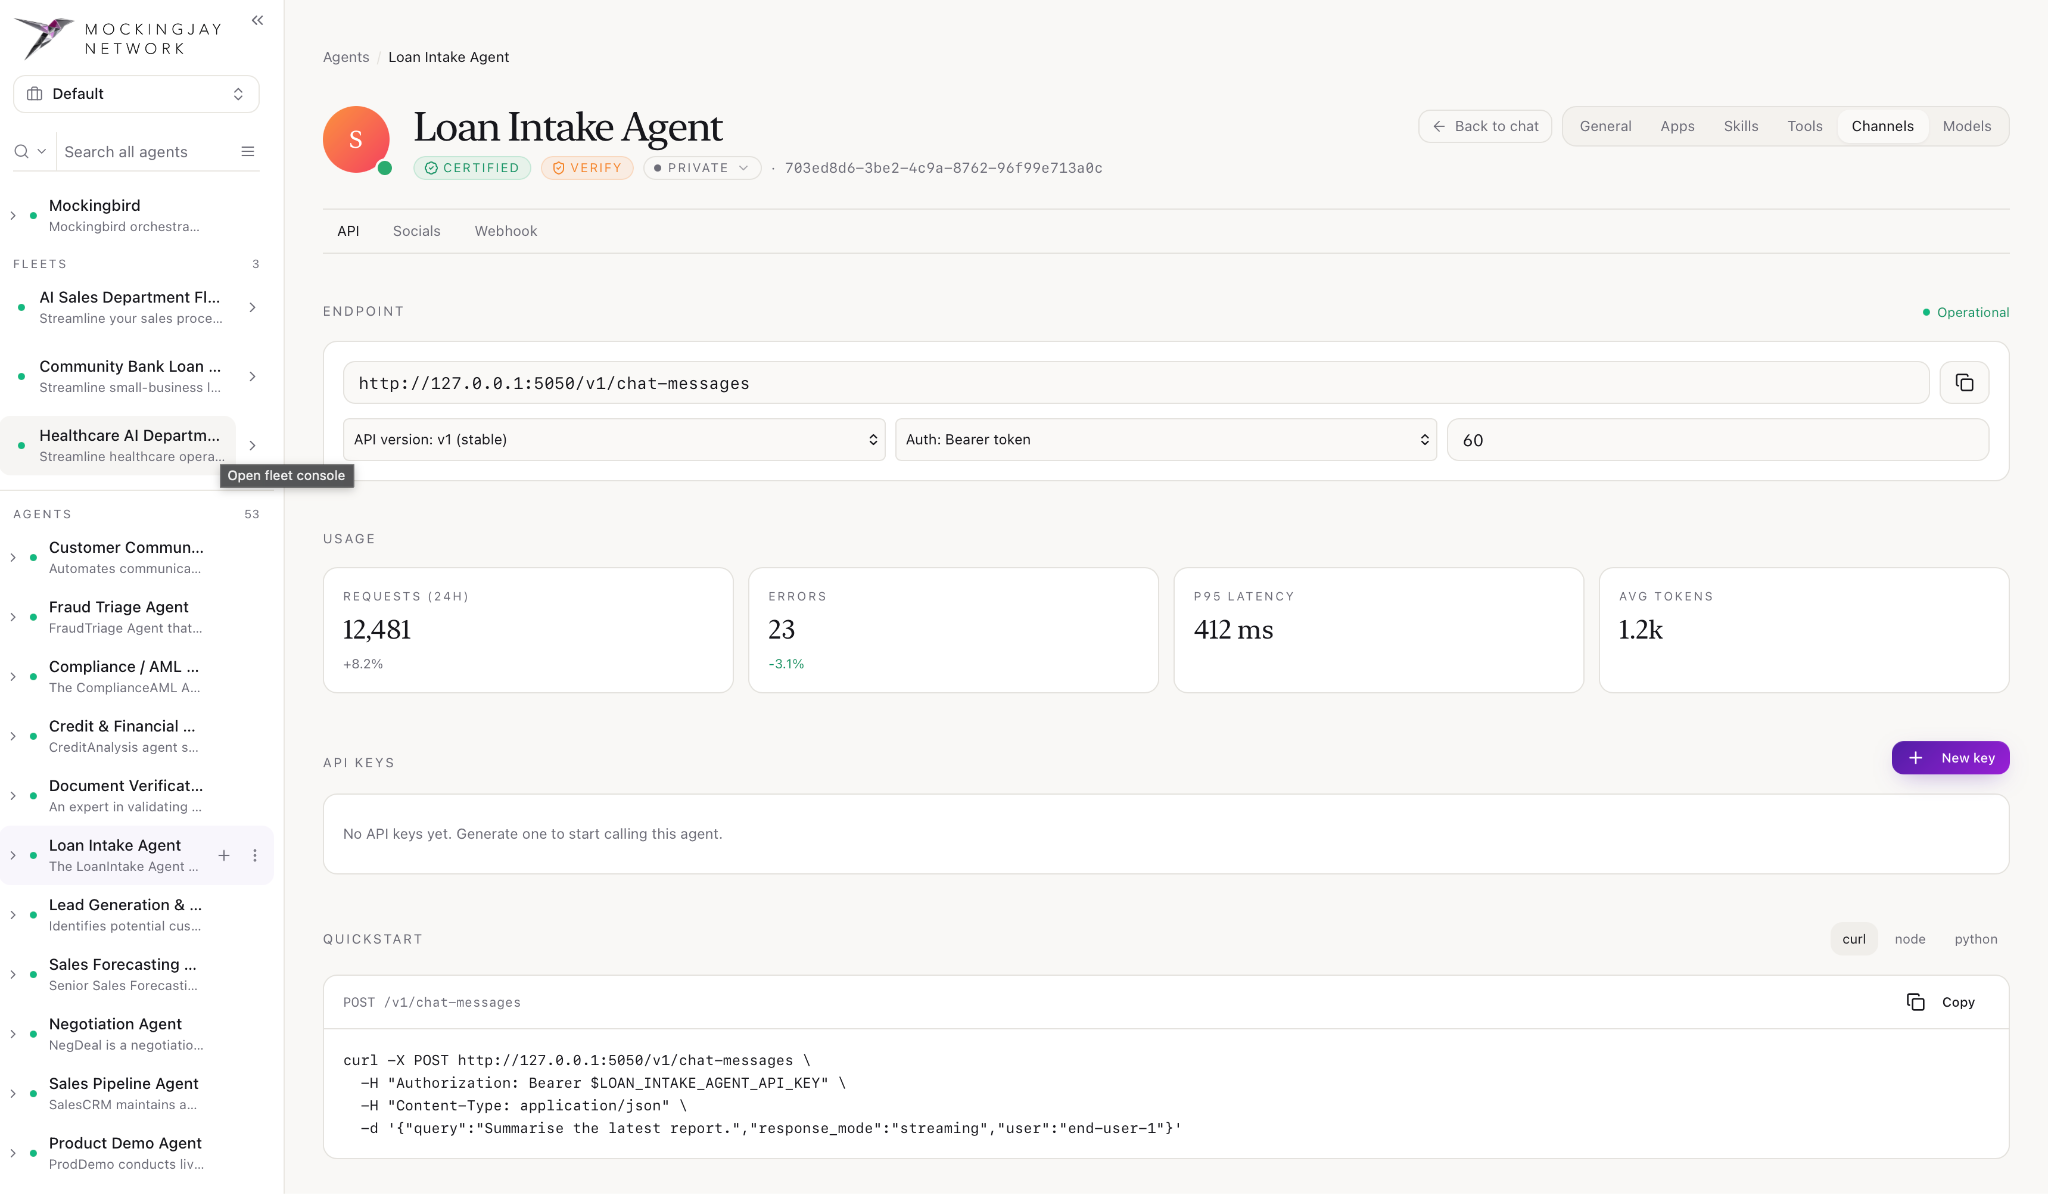
This tab lets other software call the agent directly.
- Endpoint shows the address that programs send requests to (for example
http://127.0.0.1:5050/v1/chat-messages). Click the copy icon to copy it. Operational in green means the endpoint is working. - Below the address you can choose the API version (for example v1 (stable)) and the Auth method (for example Bearer token).
- Usage shows four figures:
- Requests (24h): the number of calls in the last 24 hours
- Errors: the number of failed calls
- P95 latency: 95% of requests were answered within this time
- Avg tokens: the average amount of AI processing used per request
- API Keys: click + New key to create a key for calling the agent.
- Quickstart gives a ready-made example request in curl, node or python. Click Copy and replace
$LOAN_INTAKE_AGENT_API_KEYwith your key.
Socials
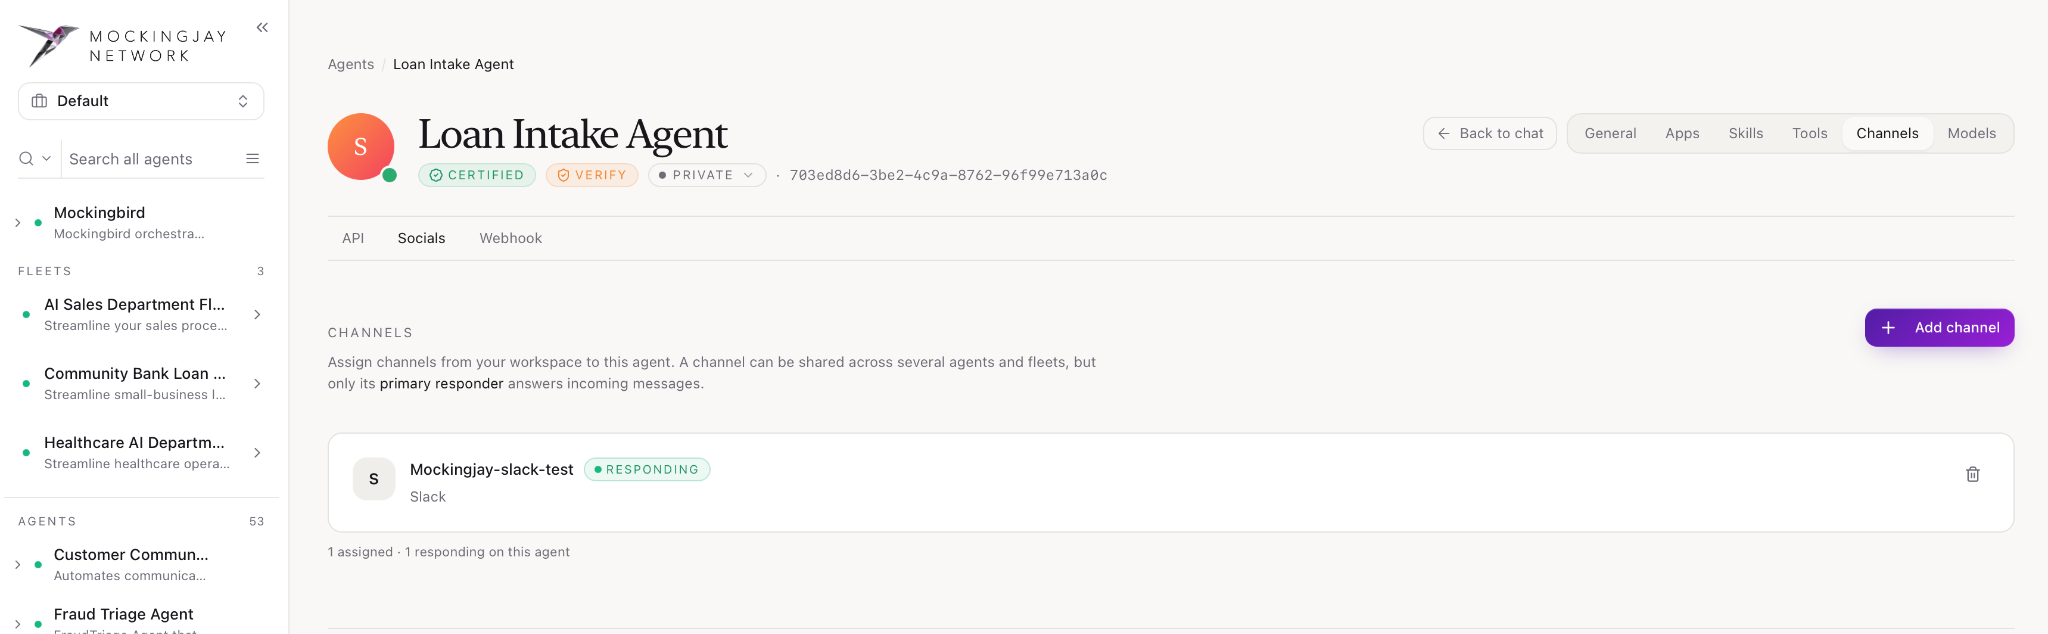
This tab connects the agent to messaging channels from your workspace, such as Slack.
- Click + Add channel to assign a workspace channel to this agent. (To set up a new channel first, see Channels (Connectivity) and Social accounts (Connected accounts).)
- Each assigned channel shows its name and platform (for example Mockingjay-slack-test · Slack). A RESPONDING label means this agent is the one answering messages on that channel.
- Click the bin icon to remove a channel from this agent.
- The line below the list shows how many channels are assigned and how many this agent is responding on.
Webhook
Webhooks send the agent’s events to another system automatically, for example to notify your own app whenever the agent replies.
- The summary cards show how many webhooks are Active, how many are Failing, and the Total.
- Click + Add webhook to start sending events to a web address.
- Sample payload shows an example of the data each webhook receives. It includes:
- the event ID and type (for example
agent.message) - the time the event was created
- the agent’s ID and name
- the message data (role and content)
- the event ID and type (for example
- Click Copy to use it when setting up the receiving system.
Models (M)
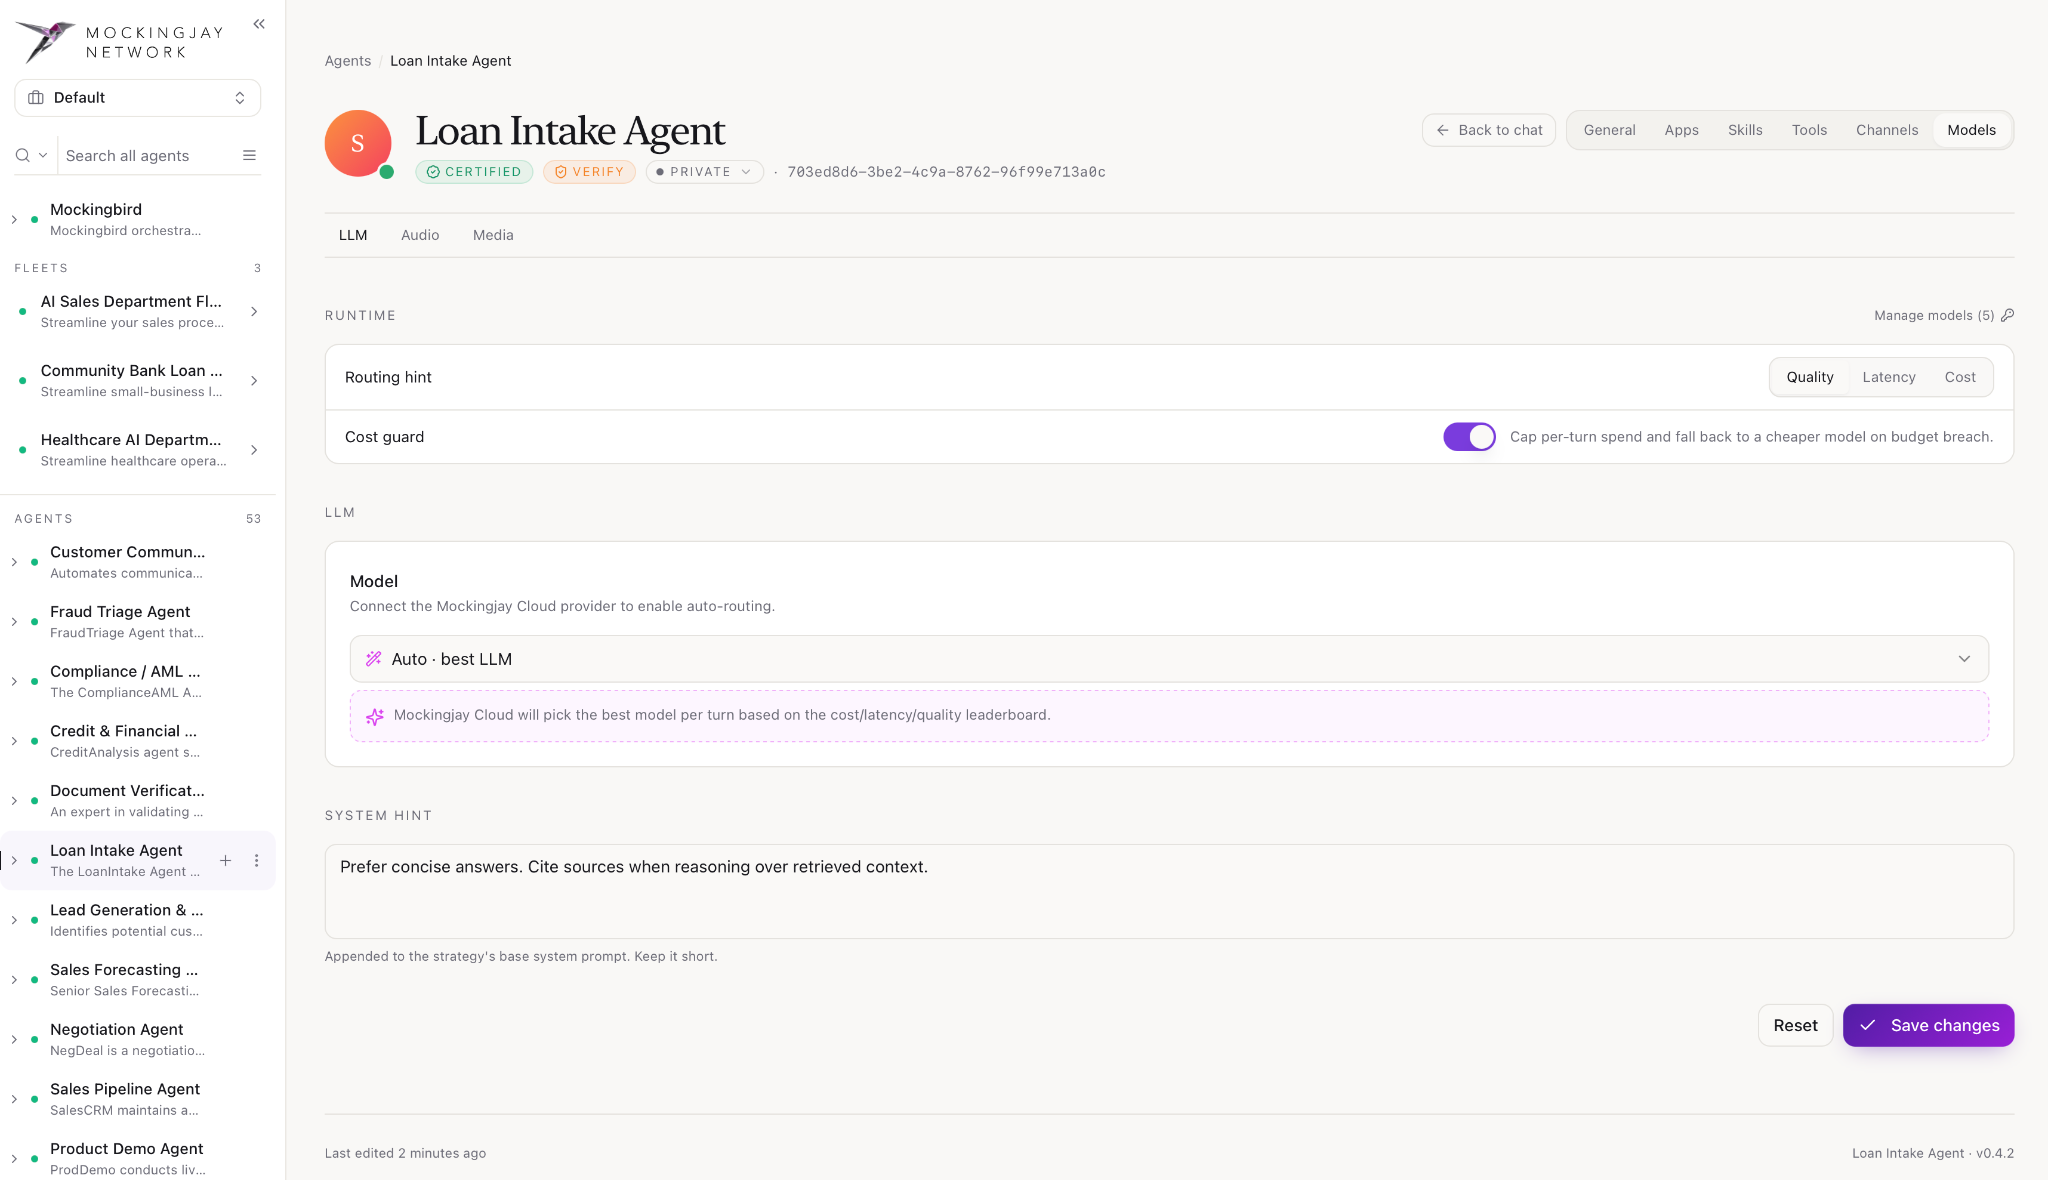
The Models page sets which AI models the agent uses. It has three tabs: LLM, Audio and Media. On each tab, click Save changes to apply your choices, or Reset to undo unsaved changes.
LLM
This tab sets the main language model the agent thinks and writes with.
- Runtime:
- Routing hint tells Mockingjay what to prioritise when choosing a model: Quality, Latency (speed) or Cost.
- Cost guard: when switched on, it caps how much each turn can spend and switches to a cheaper model if the budget is exceeded.
- Model: choose a specific model from the dropdown, or leave it on Auto · best LLM. With Auto, Mockingjay Cloud picks the best model for each turn based on cost, speed and quality. Auto-routing needs the Mockingjay Cloud provider to be connected. Click Manage models to see or add the models available to your workspace.
- System hint is a short extra instruction added to the agent’s base prompt, for example “Prefer concise answers. Cite sources when reasoning over retrieved context.” Keep it brief; the agent’s main instructions belong to Skills → Instruction.
Audio
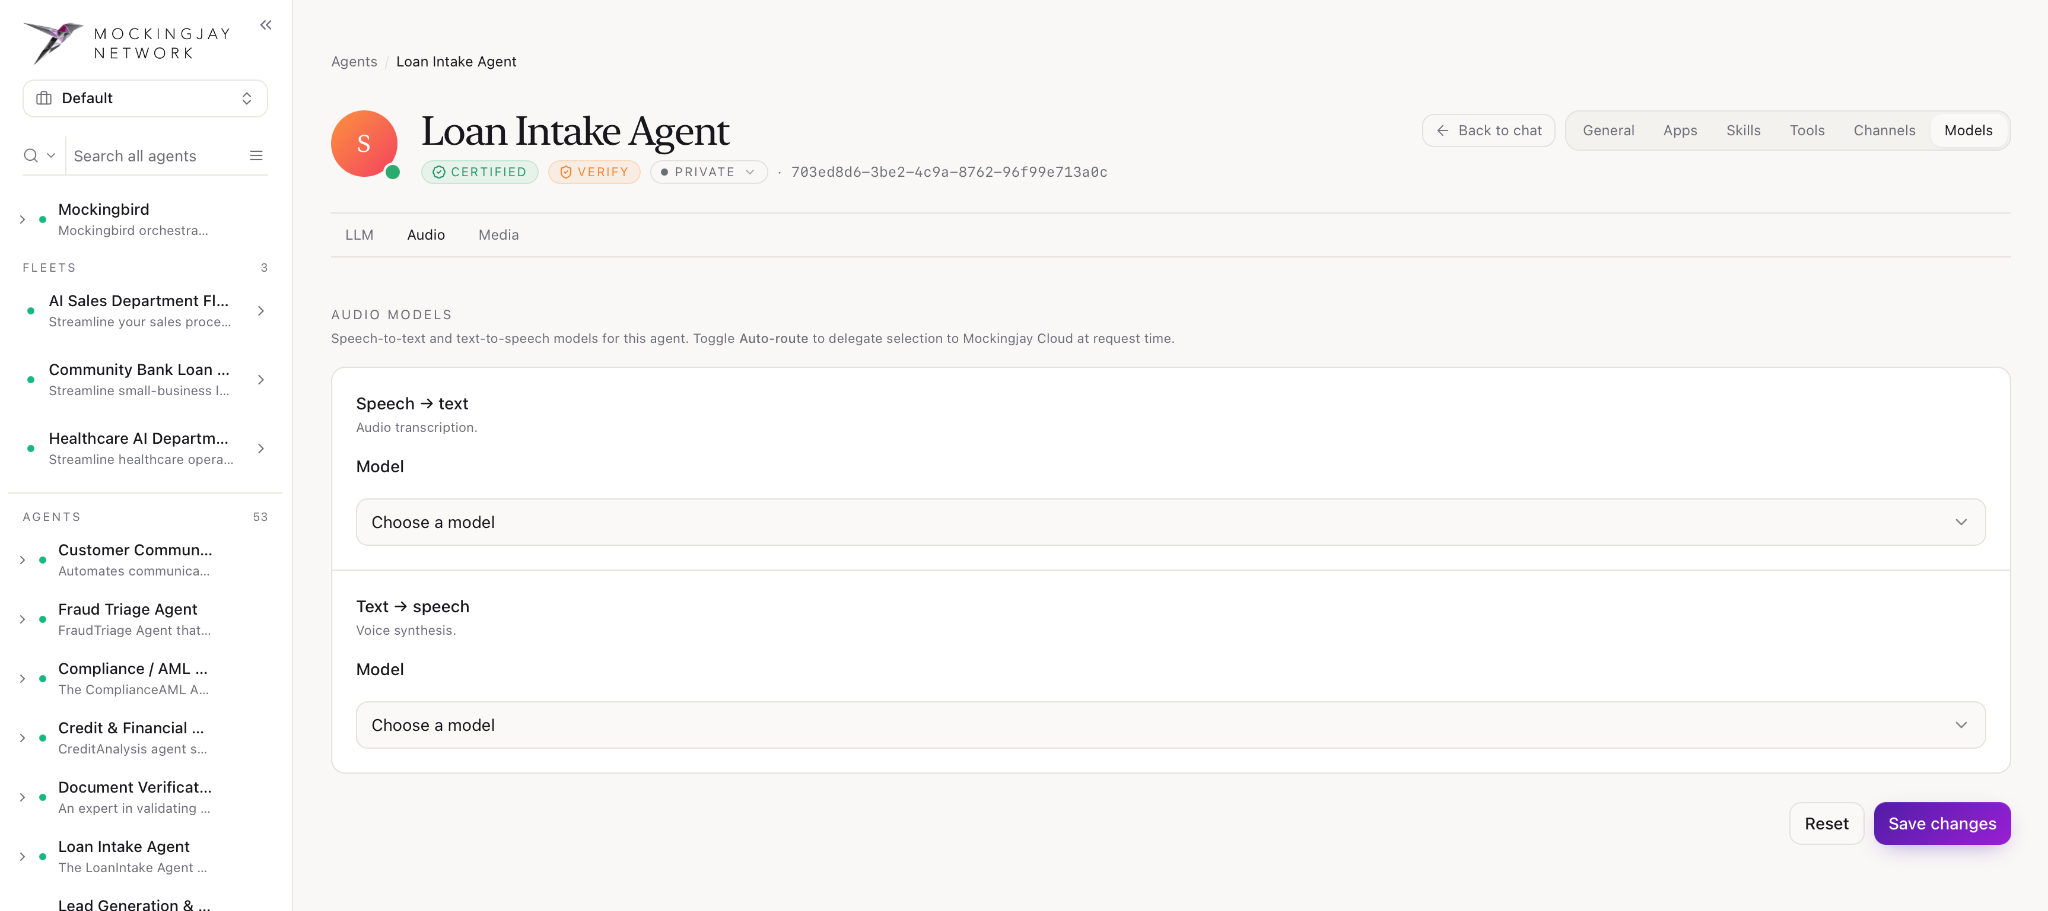
This tab sets the models the agent uses for voice.
- Speech → text is the model that transcribes audio into text.
- Text → speech is the model that turns the agent’s replies into a spoken voice.
- For each one, click Choose a model and select from the list. To let Mockingjay Cloud pick the model for each request, turn on Auto-route.
Media
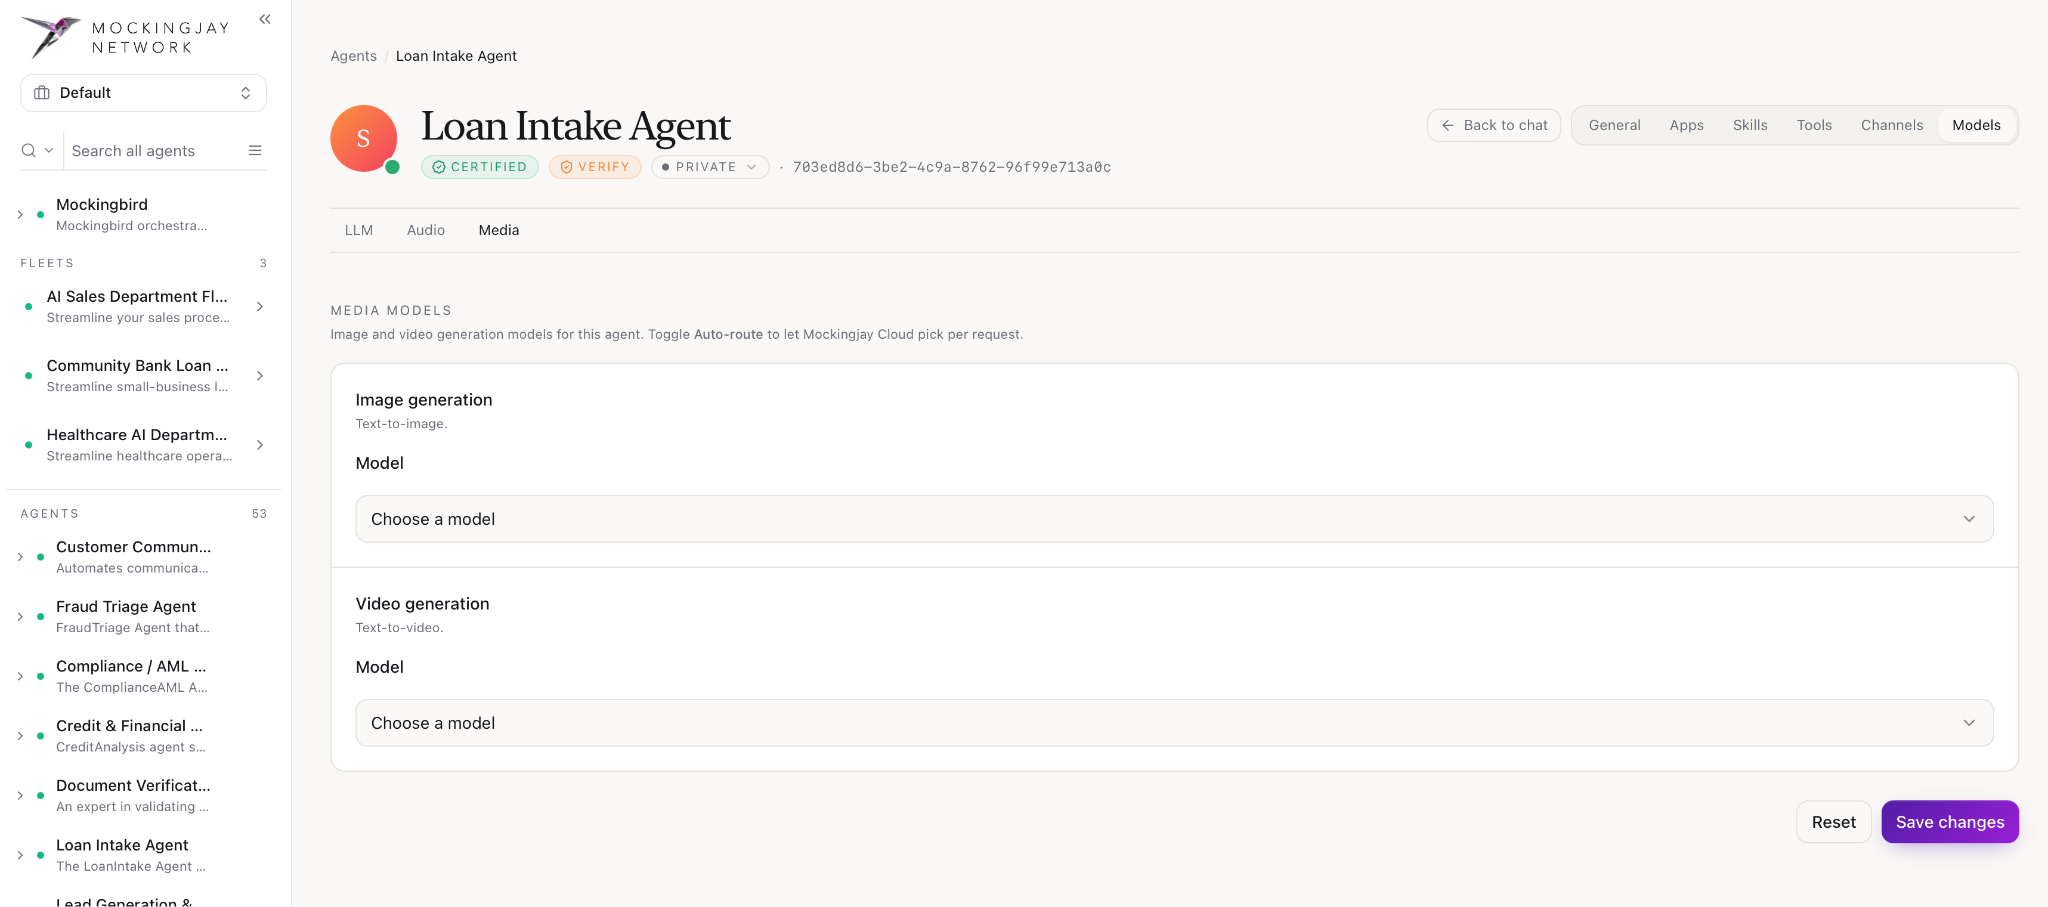
This tab sets the models the agent uses to create images and video.
- Image generation is the model that creates images from a text description.
- Video generation is the model that creates videos from a text description.
- For each one, click Choose a model and select from the list. To let Mockingjay Cloud pick the model for each request, turn on Auto-route.
All Sessions (H)
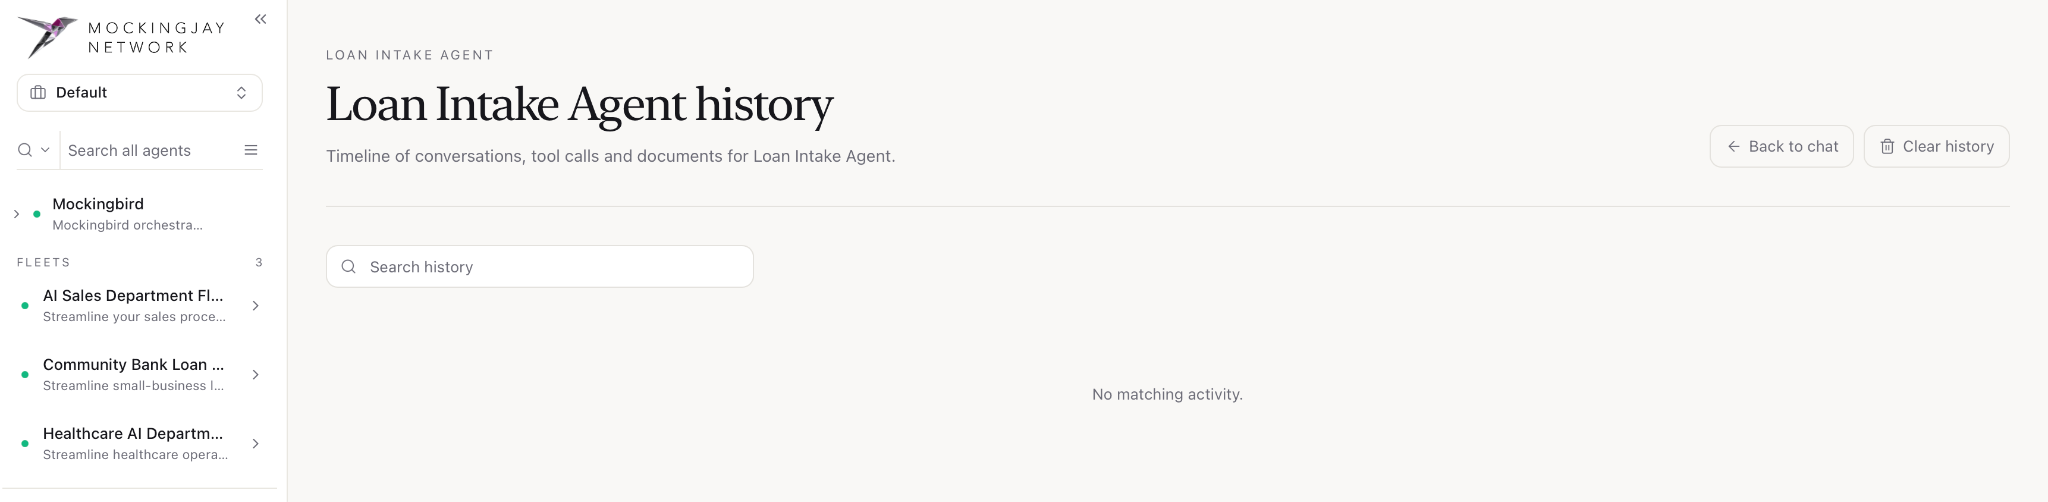
The agent’s history page: a timeline of its conversations, tool calls and documents. You can search the history or click Clear history.
Delete Agent (D)
Permanently removes the agent.
Fleets (Agent Fleet)
A fleet is a team of agents that work together on a job.
Summary cards. These show how many Fleets and Agents you have, and how many fleets are Running right now.
You can search for a fleet, and switch between grid and list view.
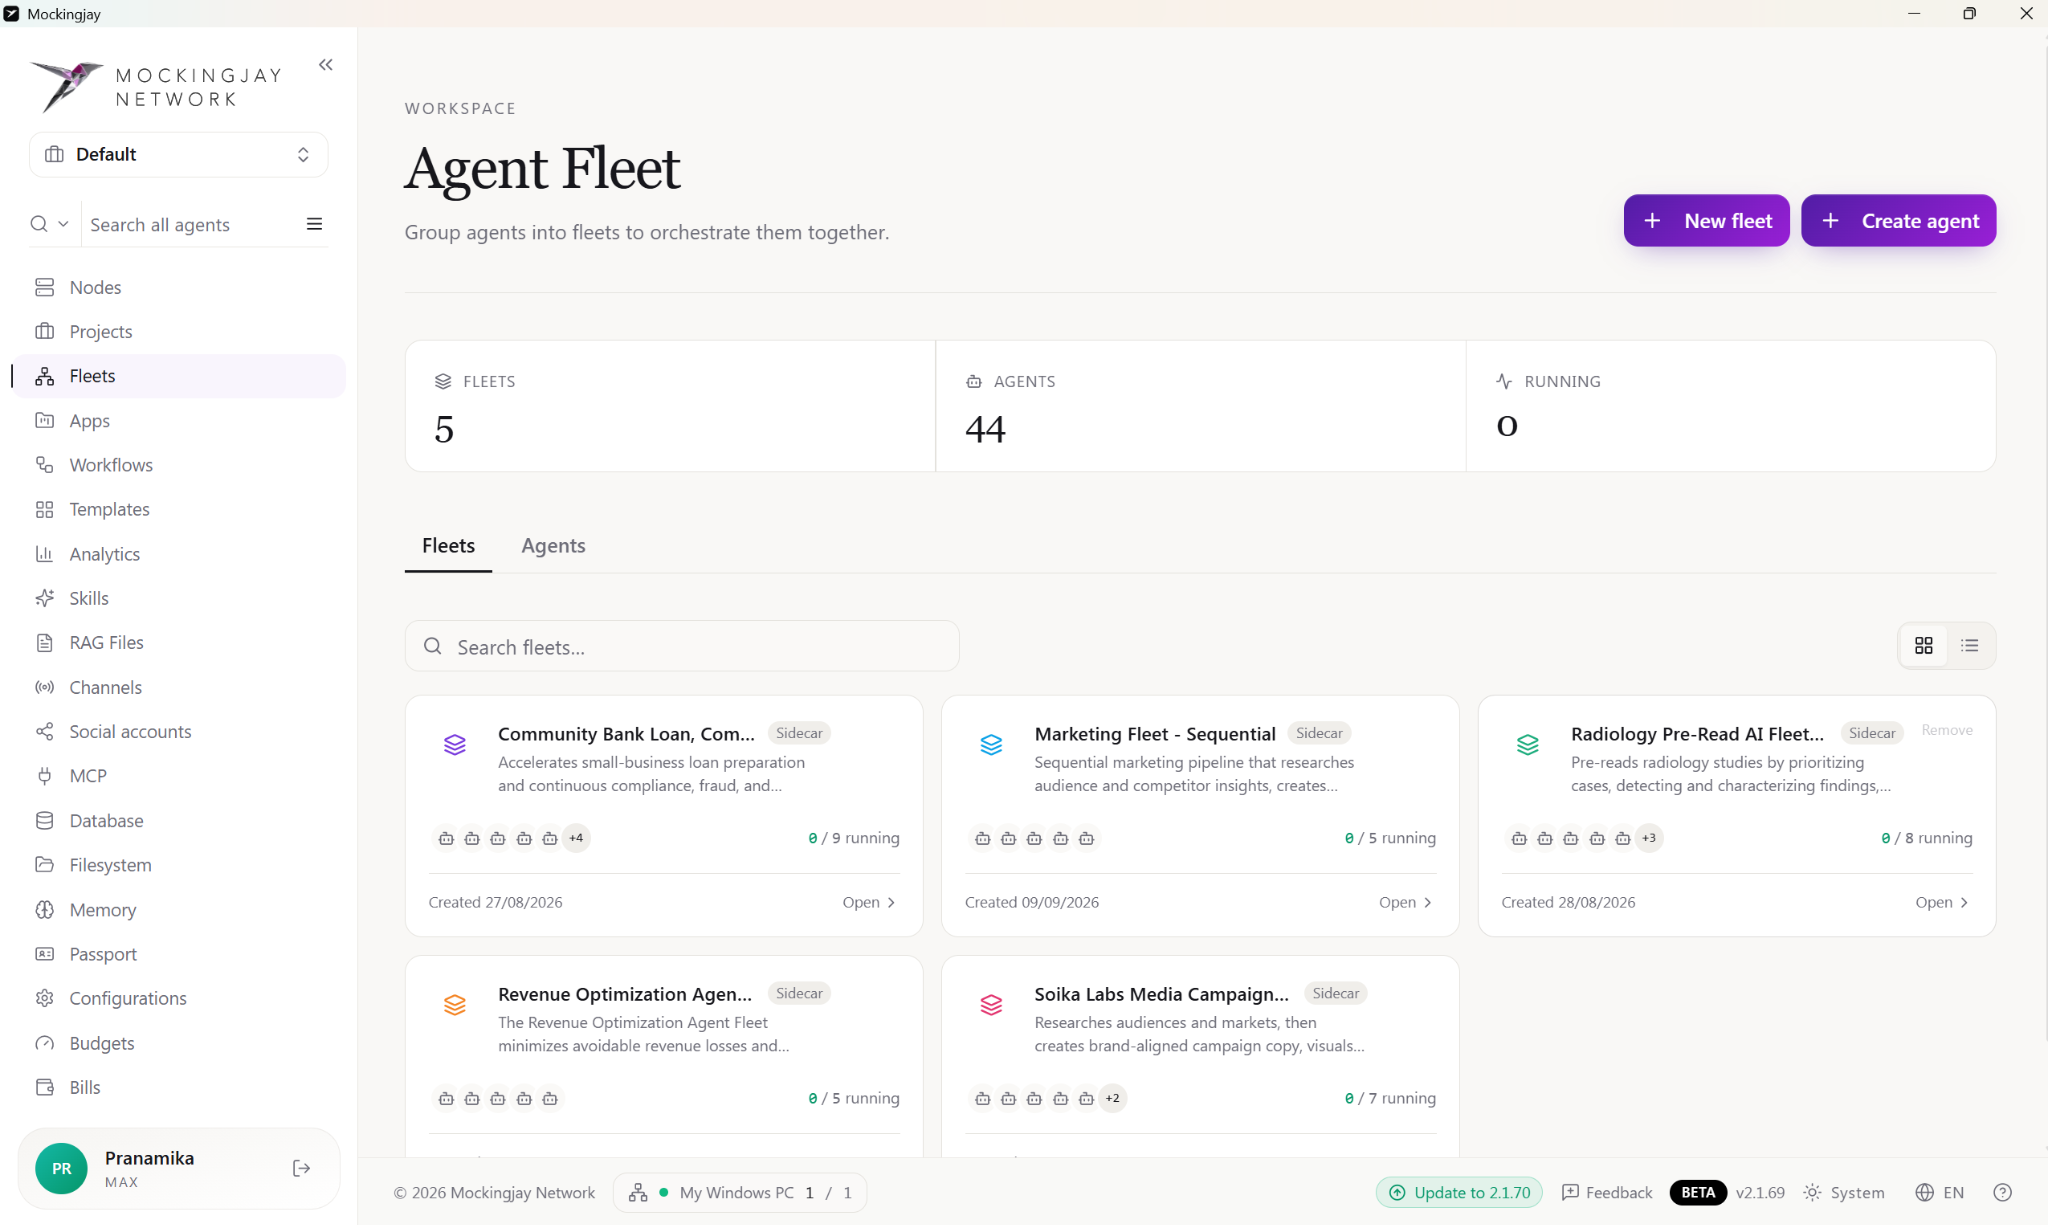
Fleet cards. Each fleet card shows:
- The fleet's name and a Sidecar label.
- A short description.
- The + New Fleet and + Create Agent buttons at the top of the page, for adding a fleet or an agent.
- How many of its agents are running, for example “0 / 9 running”.
- When it was created.
- An Open link.
Some example fleets are Community Bank Loan & Compliance, Marketing Fleet – Sequential, Radiology Pre‑Read AI Fleet, Revenue Optimization Agent and Soika Labs Media Campaign.
Creating a new fleet
Here you set up the fleet and choose its agents before you send it off to work. Fill in:
- Name, for example “Banking and Finance”.
- Description.
- Region: set to Auto unless you choose otherwise.
- Dispatch strategy: how work is shared out between the agents. It starts as Round Robin, and you can change it to another option such as Hierarchy, Priority or Fallback.
- Workflow app: optional. Leave it as None if you don't need one.
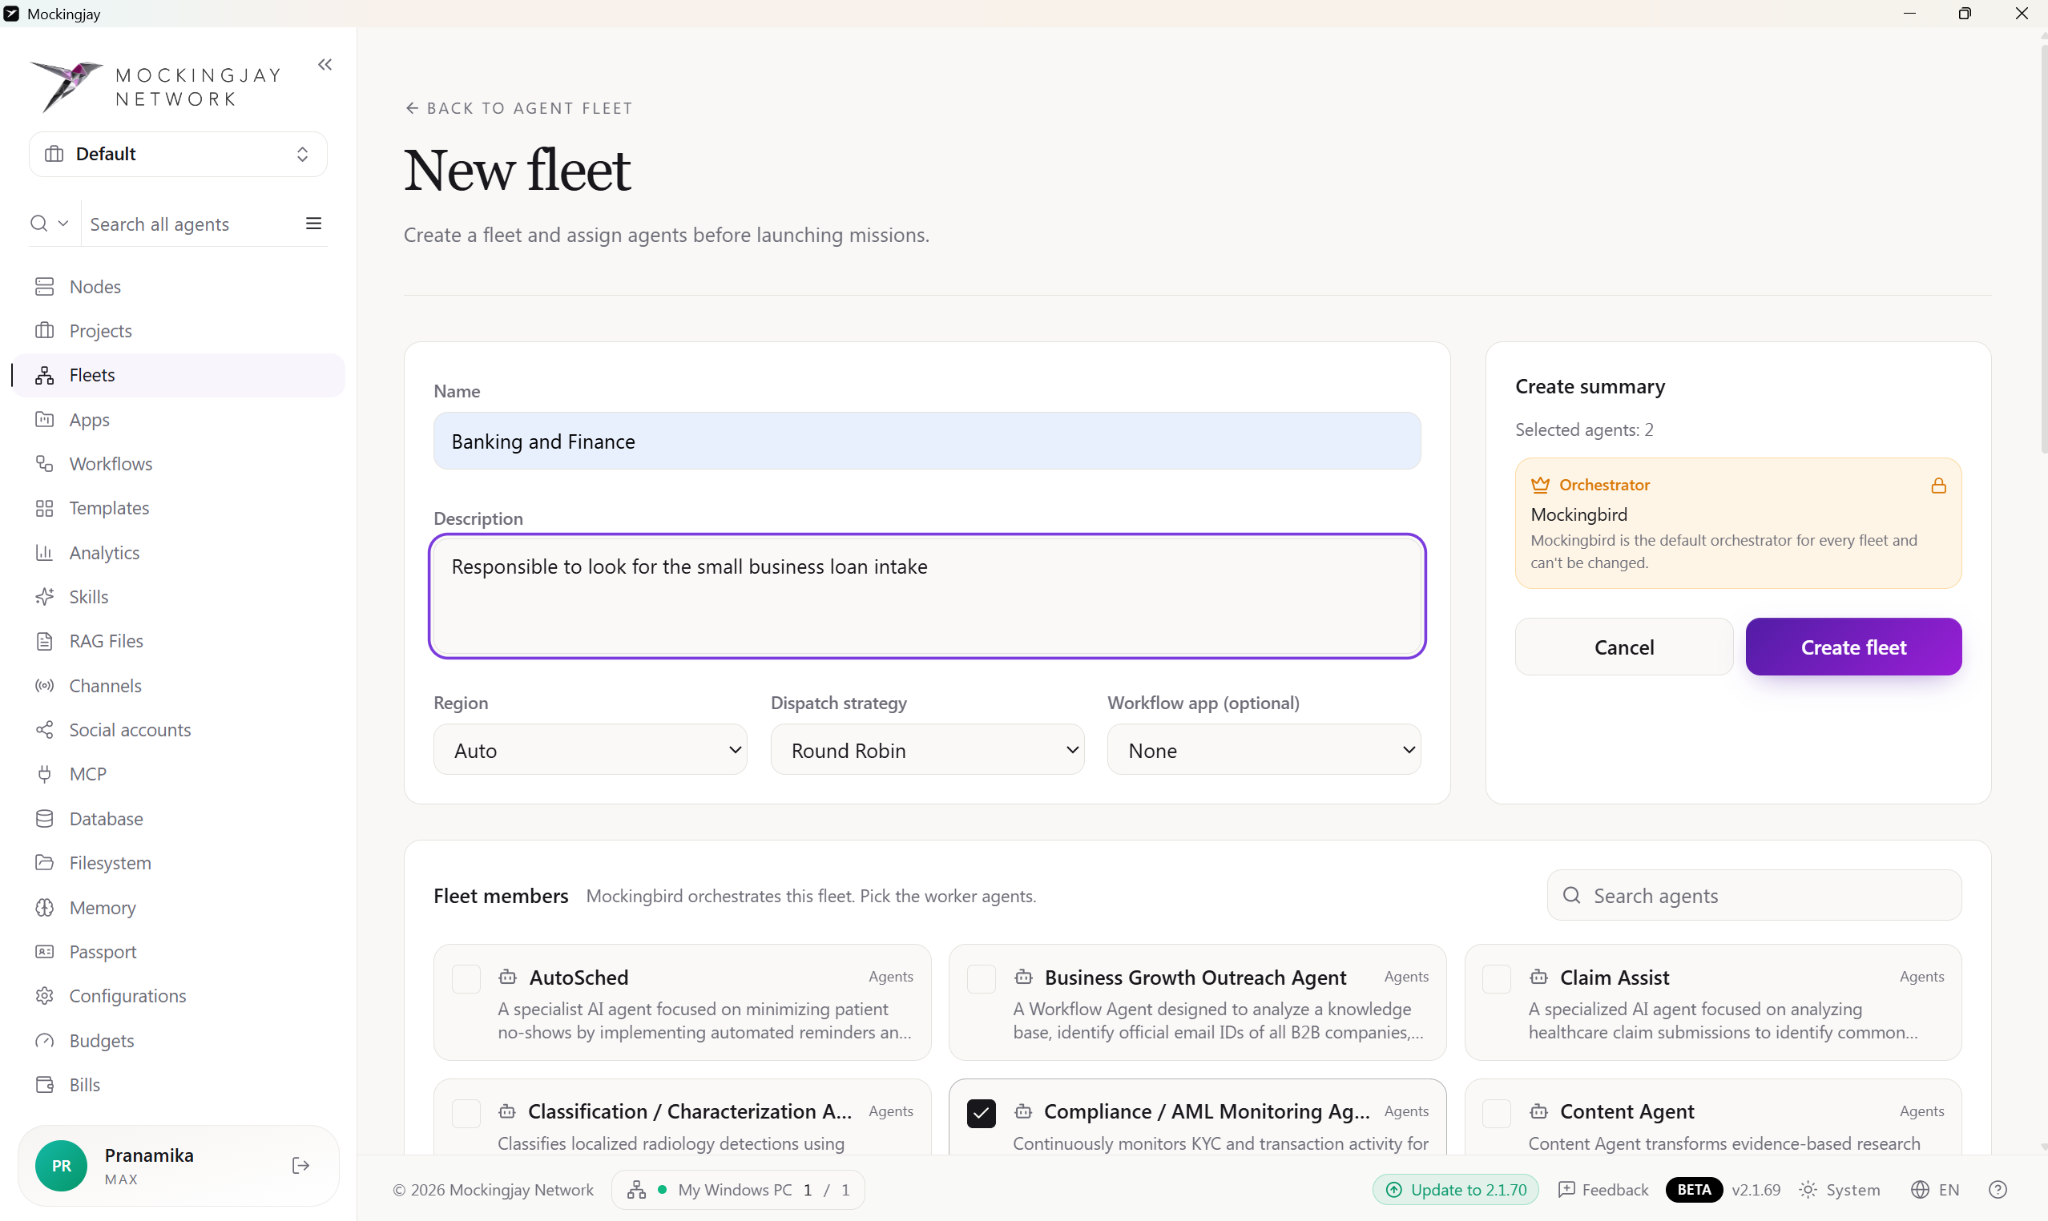
Under Fleet members, choose the agents that will do the work. Mockingbird leads every fleet, so you only pick the workers. Each agent appears as a card with a tick box, and you can search to narrow the list down. For example, typing “loa” shows only the loan agents.
On the right, the Create summary panel shows:
- How many agents you've picked.
- Orchestrator: Mockingbird, which is locked. Mockingbird leads every fleet and can't be swapped out.
- The Cancel and Create fleet buttons.
Creating a fleet from Mockingbird
- From the Mockingjay Network sidebar, select Mockingbird in the agent list, or by clicking + start a fresh conversation.
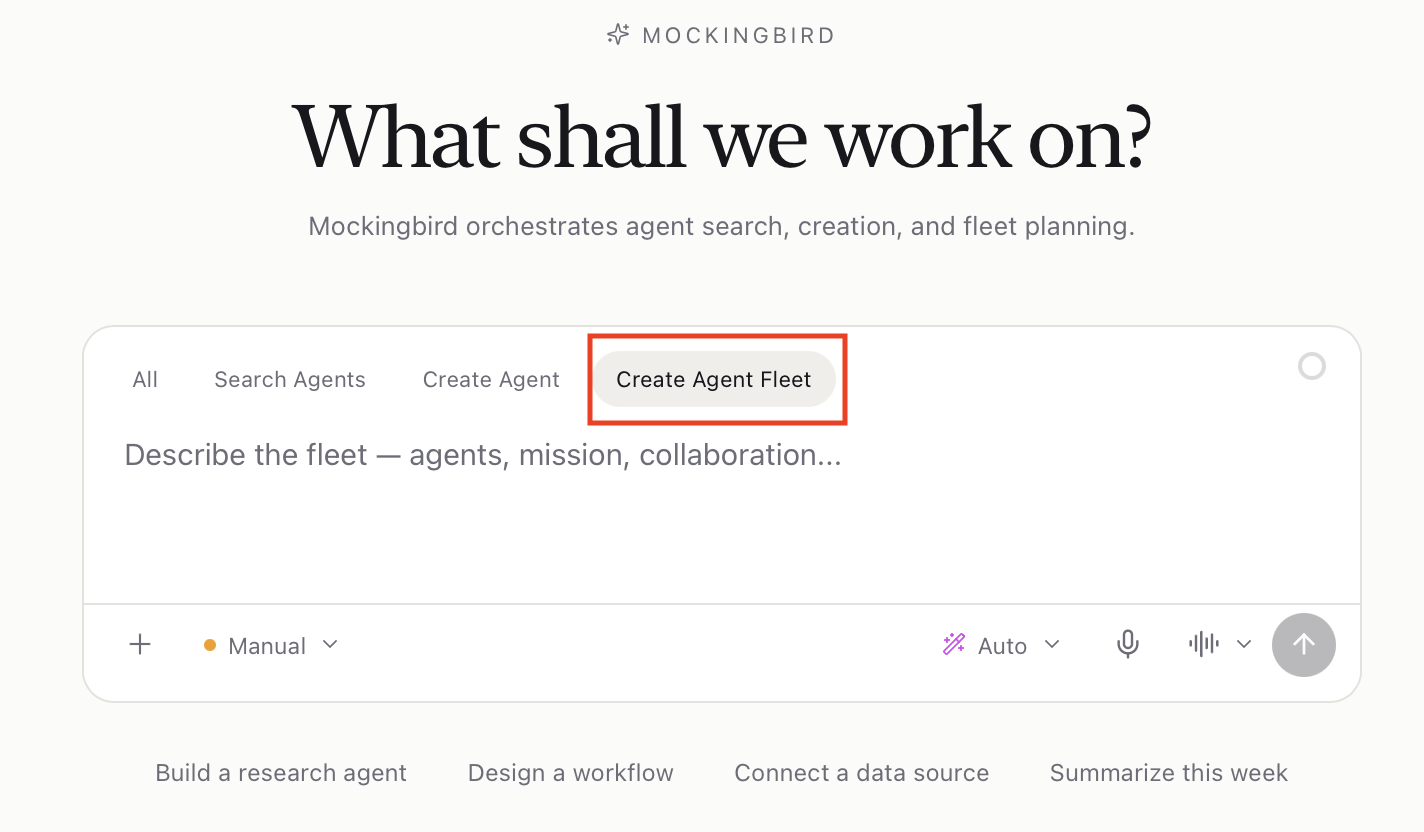
- In the composer, describe the business outcome you want to achieve and the stages of the process. It includes the overall goal of the fleet, each stage and what it should produce, how work passes from one stage to the next, the points at which a person must review or approve something, and which apps, databases or channels are involved. For example:
Create an agent fleet that accelerates small-business loan processing. Stages: intake of the application, document verification, credit and financial analysis, underwriting recommendation, AML/compliance screening, fraud triage, customer updates, and final reconciliation. A human loan officer must approve every underwriting decision before the customer is notified.
- Click ↑ Send
- Mockingbird replies with a fleet plan, which lists the orchestrator and each proposed agent with its name, its ID and its responsibility. For the request above, the plan would include agents such as
loan_intake,doc_verify,credit_analysis,underwriting,aml_monitoring,fraud_triage,customer_commsandreconciliation.
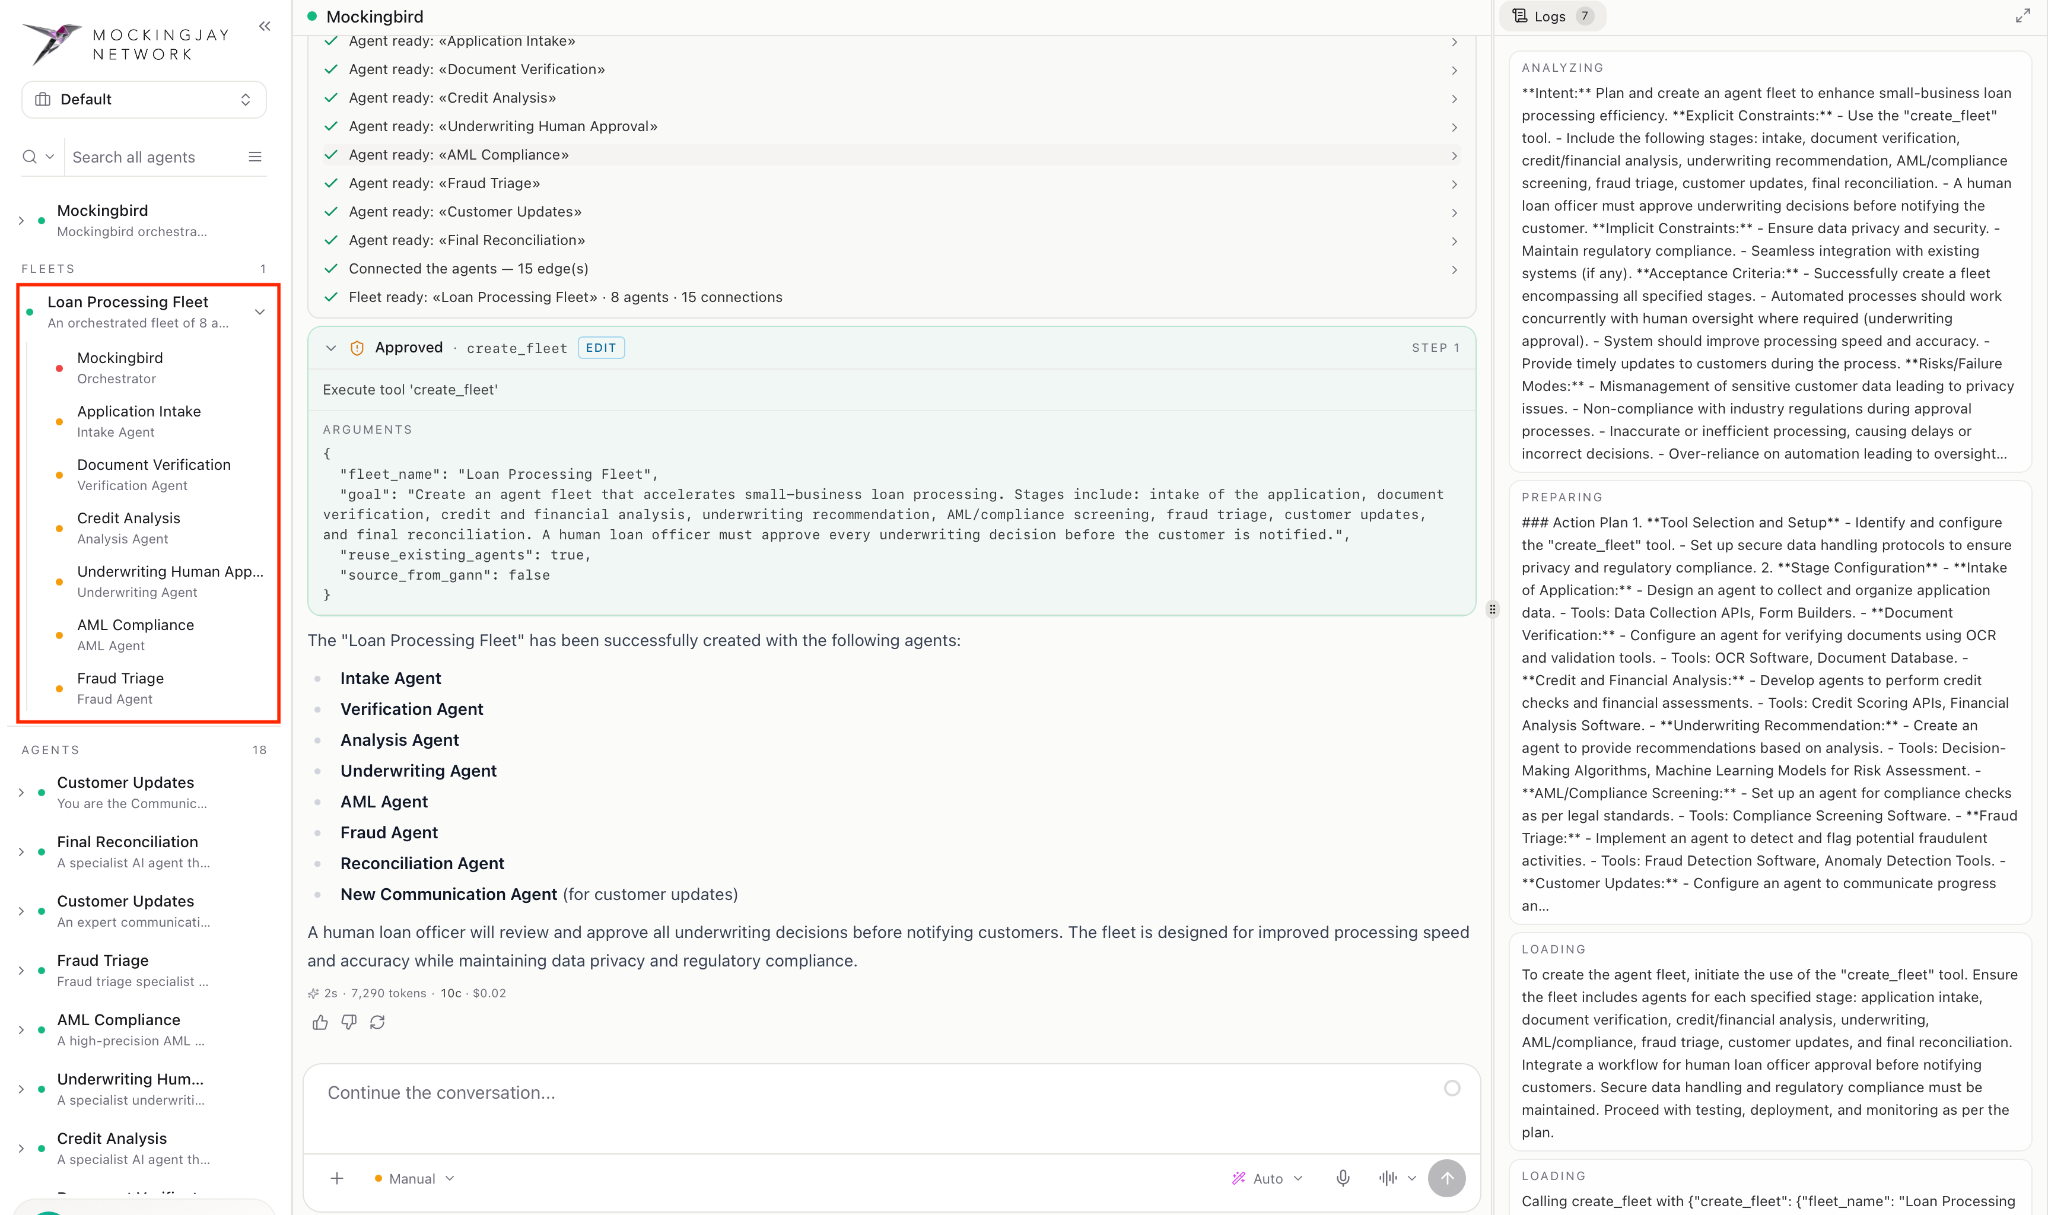
- The fleets are listed in the fleet console.
Apps
Apps are the business tools that you, your team and your agents work in. You build them from ready-made templates, then adjust them and share them as you like.
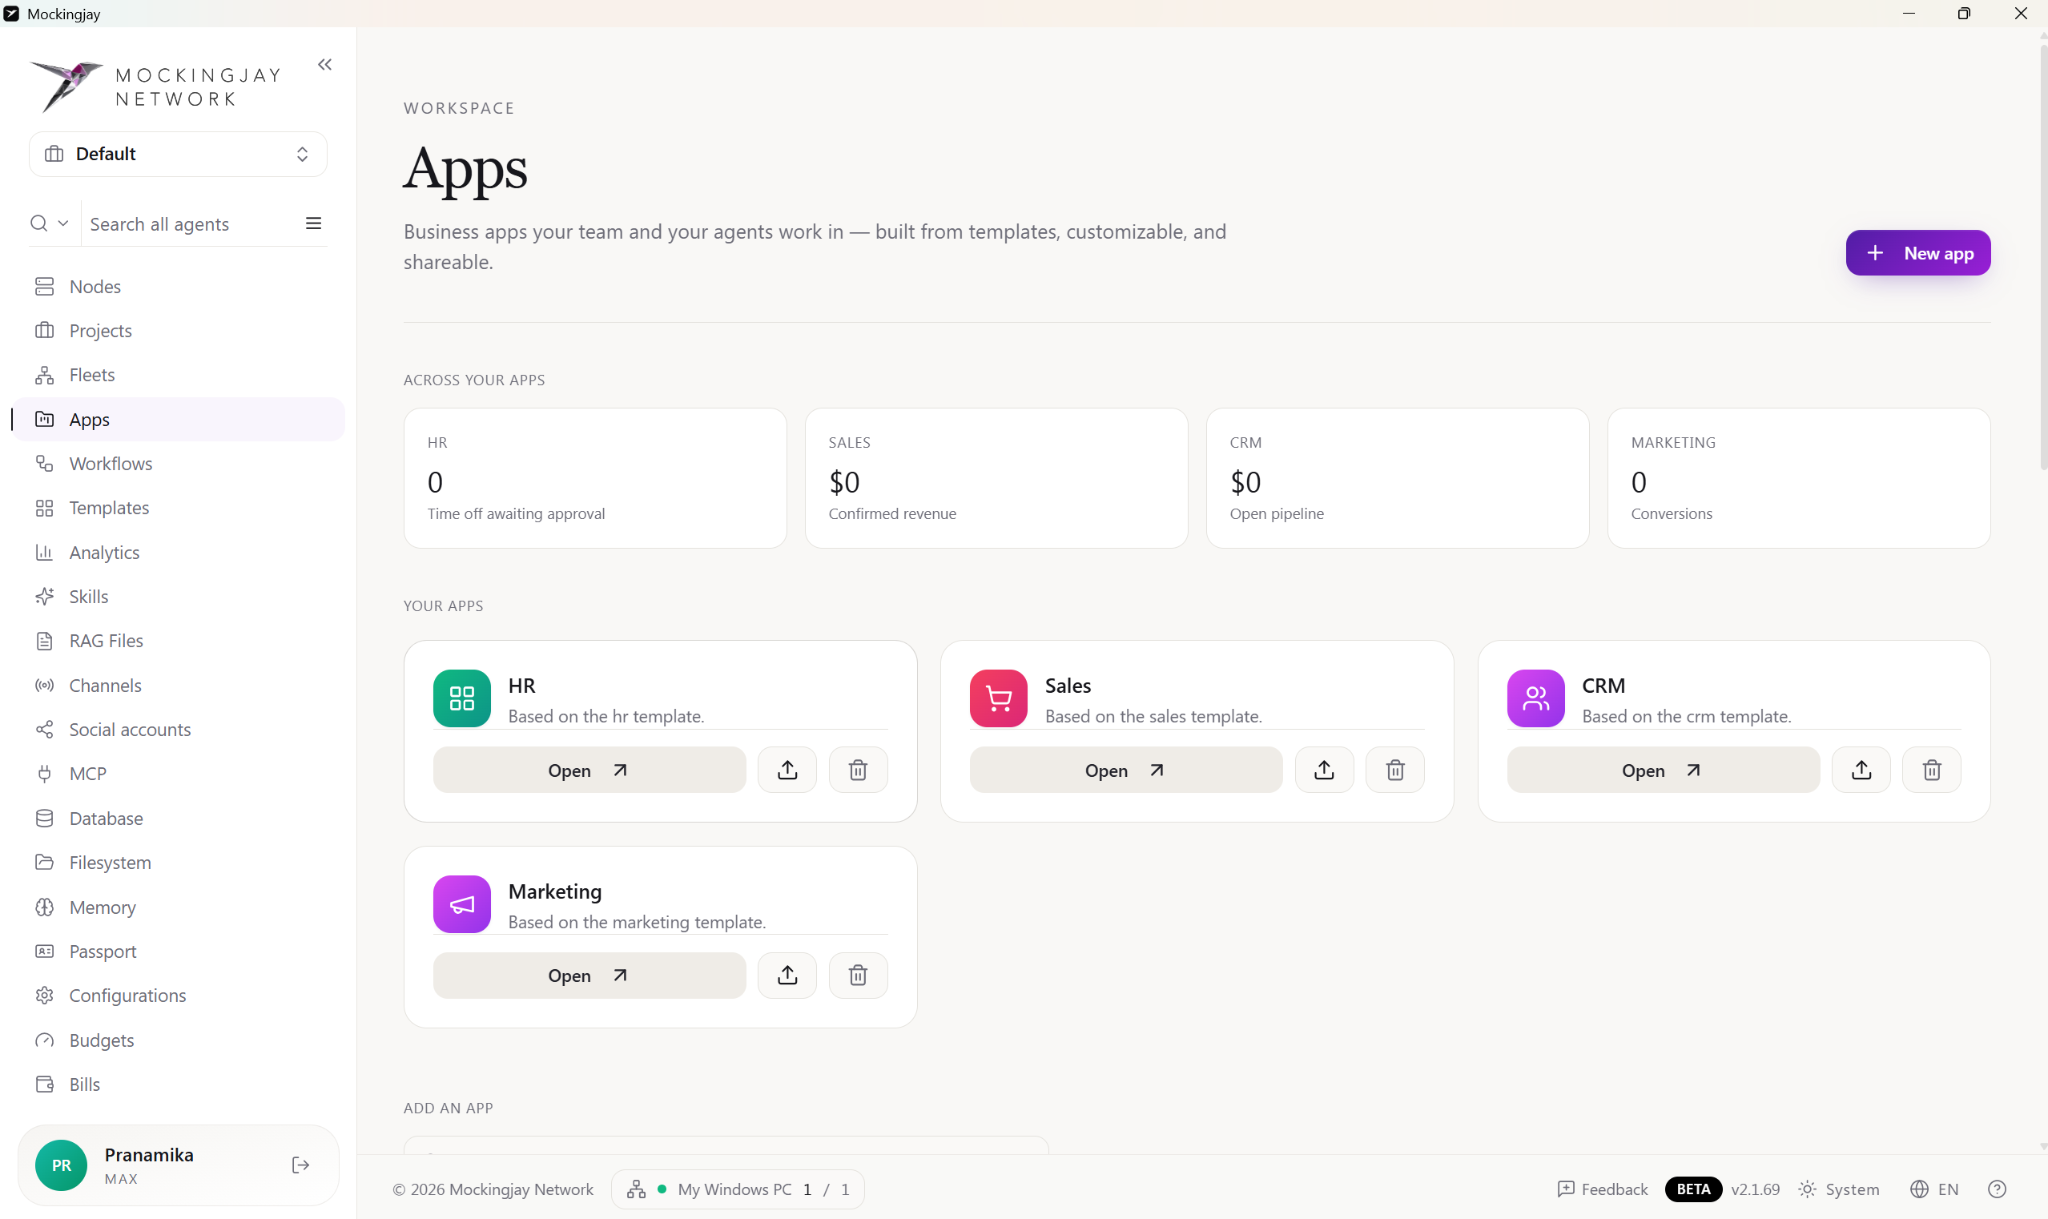
Across your apps
The key numbers from your apps, all in one place. For example, confirmed revenue from Sales, open pipeline from CRM, and conversions from Marketing.
Your apps
Each app you've added has its own card (for example Sales, CRM or Marketing), showing which template it came from. Use the buttons on the card to Open, Export/share or Delete it.
Add an app
Browse more than 15 templates, or search for one. You can filter them by All, finance, operations, people, sales or services. Each card tells you what records, screens and automations the template includes. Click Use template to start with it.
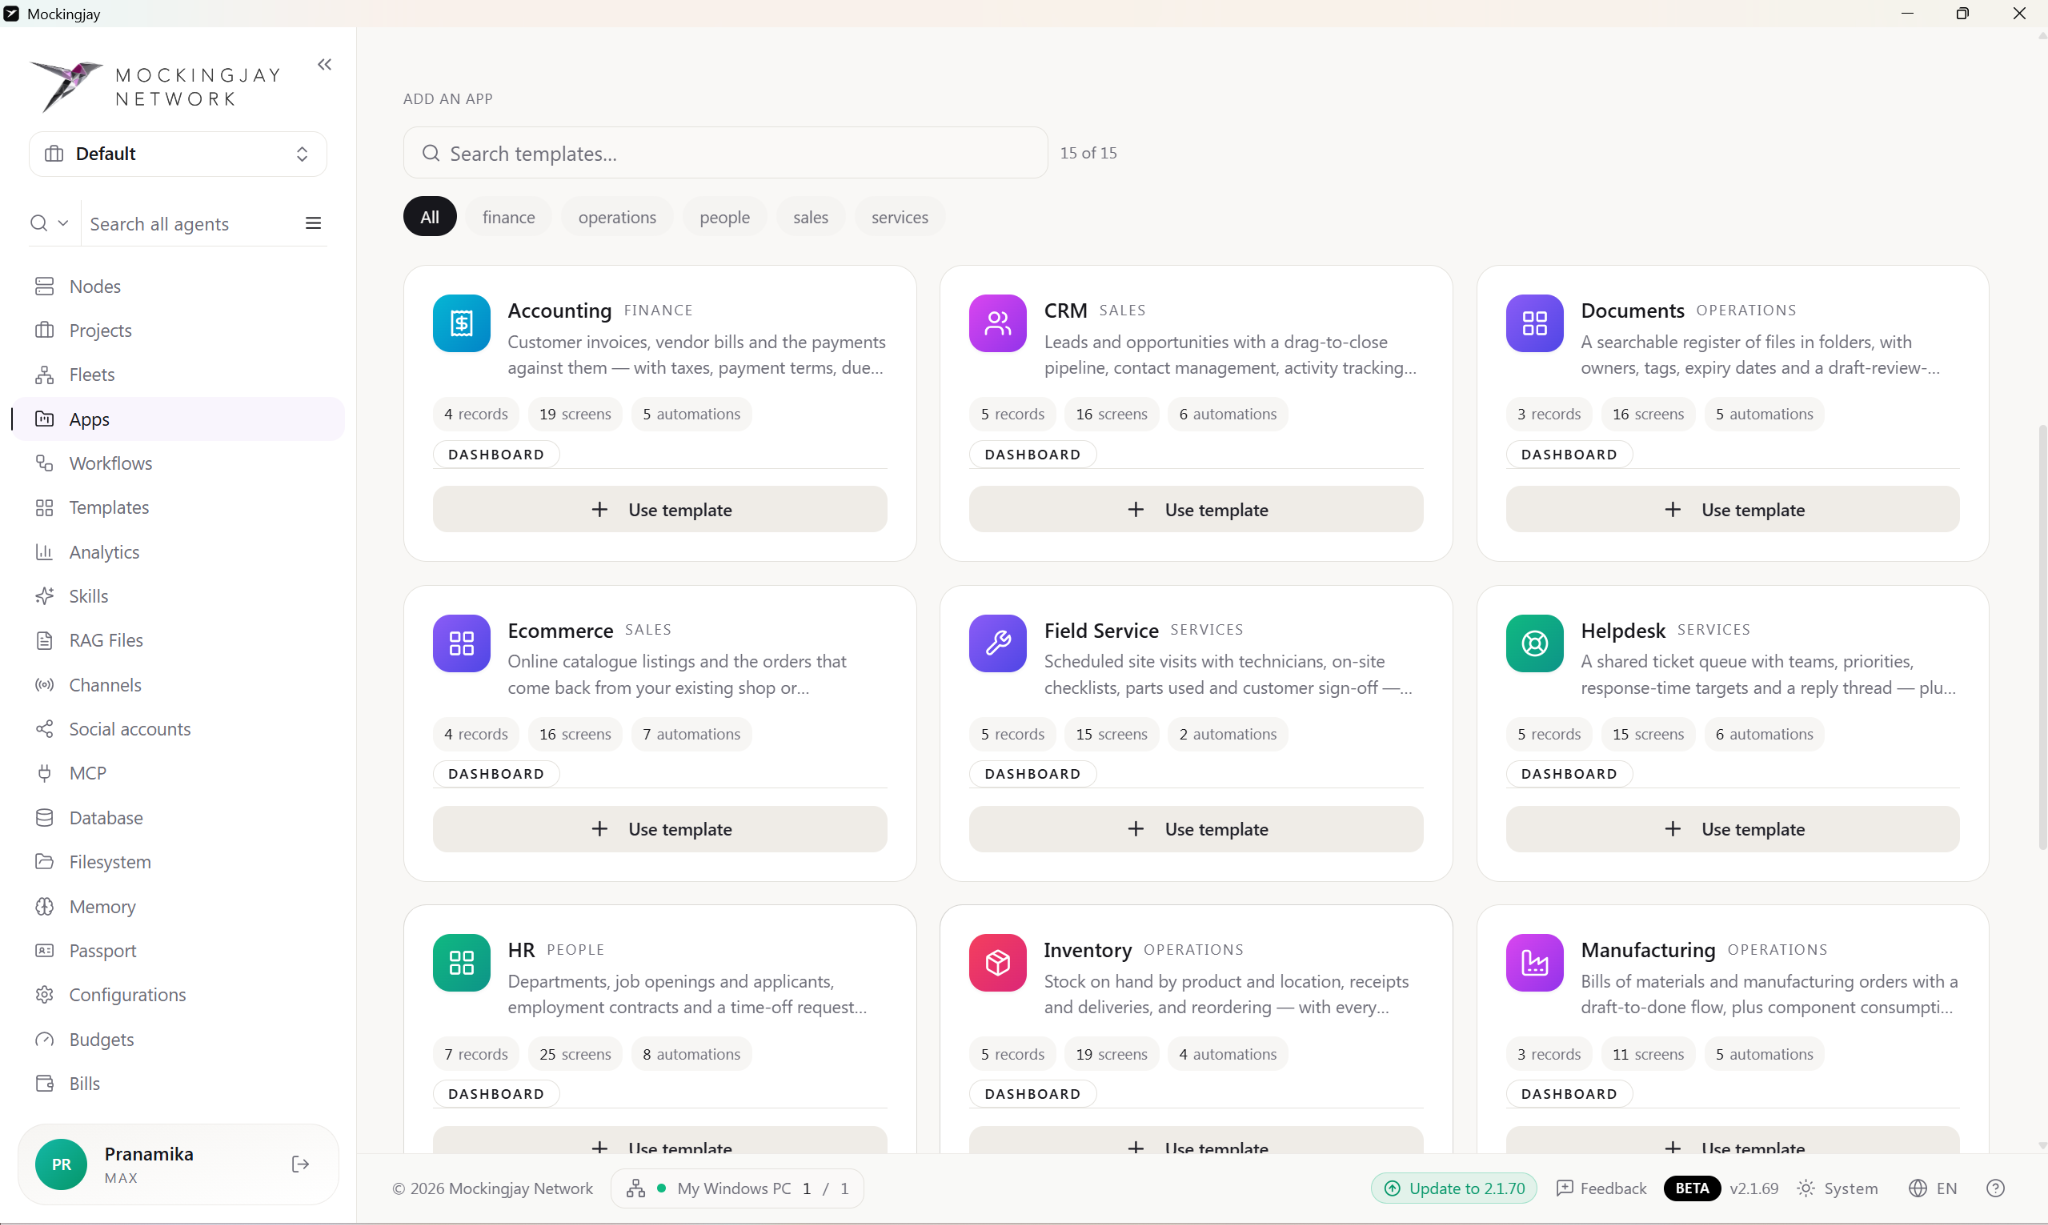
Creating a new app
Click New app or Use template, choose a template and give your app a name. Its records, screens and some starting data are set up for you. The 15 templates are:
- Accounting, CRM, Documents, Ecommerce, Field Service
- Helpdesk, HR, Inventory, Manufacturing, Marketing
- Point of Sale, Project, Purchase, Sales, Timesheets
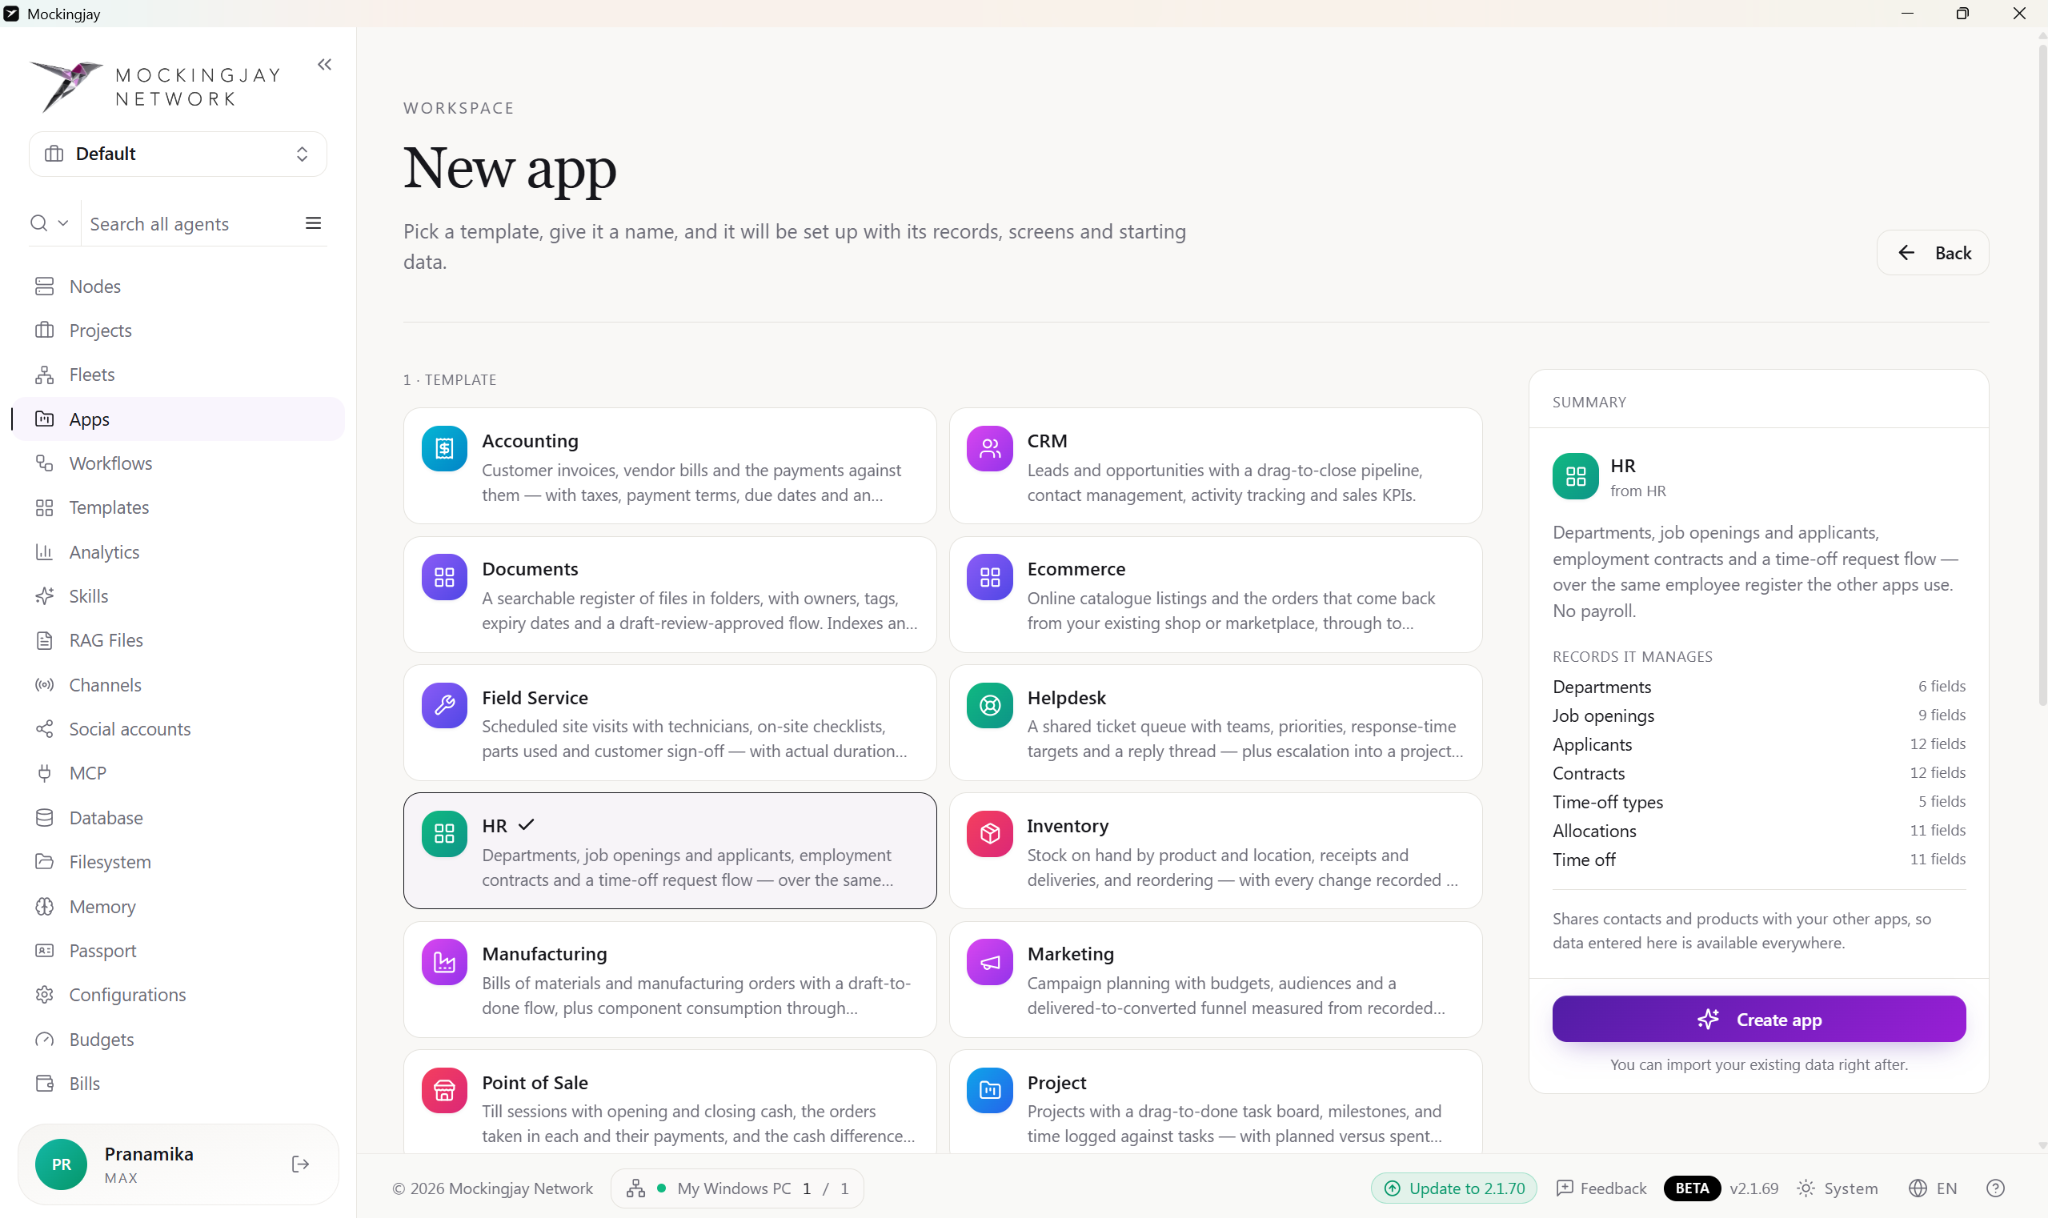
When you click a template, the Summary panel tells you:
- What the app does.
- The records it manages and how many fields each one has. For HR, these are Departments, Job openings, Applicants, Contracts, Time‑off types, Allocations and Time off.
- That contacts and products are shared with your other apps.
Click Create app. You can bring in your existing data straight afterwards. A message tells you when it's done, for example “HR is ready”.
Working inside an app (using HR as an example)
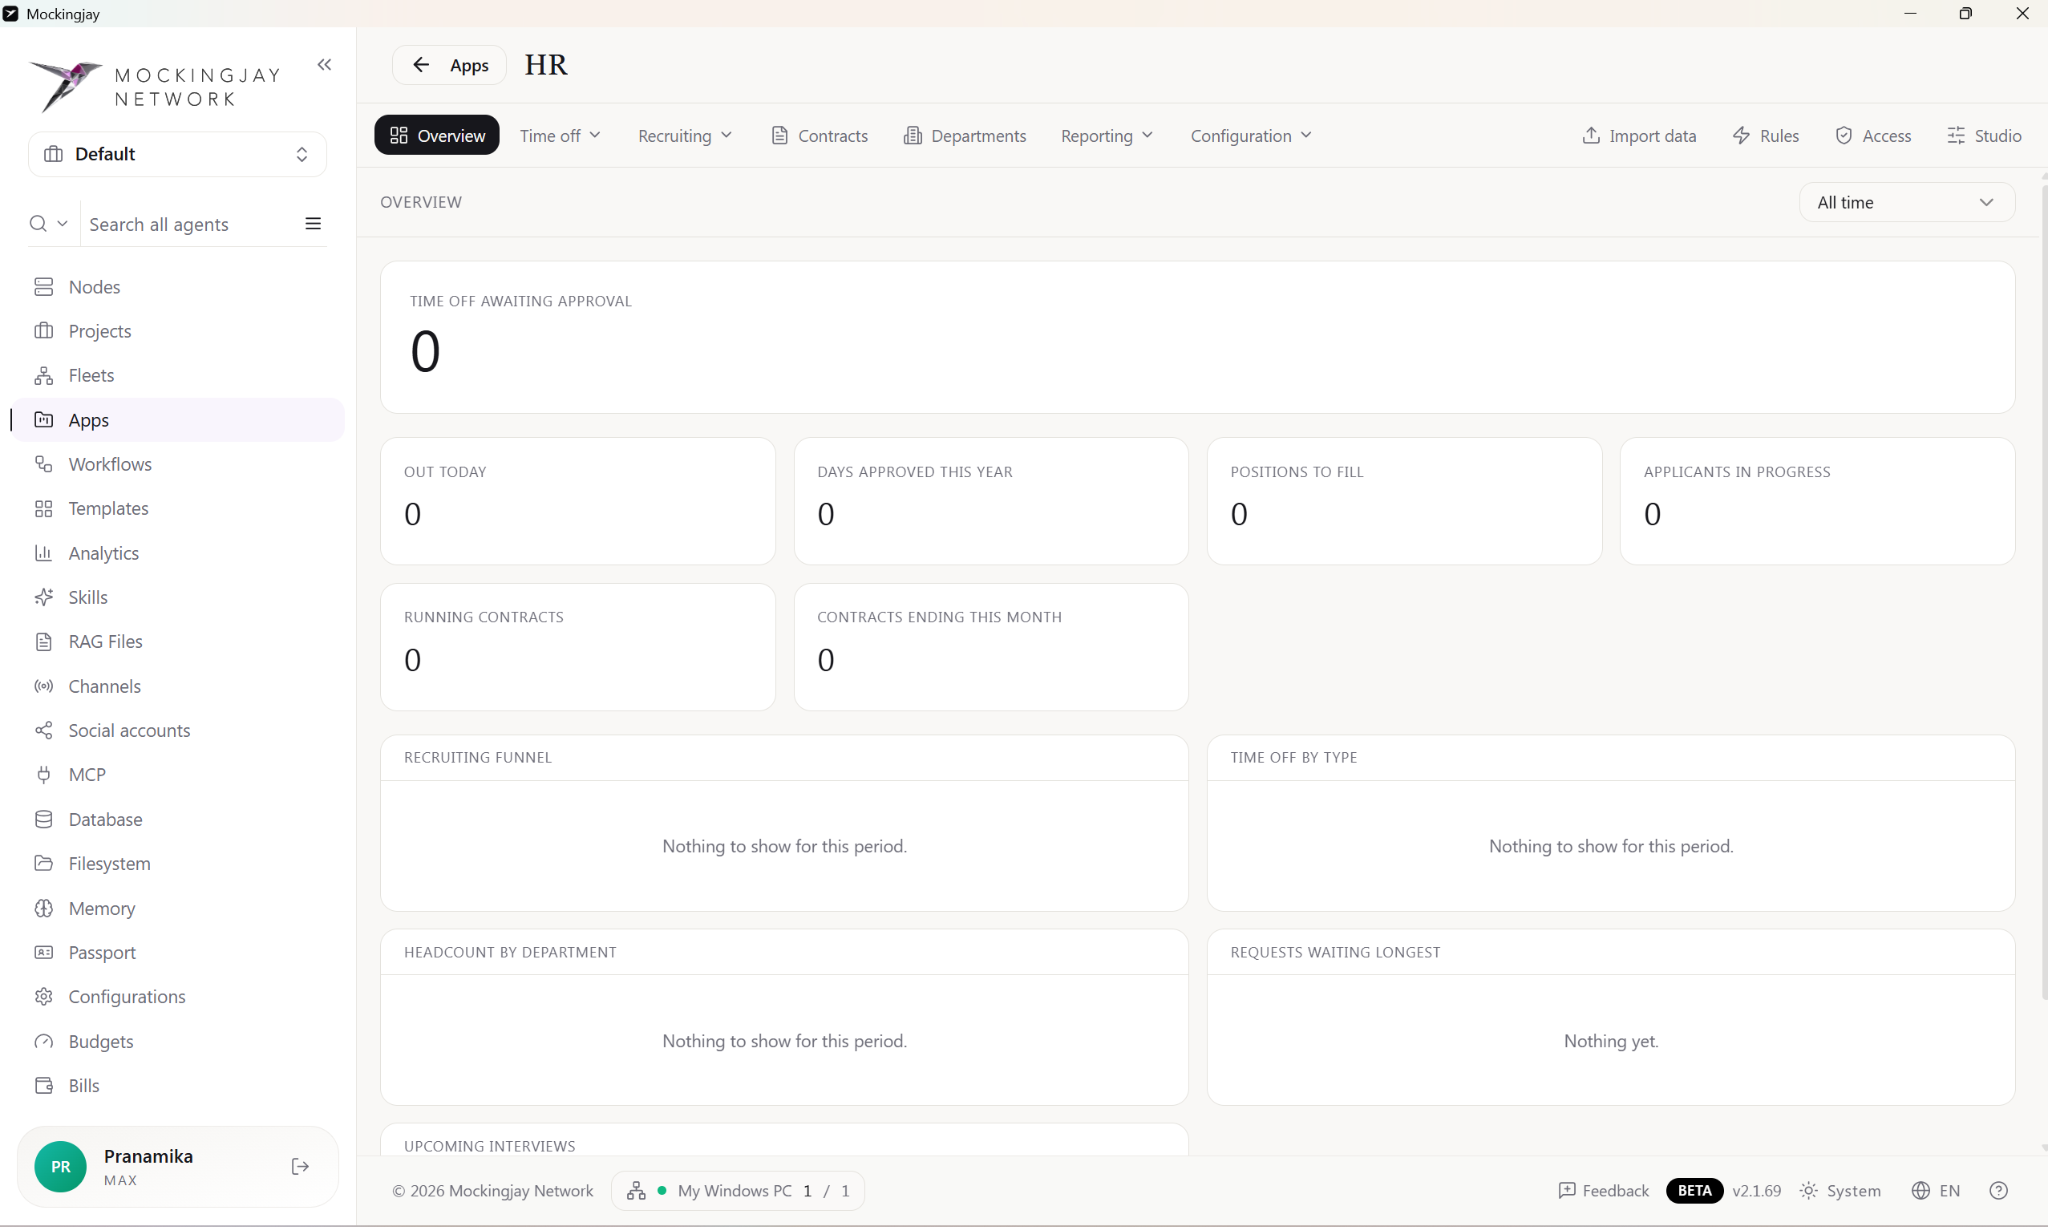
- Tabs across the top: Overview, Time off, Recruiting, Contracts, Departments, Reporting and Configuration.
- Other options: Import data, Rules, Access and Studio.
- Overview: a dashboard you can filter by date (it starts on All time). It shows:
- Time off awaiting approval, Out today, Days approved this year.
- Positions to fill, Applicants in progress.
- Running contracts, Contracts ending this month.
- Recruiting funnel, Time off by type, Headcount by department.
- Requests waiting longest, Upcoming interviews.
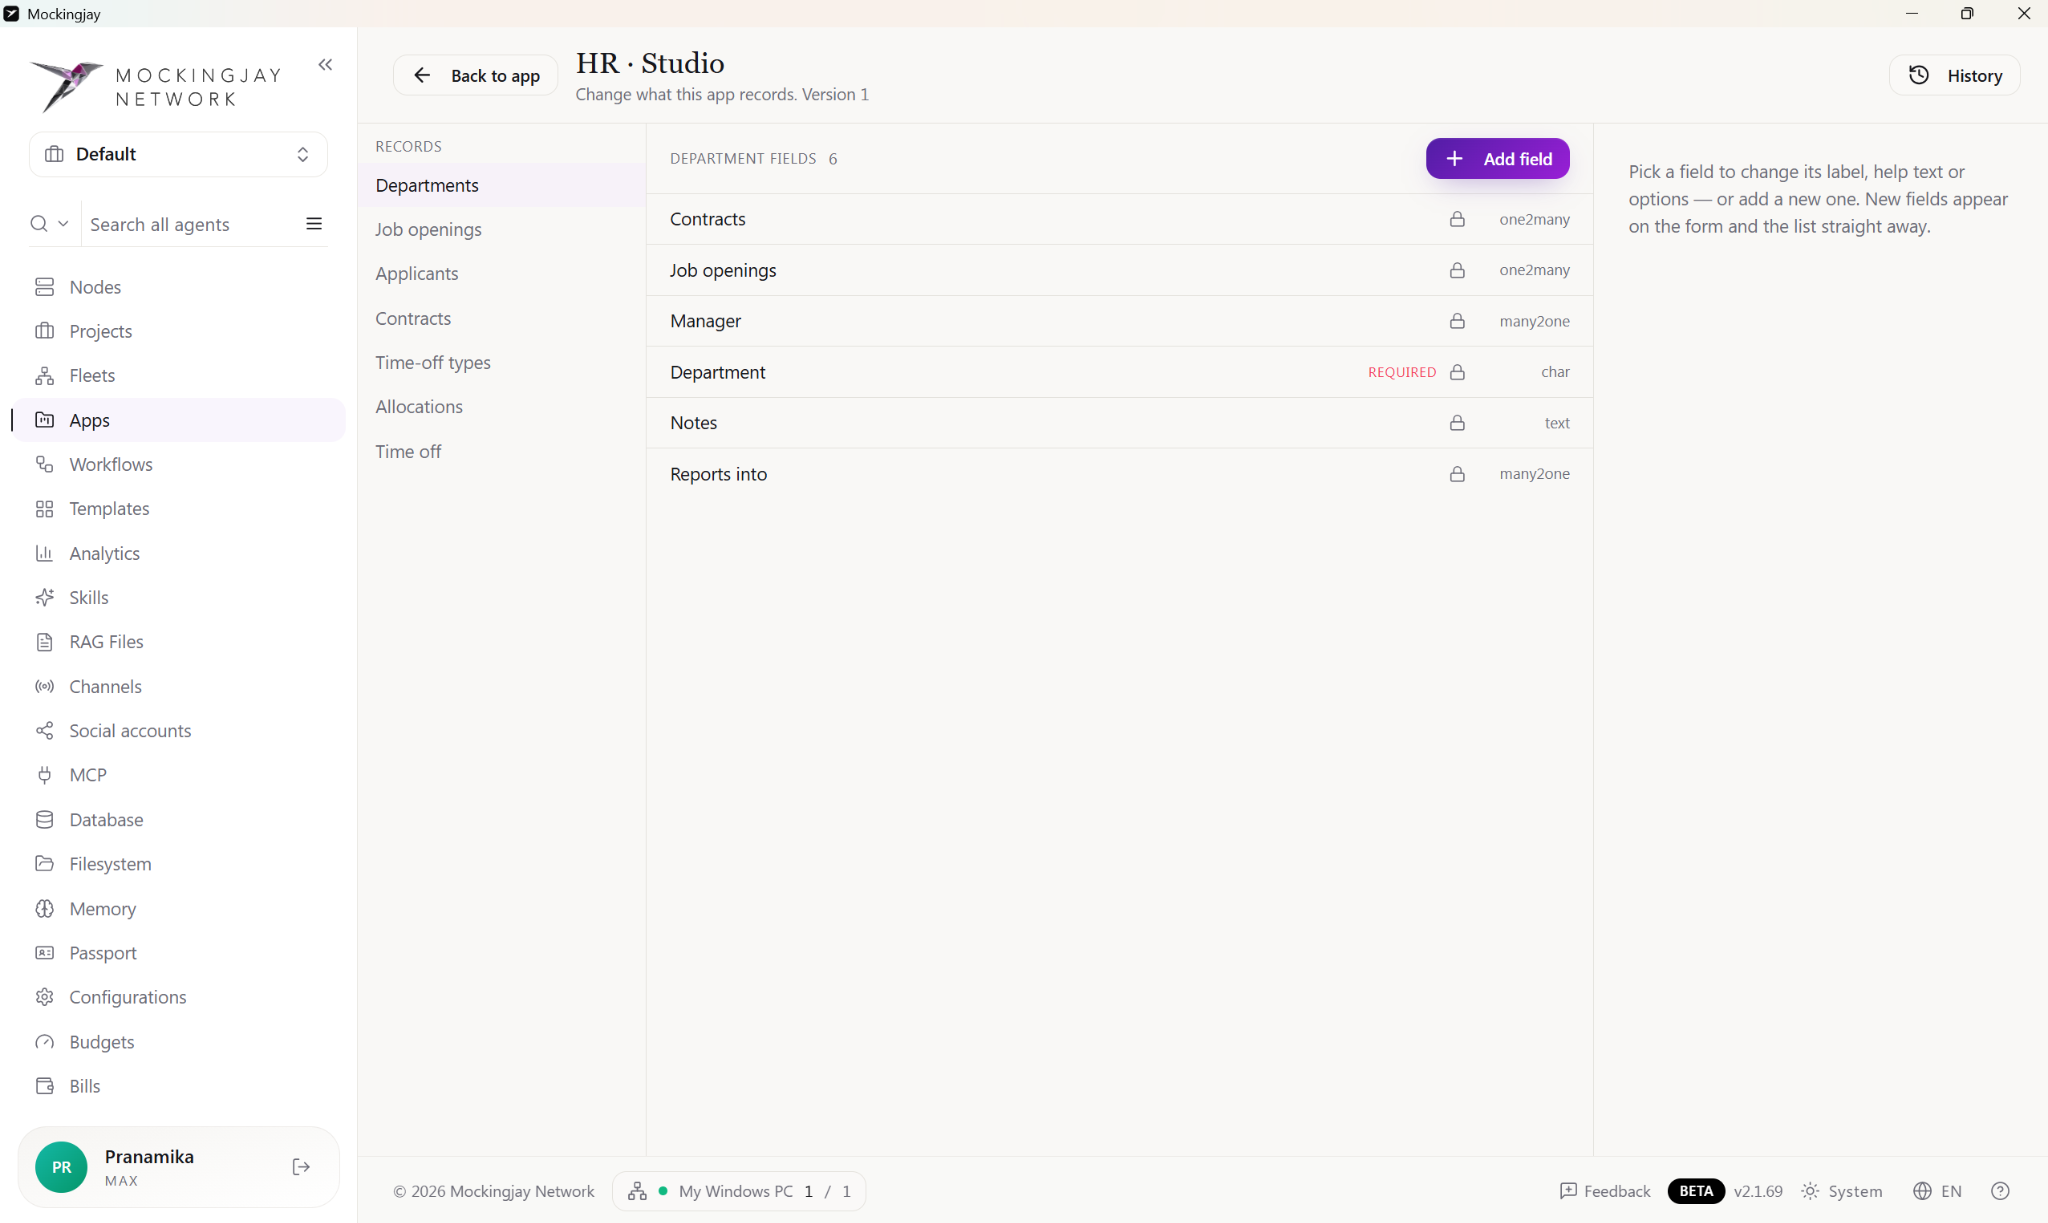
- Record lists (such as Departments) are tables. You can search them, save your own views, group the rows, move between pages, and add a record with + New.
- Studio is where you change what the app keeps track of. The record types are listed on the left and their fields on the right. Each field shows what kind of data it holds (one2many, many2one, char or text), and required fields are marked. Use Add field to create a new one, or History to see earlier versions.
Workflows
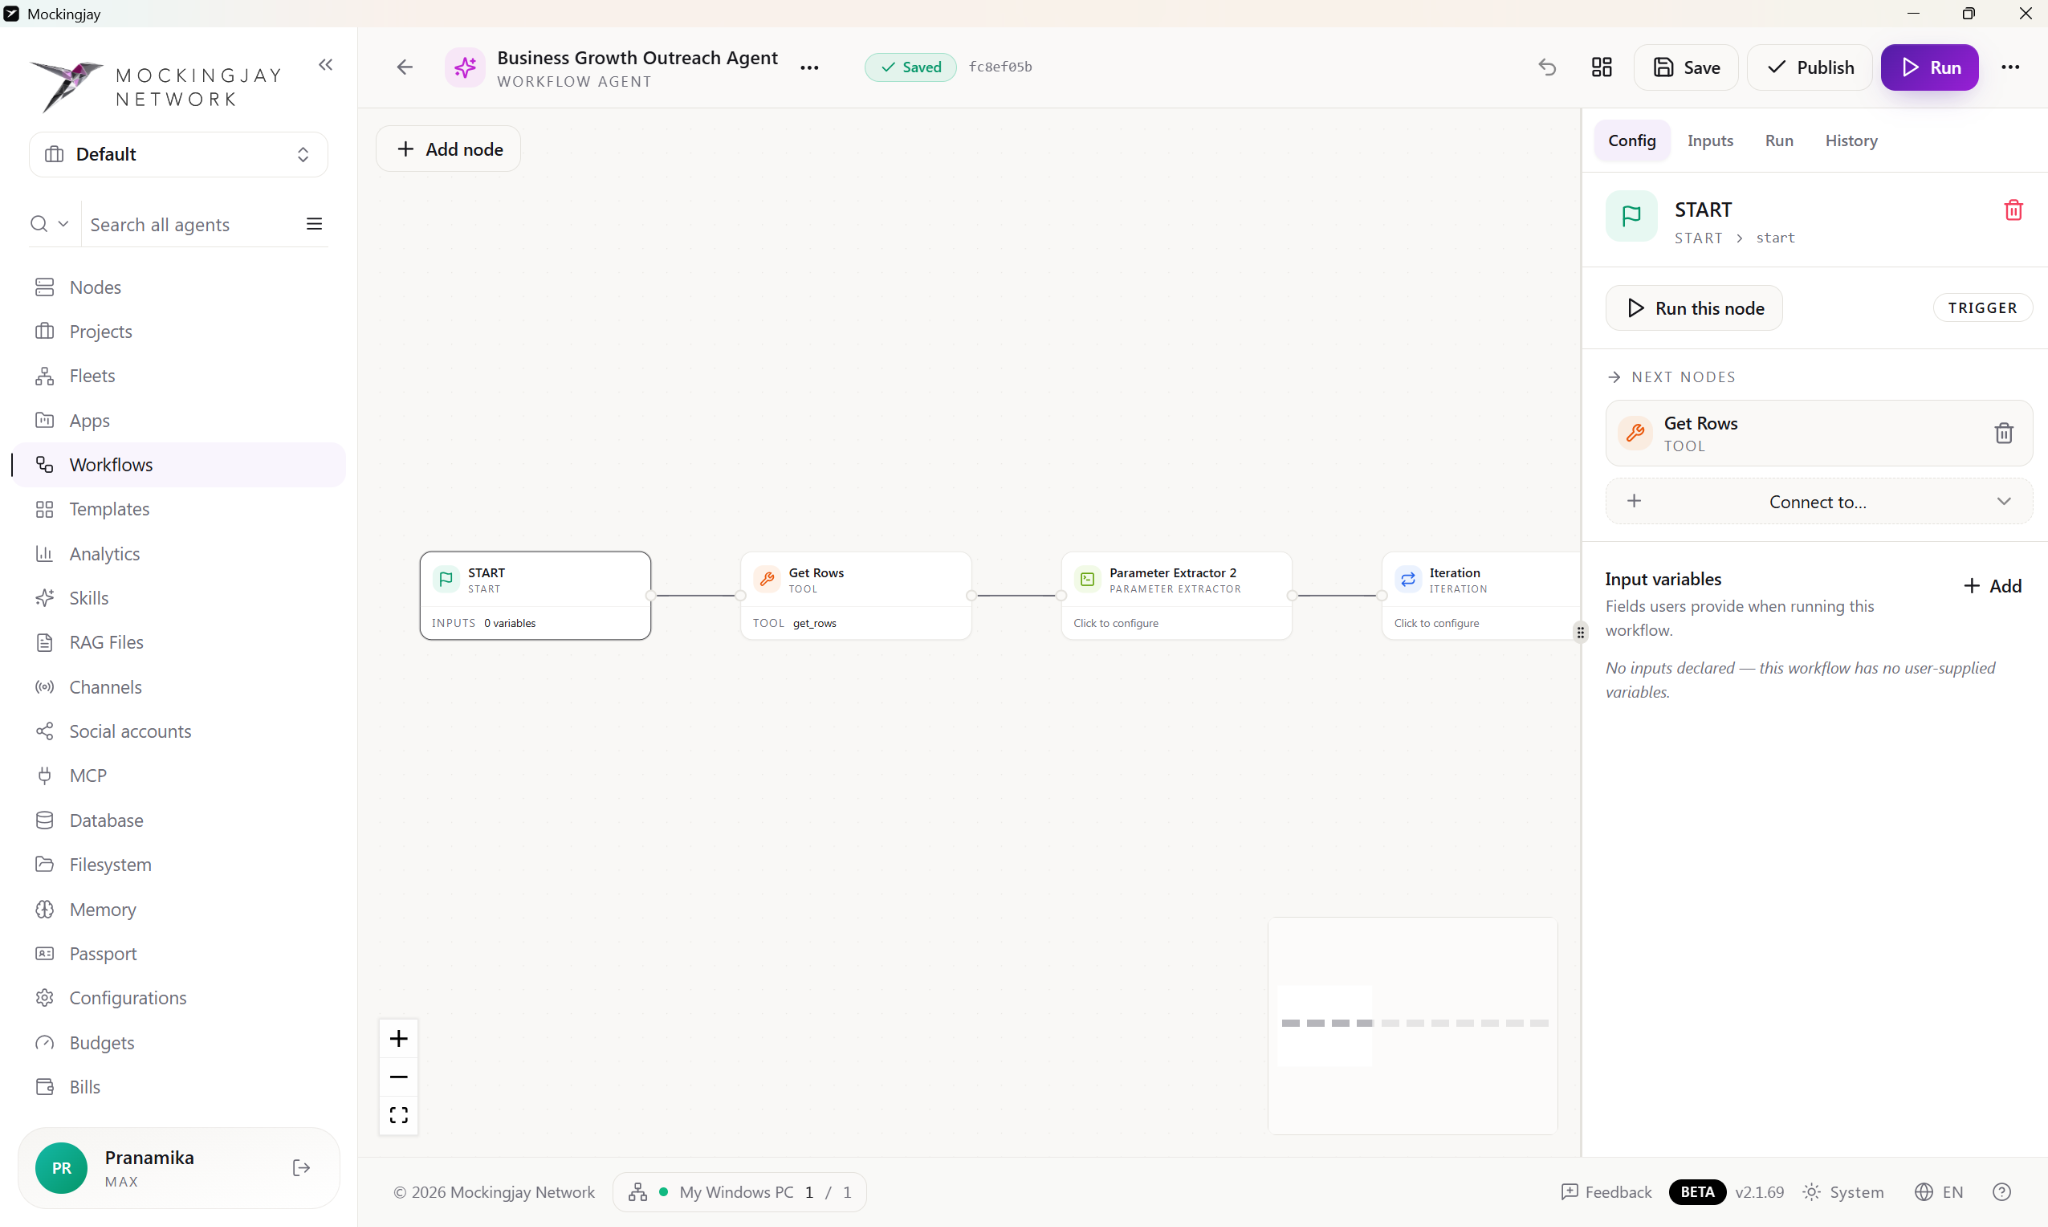
Opening Workflows takes you to the workflow editor, where you build a process visually, one step at a time. The example shown here is “Business Growth Outreach Agent”, a workflow agent.
Canvas
Each step is a box, and the boxes are joined from left to right. Use Add nodes to add a step. The zoom controls and the small map in the corner help you move around.
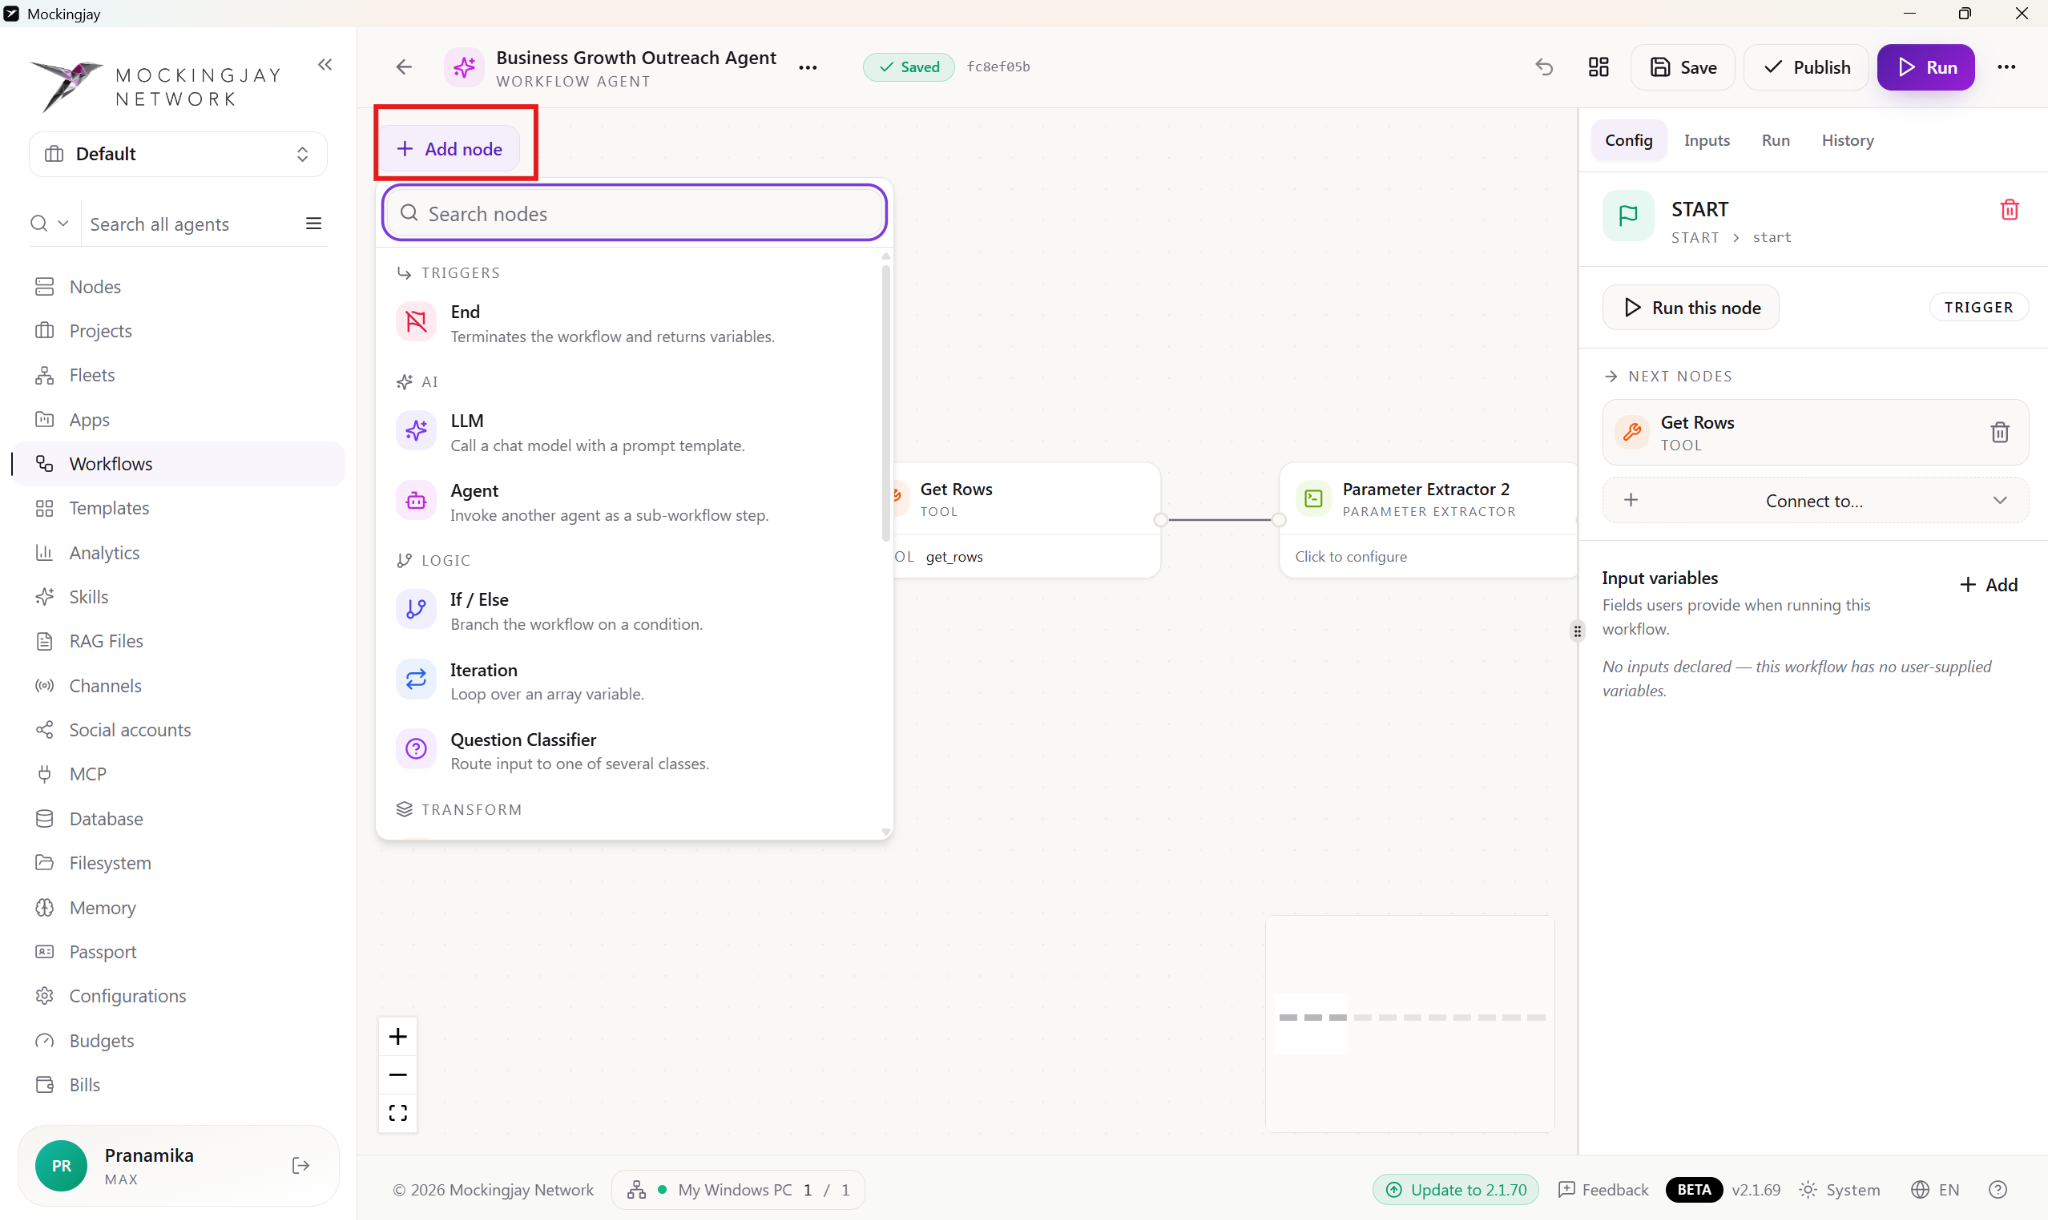
Top bar
- Whether your changes are Saved, and a Draft label until you publish.
- Undo, tidy layout, Save, Publish and Run.
- A “more” menu with Convert to tool and Export DSL (JSON).
Right panel
This has four tabs: Config, Inputs, Run and History. When you click a step (for example START, which kicks the workflow off), the panel shows:
- Run this node, to test just that step.
- Next nodes: the step that comes next, for example “Get Rows” (a tool). Use Connect to… to link another one.
- Input variables: the details someone has to fill in when they run the workflow. Click + Add to add one.
Templates (Agent templates library)
A library of ready-made agents. Pick one, change what you need, and put it to work in seconds.
Featured
For example EmailAutomation (Chat agent · Email), AI Analyser Agent (Chat agent · Analytics) and Business Growth Outreach Agent (Workflow · Sales). Each one has a Use template button and a Preview button.
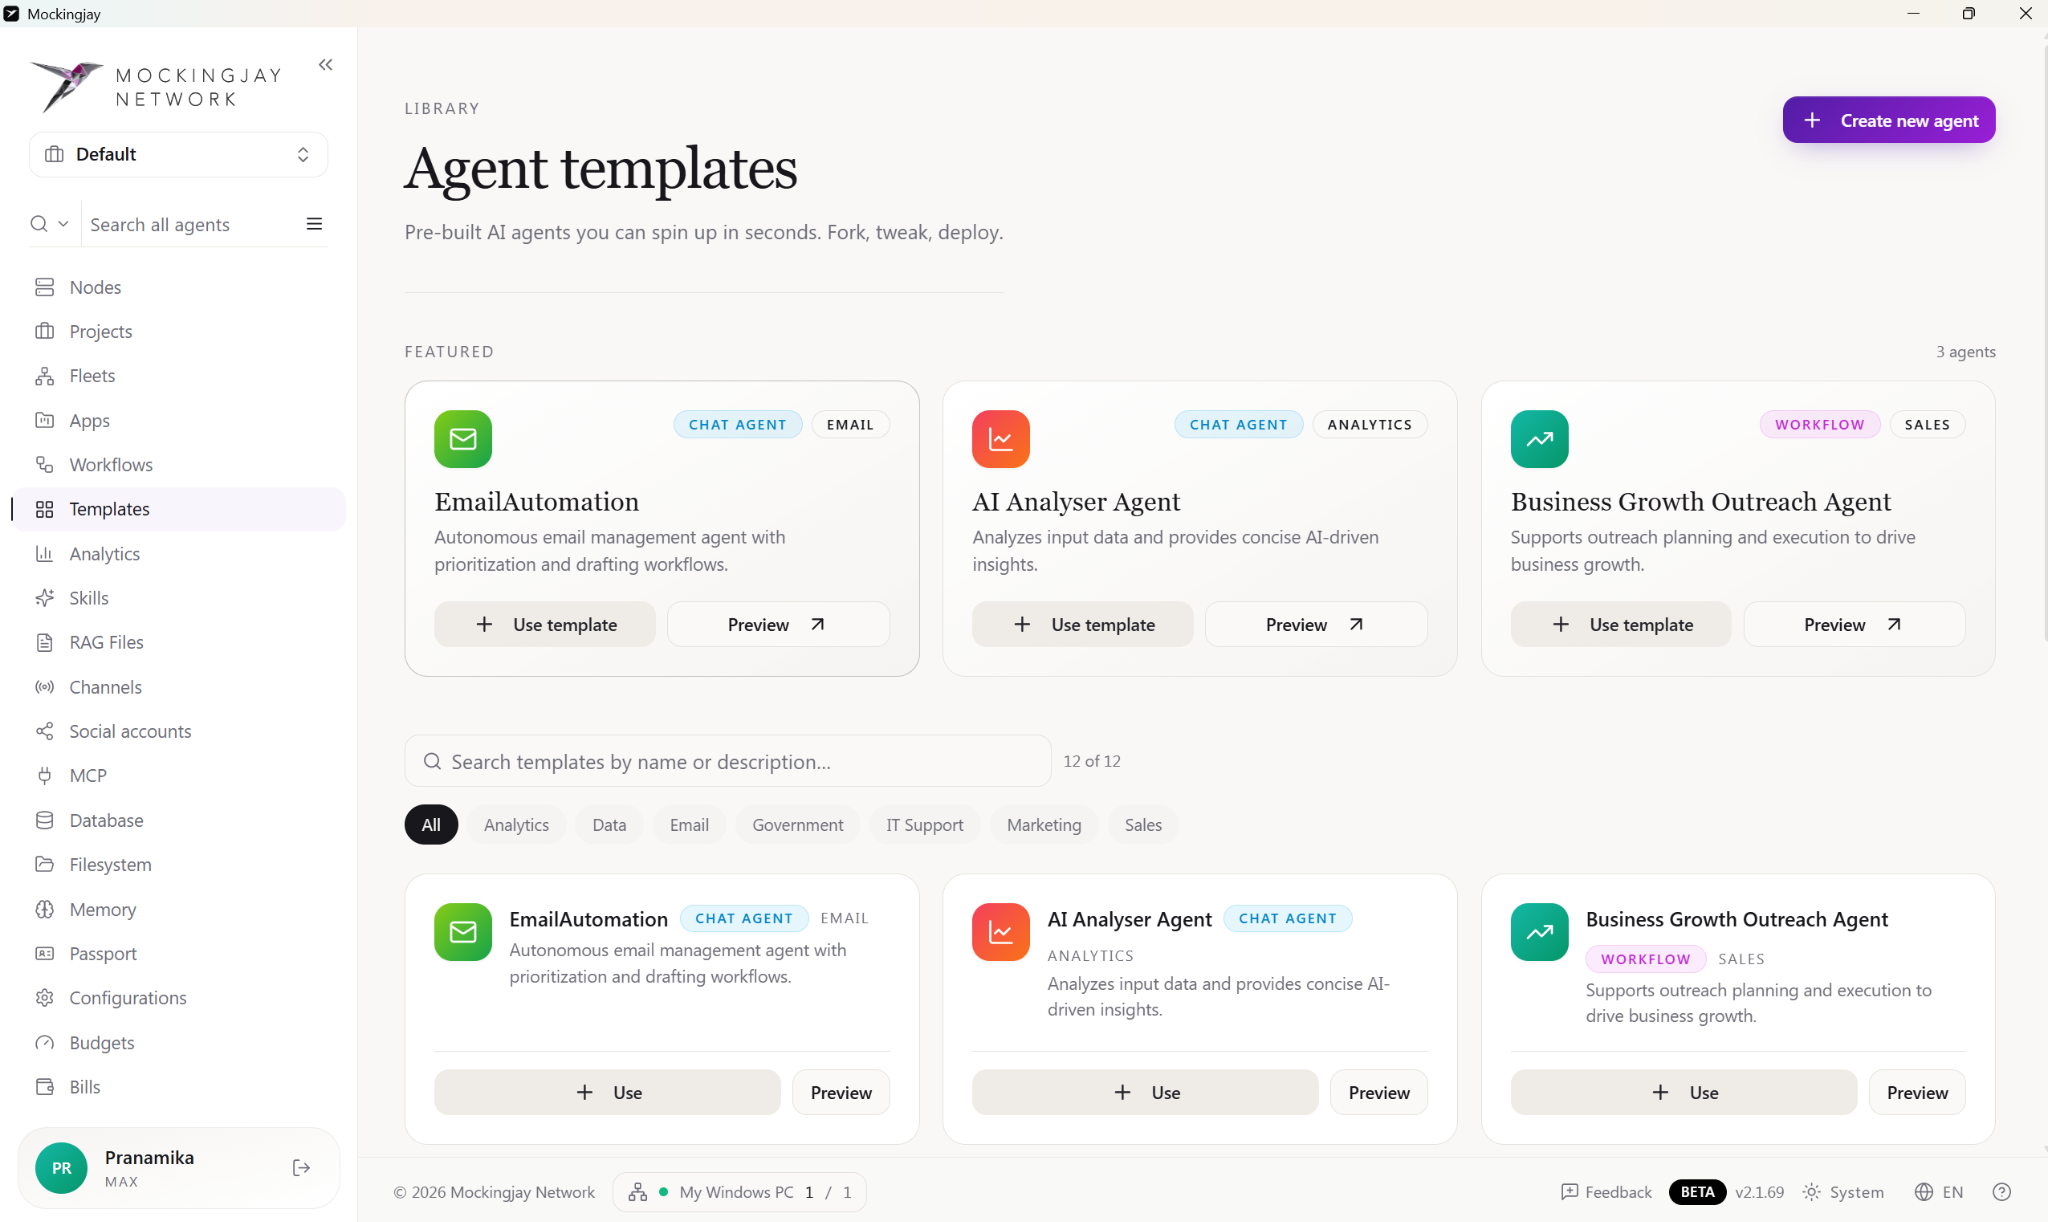
Template list
Search by name or description, or filter by All, Analytics, Data, Email, Government, IT Support, Marketing or Sales.
Note: External connections, such as tools and communication channels, must be configured separately for each agent template.
Examples include:
- Digitize Citizen Services, Email Triage Bot, Functional Logs Analyzer Agent
- IT Support HelpDesk Assistant, LinkedIn Campaign Automation, Media Campaign Automation
- Real Time Data Analytics Agent, Read and Reply Email
Creating a new agent
It takes five steps:
- Type. Choose one of these:
- Chat agent: an agent people talk to. It runs on a system prompt, a model and tools, and people reach it through chat, the API or a channel.
- Workflow agent: a set of connected steps that run in the same order every time. This is best for multi-step jobs that need to be predictable.
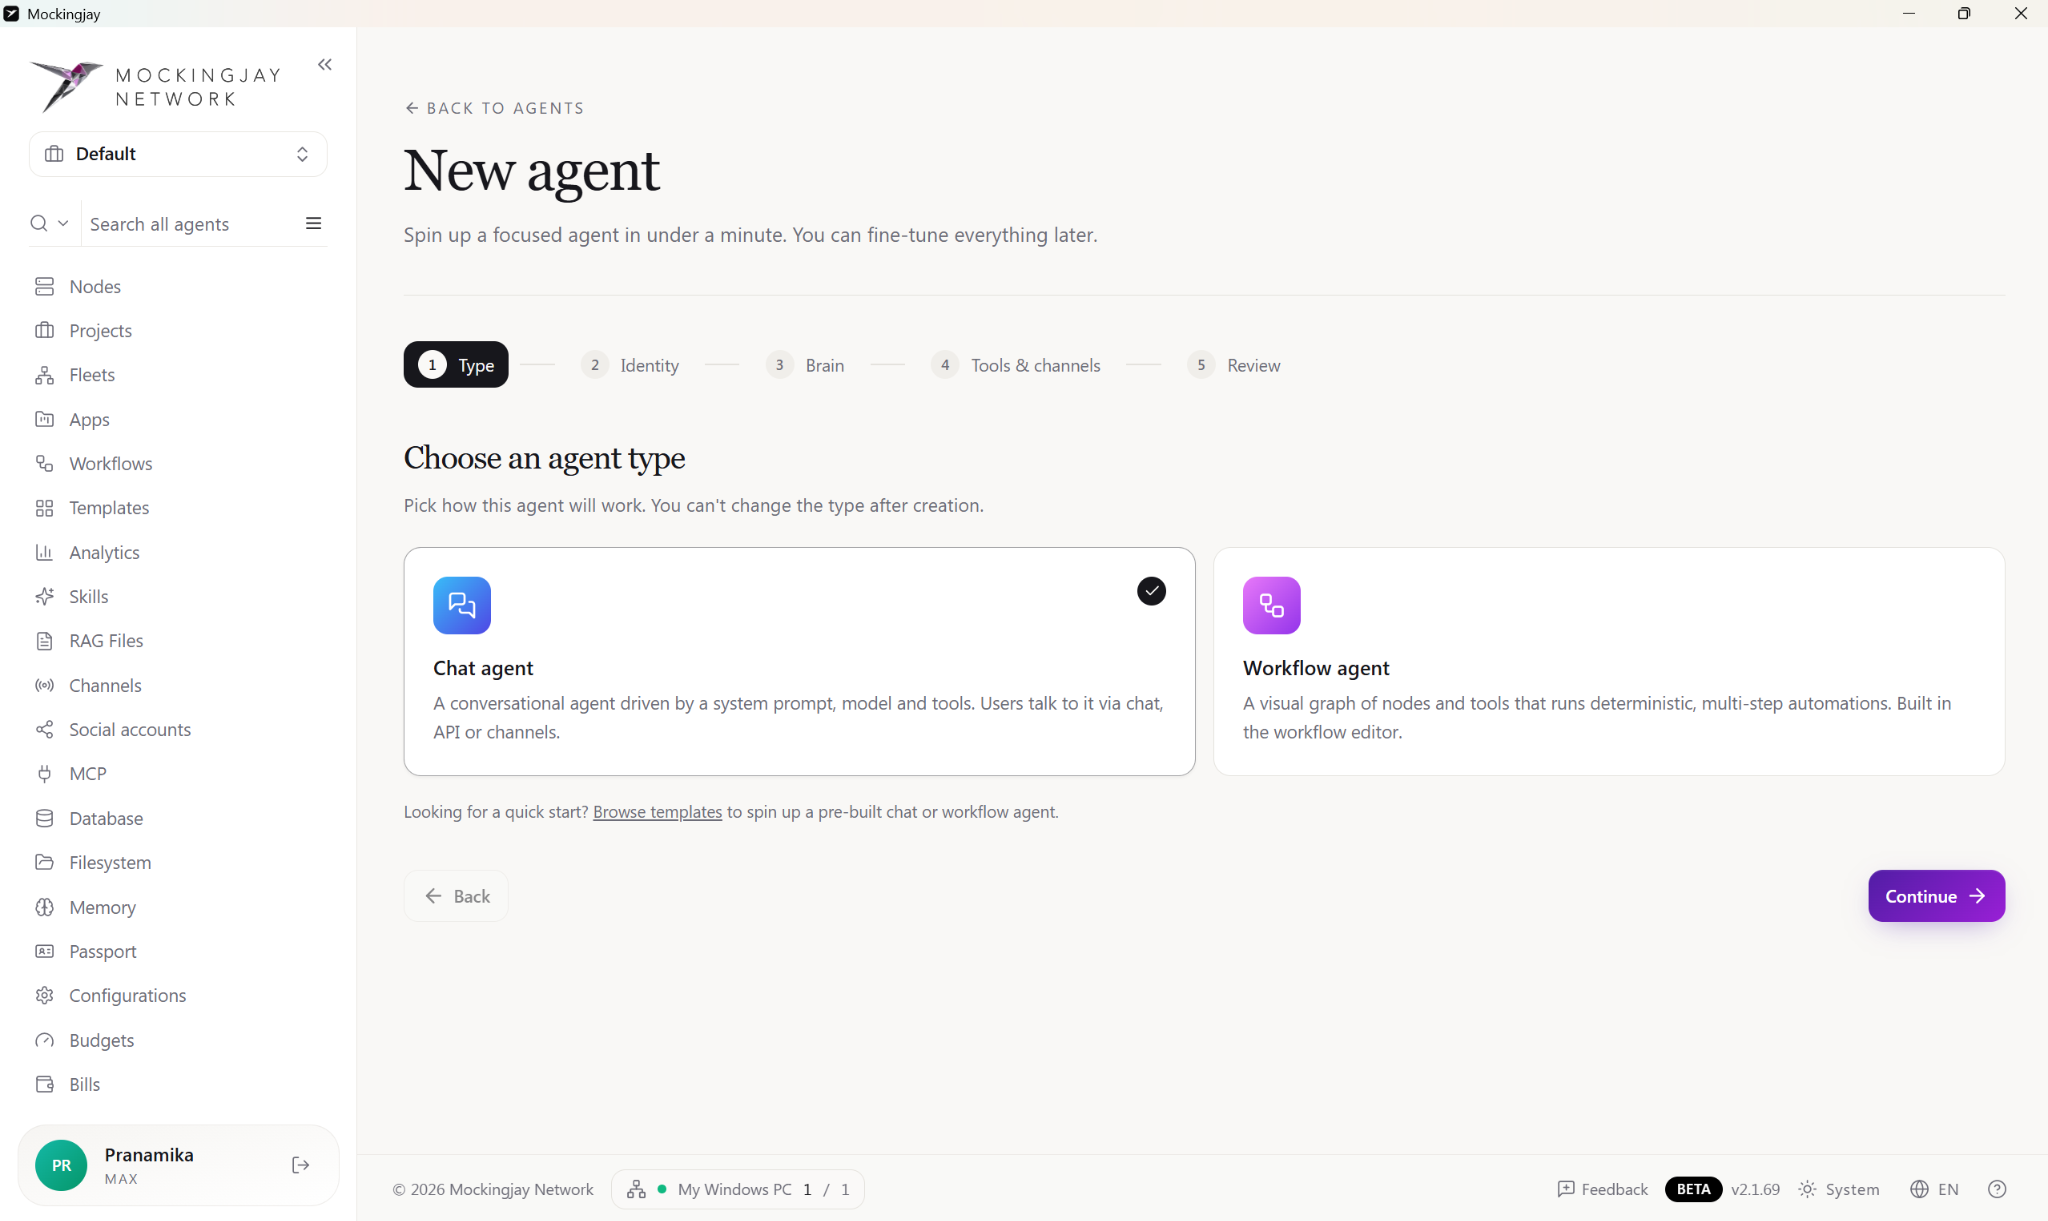
- You can't change the type later. If you'd rather start from something ready-made, use the “Browse templates” link.
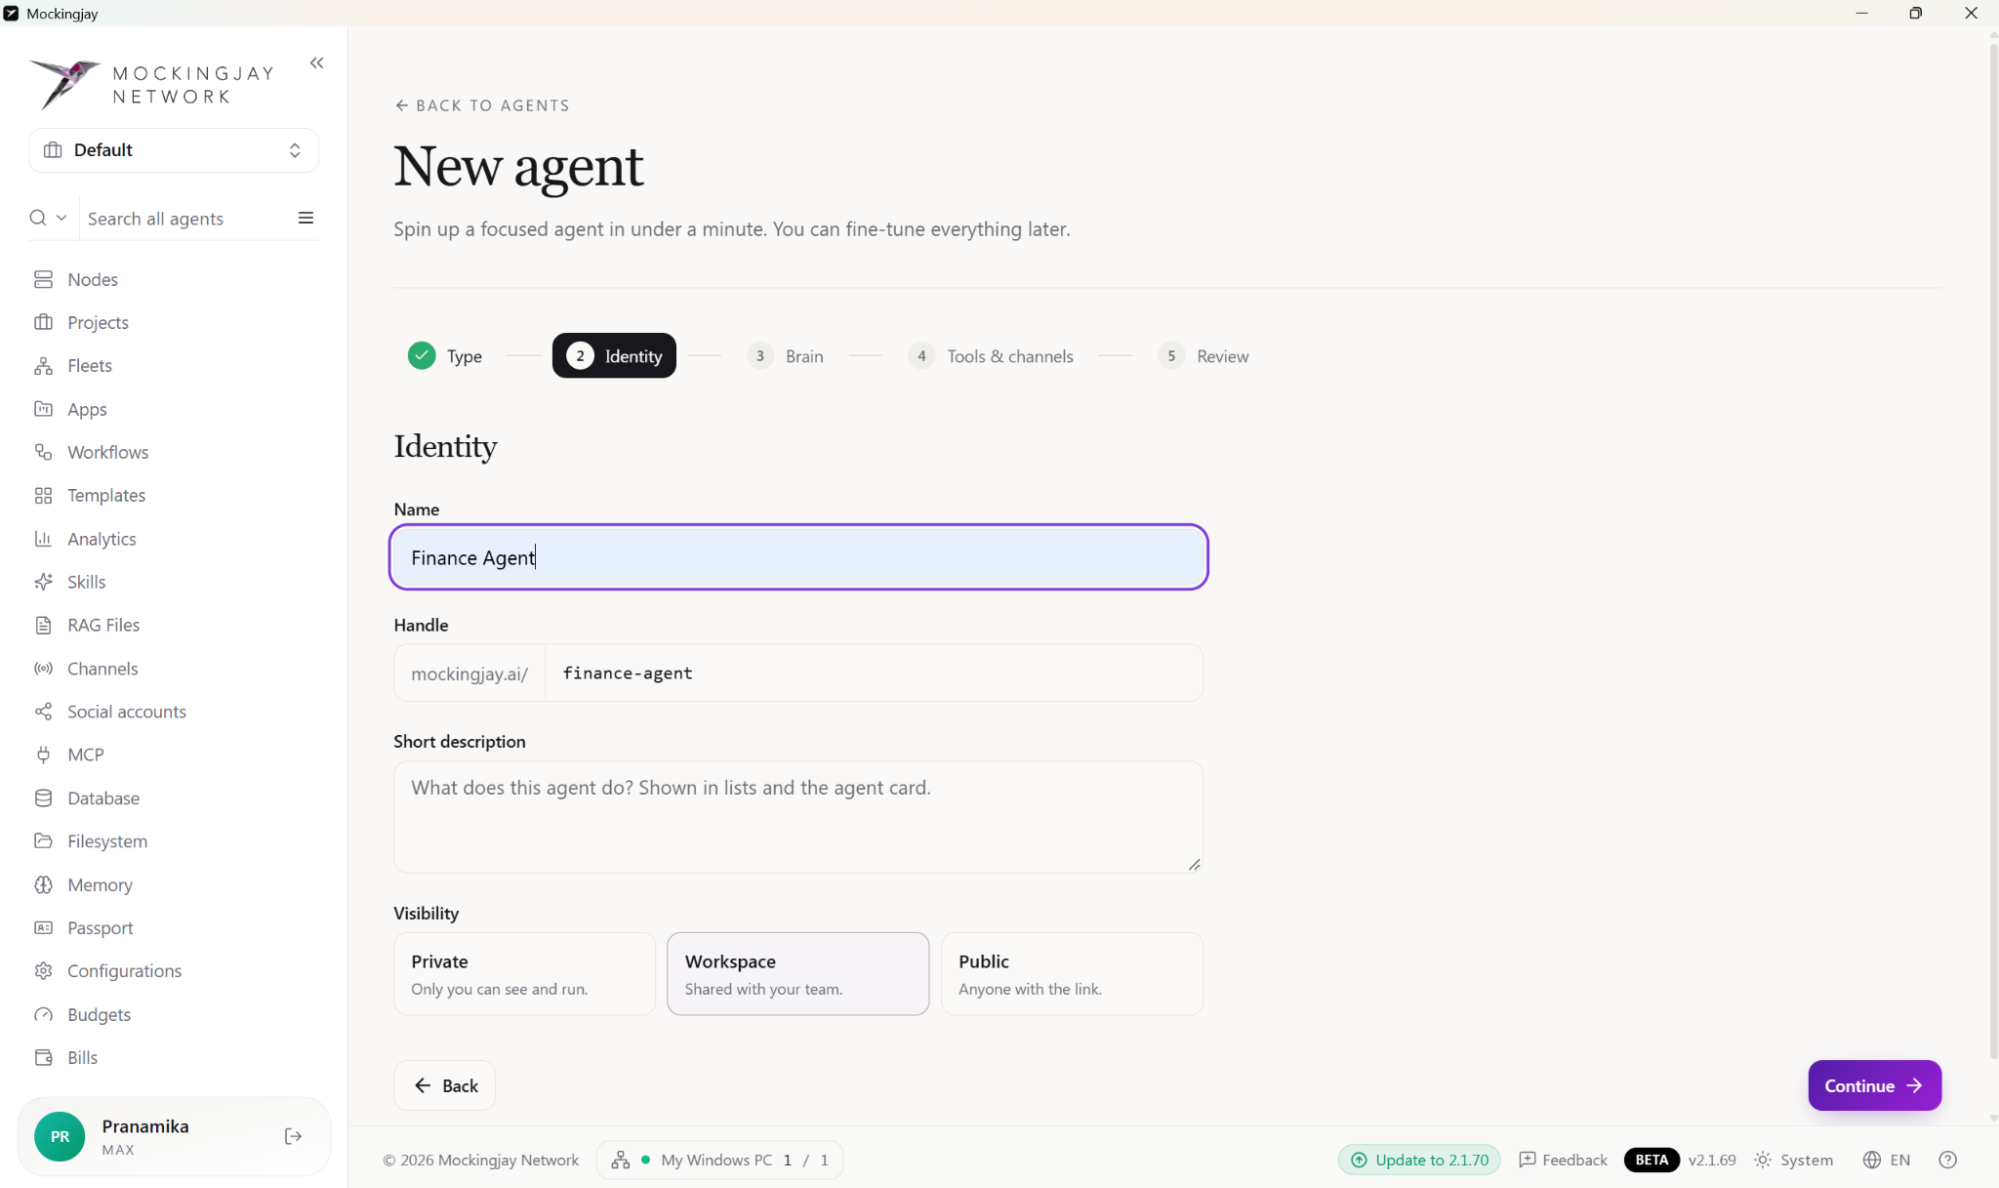
- Identity.
- Name.
- Handle (mockingjay.ai/…).
- A short description.
- Who can see it: Private (just you), Workspace (your team) or Public (anyone with the link).
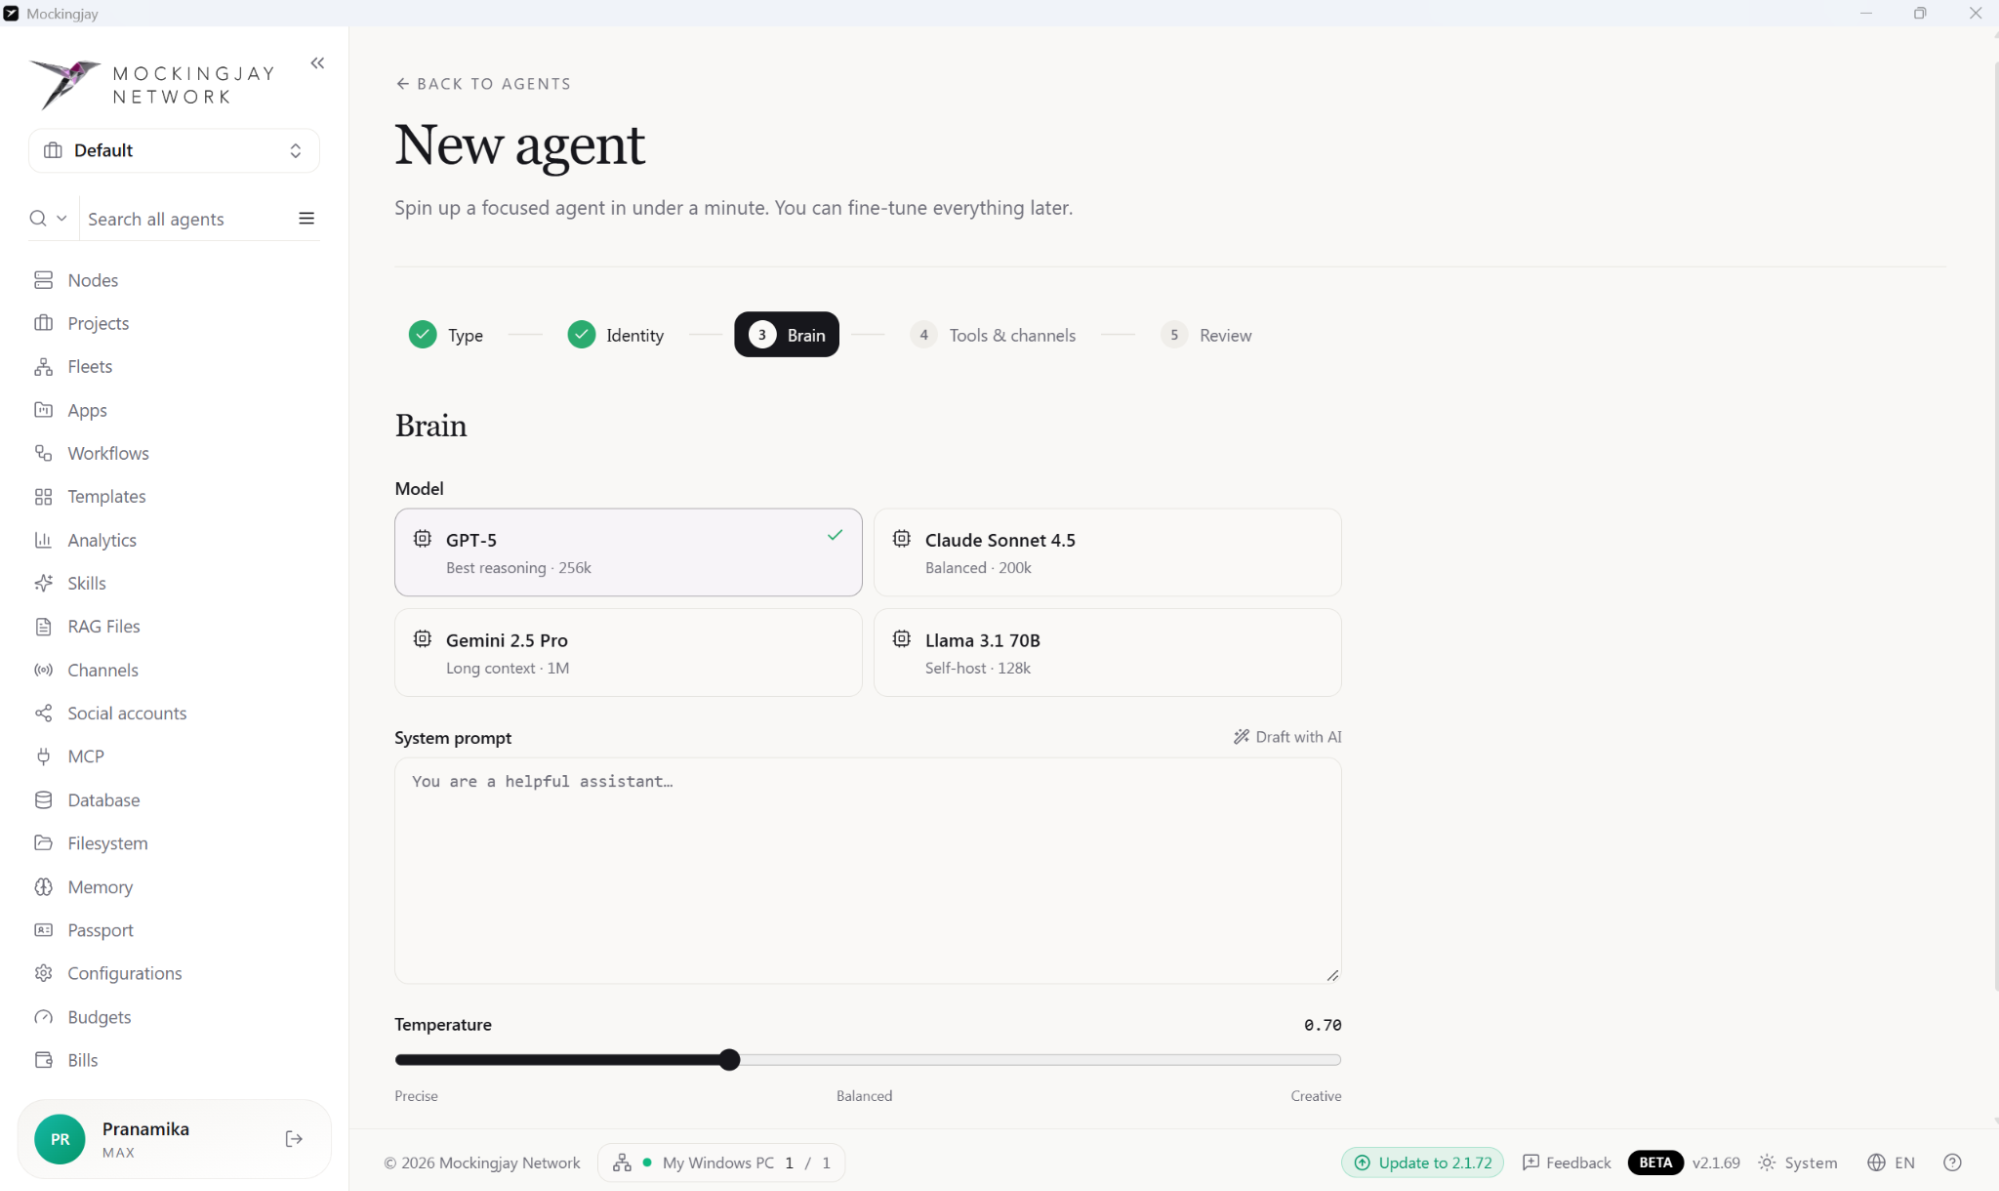
- Brain.
- Model: GPT‑5, Claude Sonnet 4.5, Gemini 2.5 Pro or Llama 3.1 70B (self-hosted). Each one shows how much text it can handle at once.
- System prompt: the instructions the agent follows. Draft with AI can write a first version for you.
- Temperature: a slider that goes from Precise, through Balanced, to Creative (for example 0.70). Lower values give steadier answers; higher values give more varied ones.
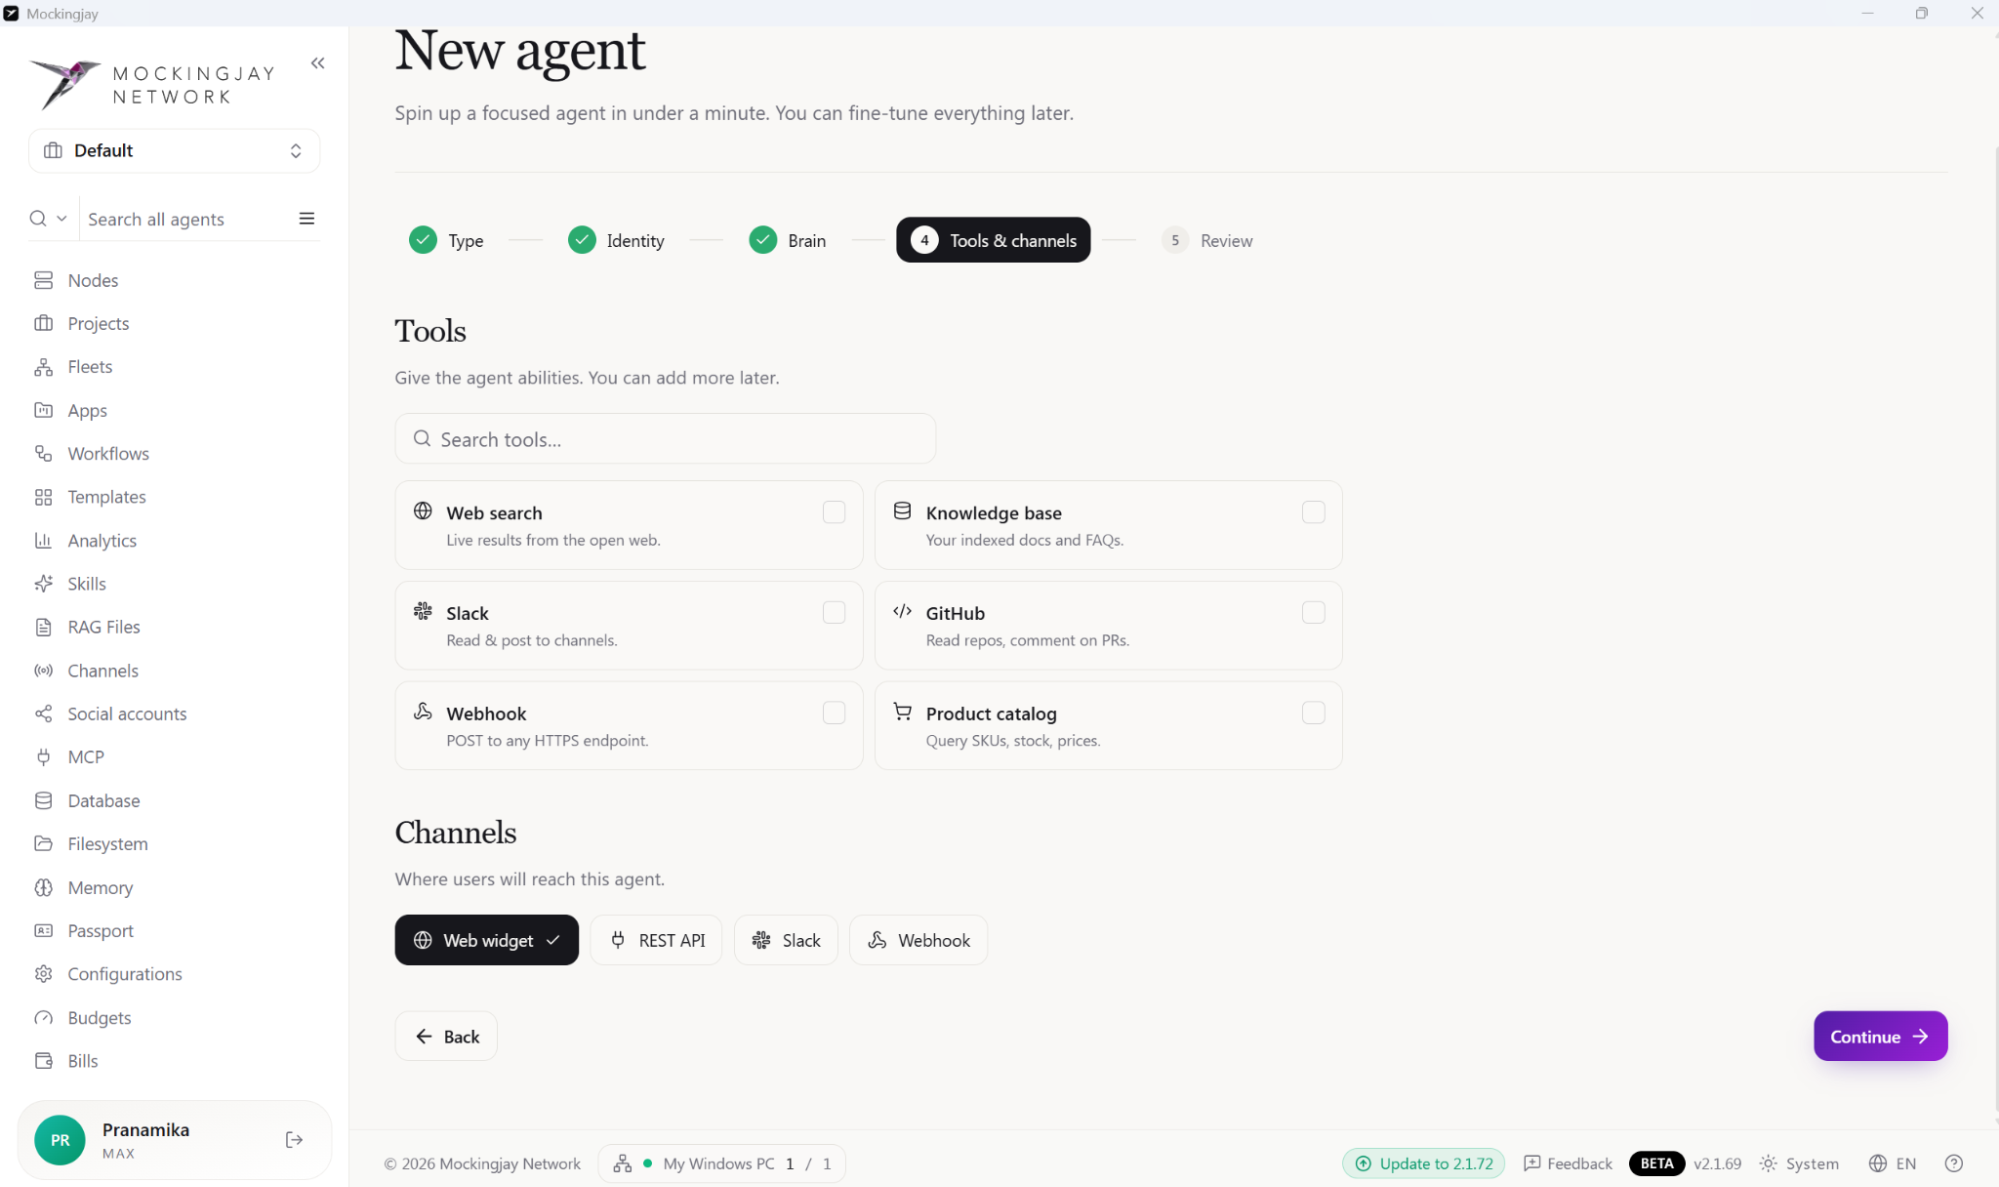
- Tools & channels.
- Tools: Web search, Knowledge base, Slack, GitHub, Webhook and Product catalog.
- Channels: Web widget, REST API, Slack and Webhook.
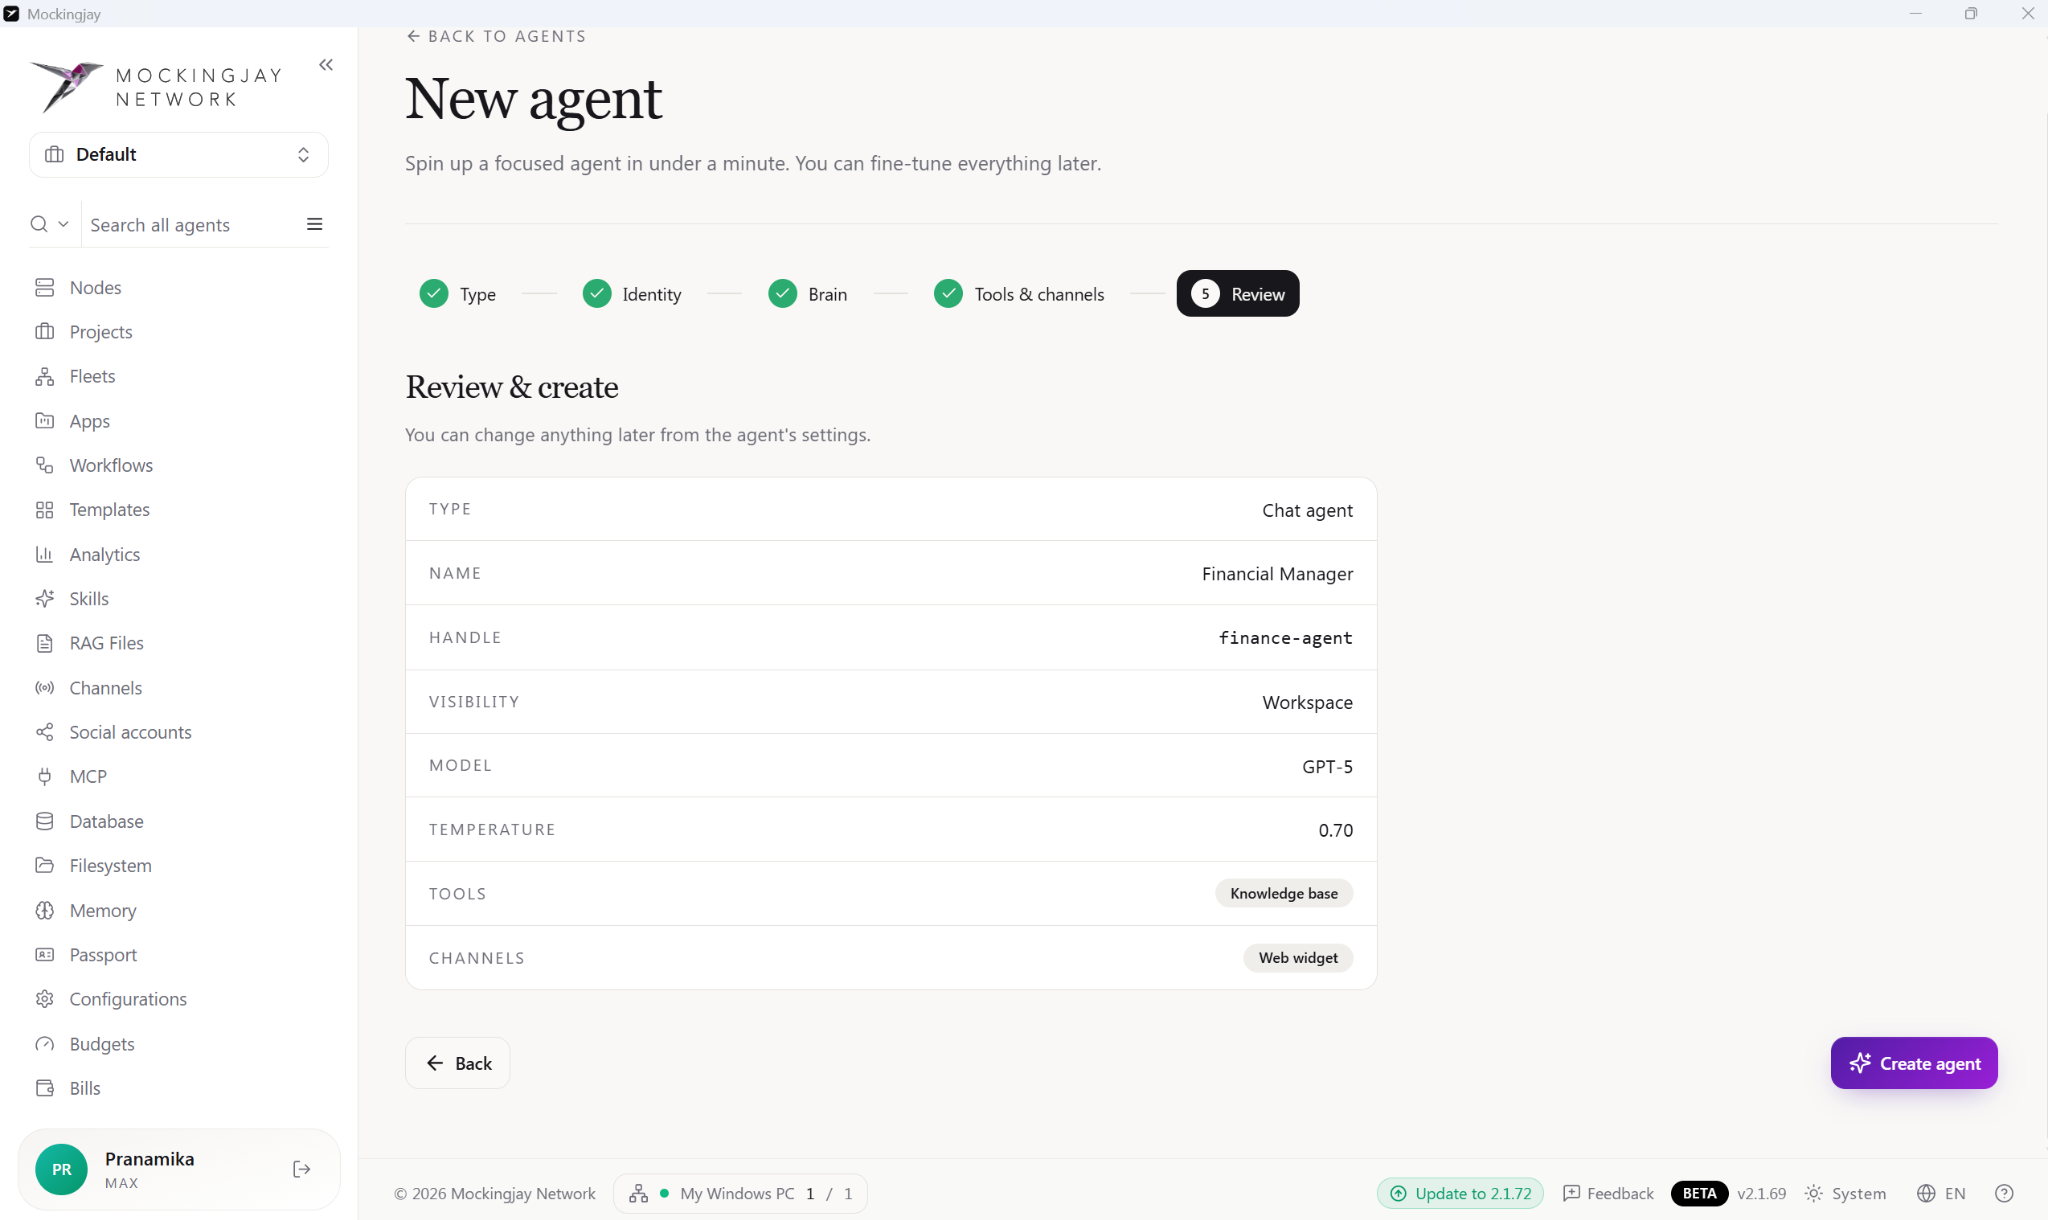
- Review & create. Check everything in one place: type, name, handle, visibility, model, temperature, tools and channels. Then click Create agent.
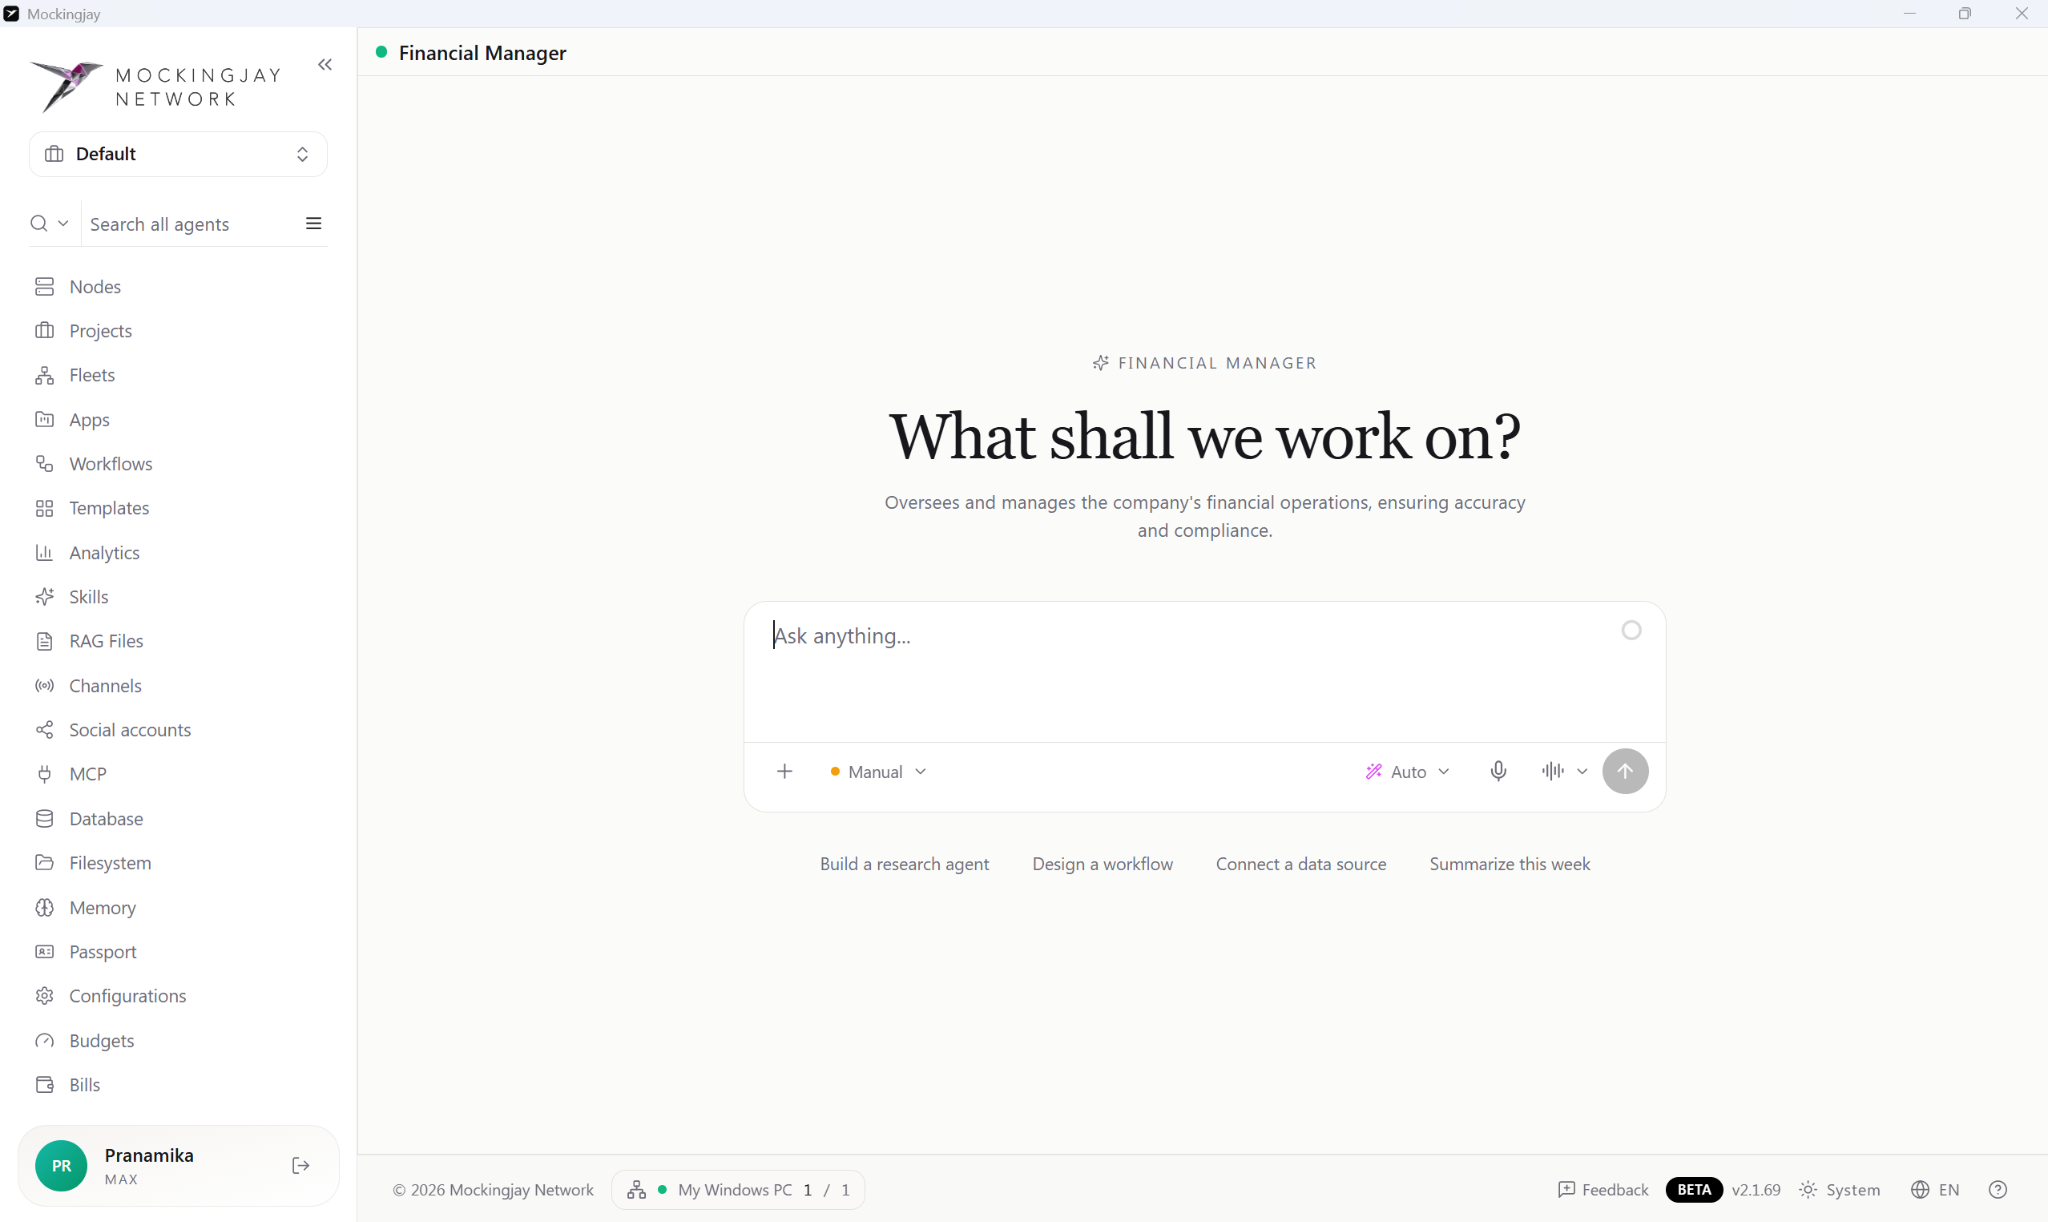
Once the agent is created, you'll see “Agent created – Opening chat…” and a chat window opens with the question “What shall we work on?”. In the chat window you'll find:
- A message box where you can switch between Manual and Auto mode, attach files, or speak instead of typing.
- Quick-start suggestions: Build a research agent, Design a workflow, Connect a data source, and Summarize this week.
The sidebar now lists your agents, grouped under Mockingbird, Fleets and Agents.
Analytics (Statistics & analysis)
See how your agents are actually being used across every project in the workspace: how much they're used, which tools they call, how quickly they reply, and when people talk to them.
Controls
Choose the last 7, 30 or 90 days. Click Export to download the figures.
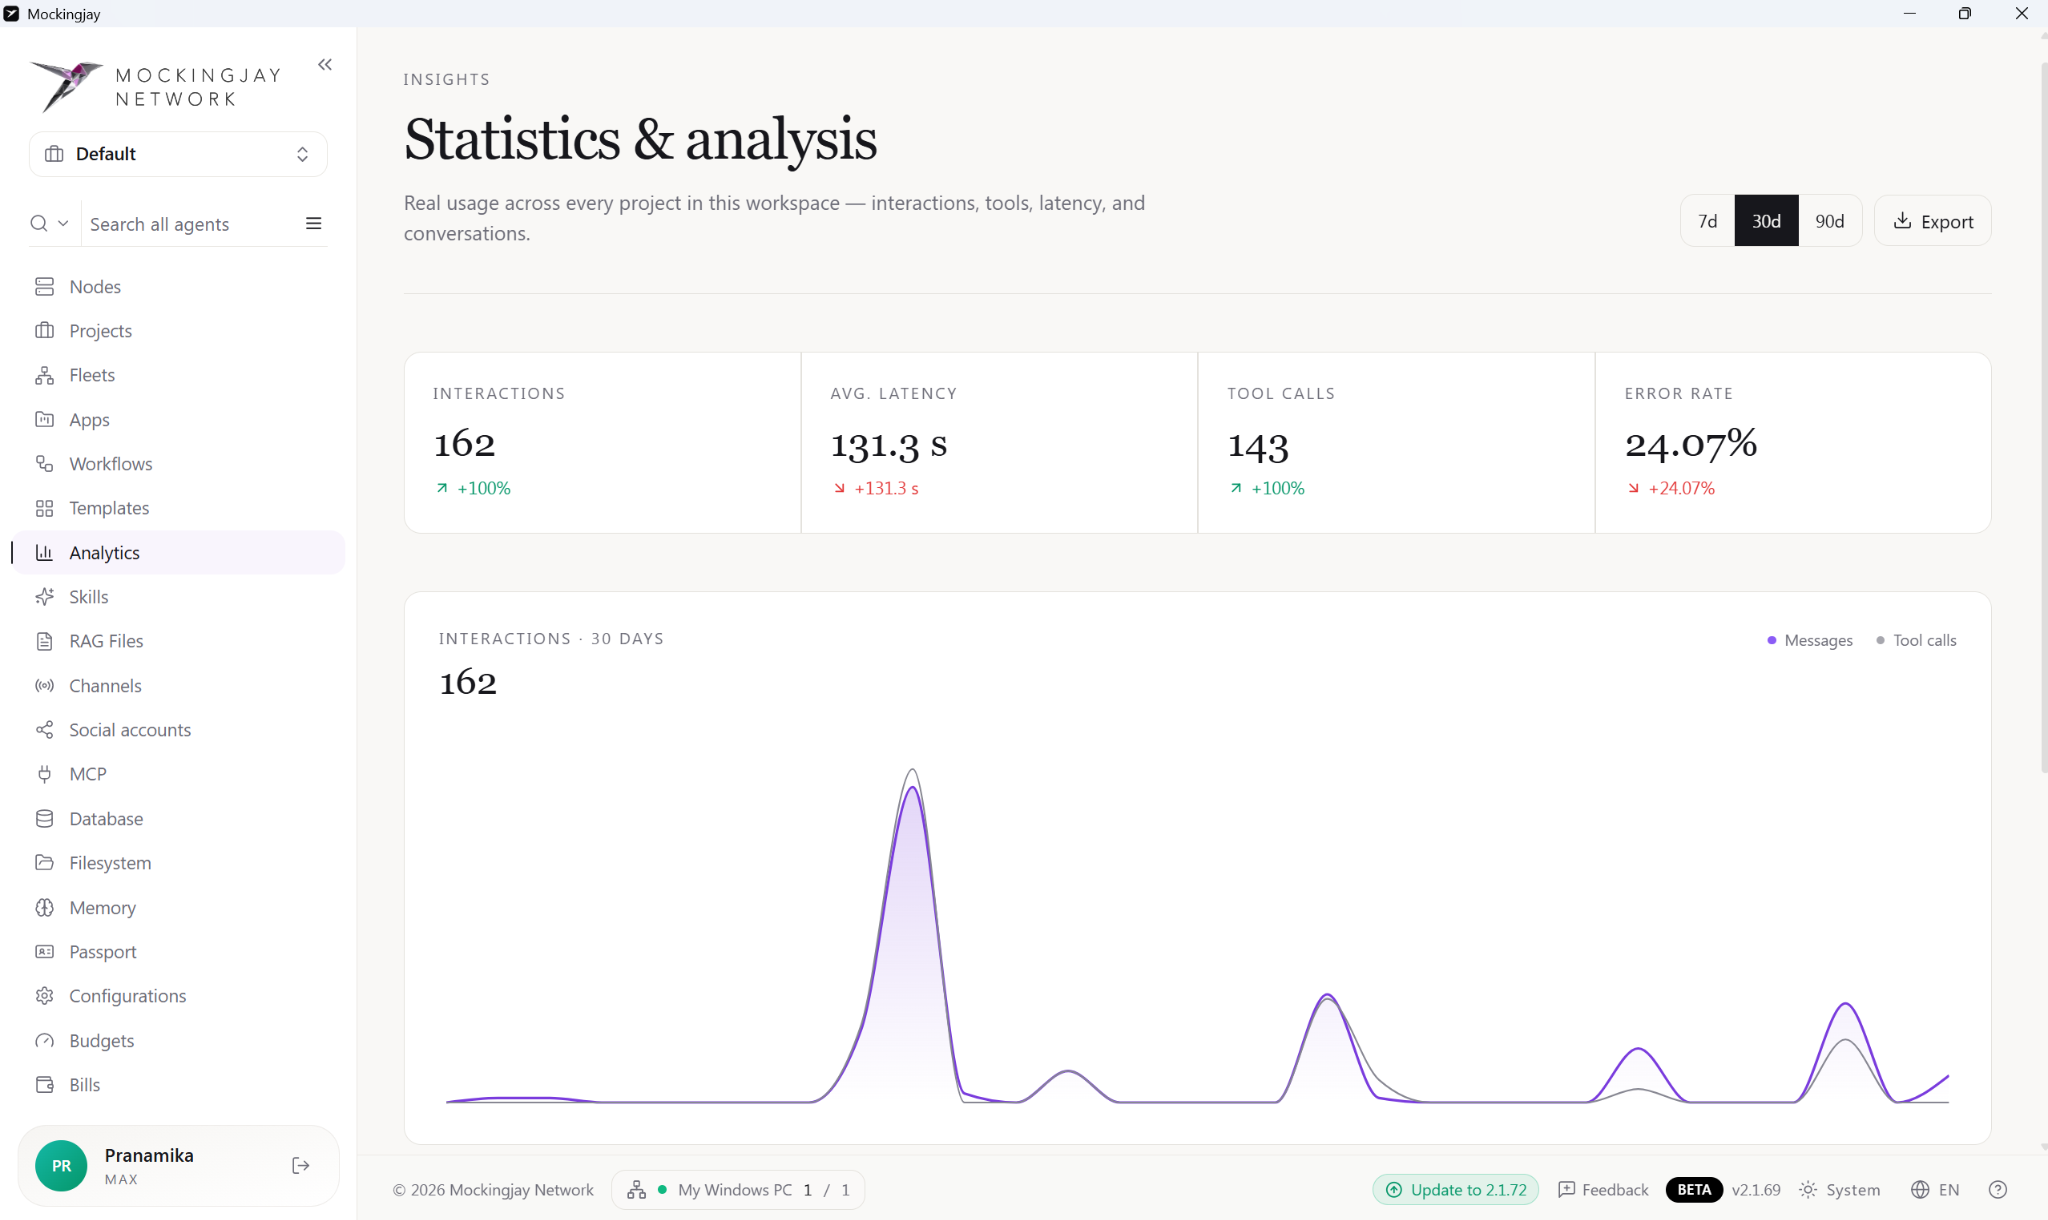
Headline numbers
Each one shows whether it has gone up or down since the previous period:
- Interactions
- Avg. latency
- Tool calls
- Error rate
Charts
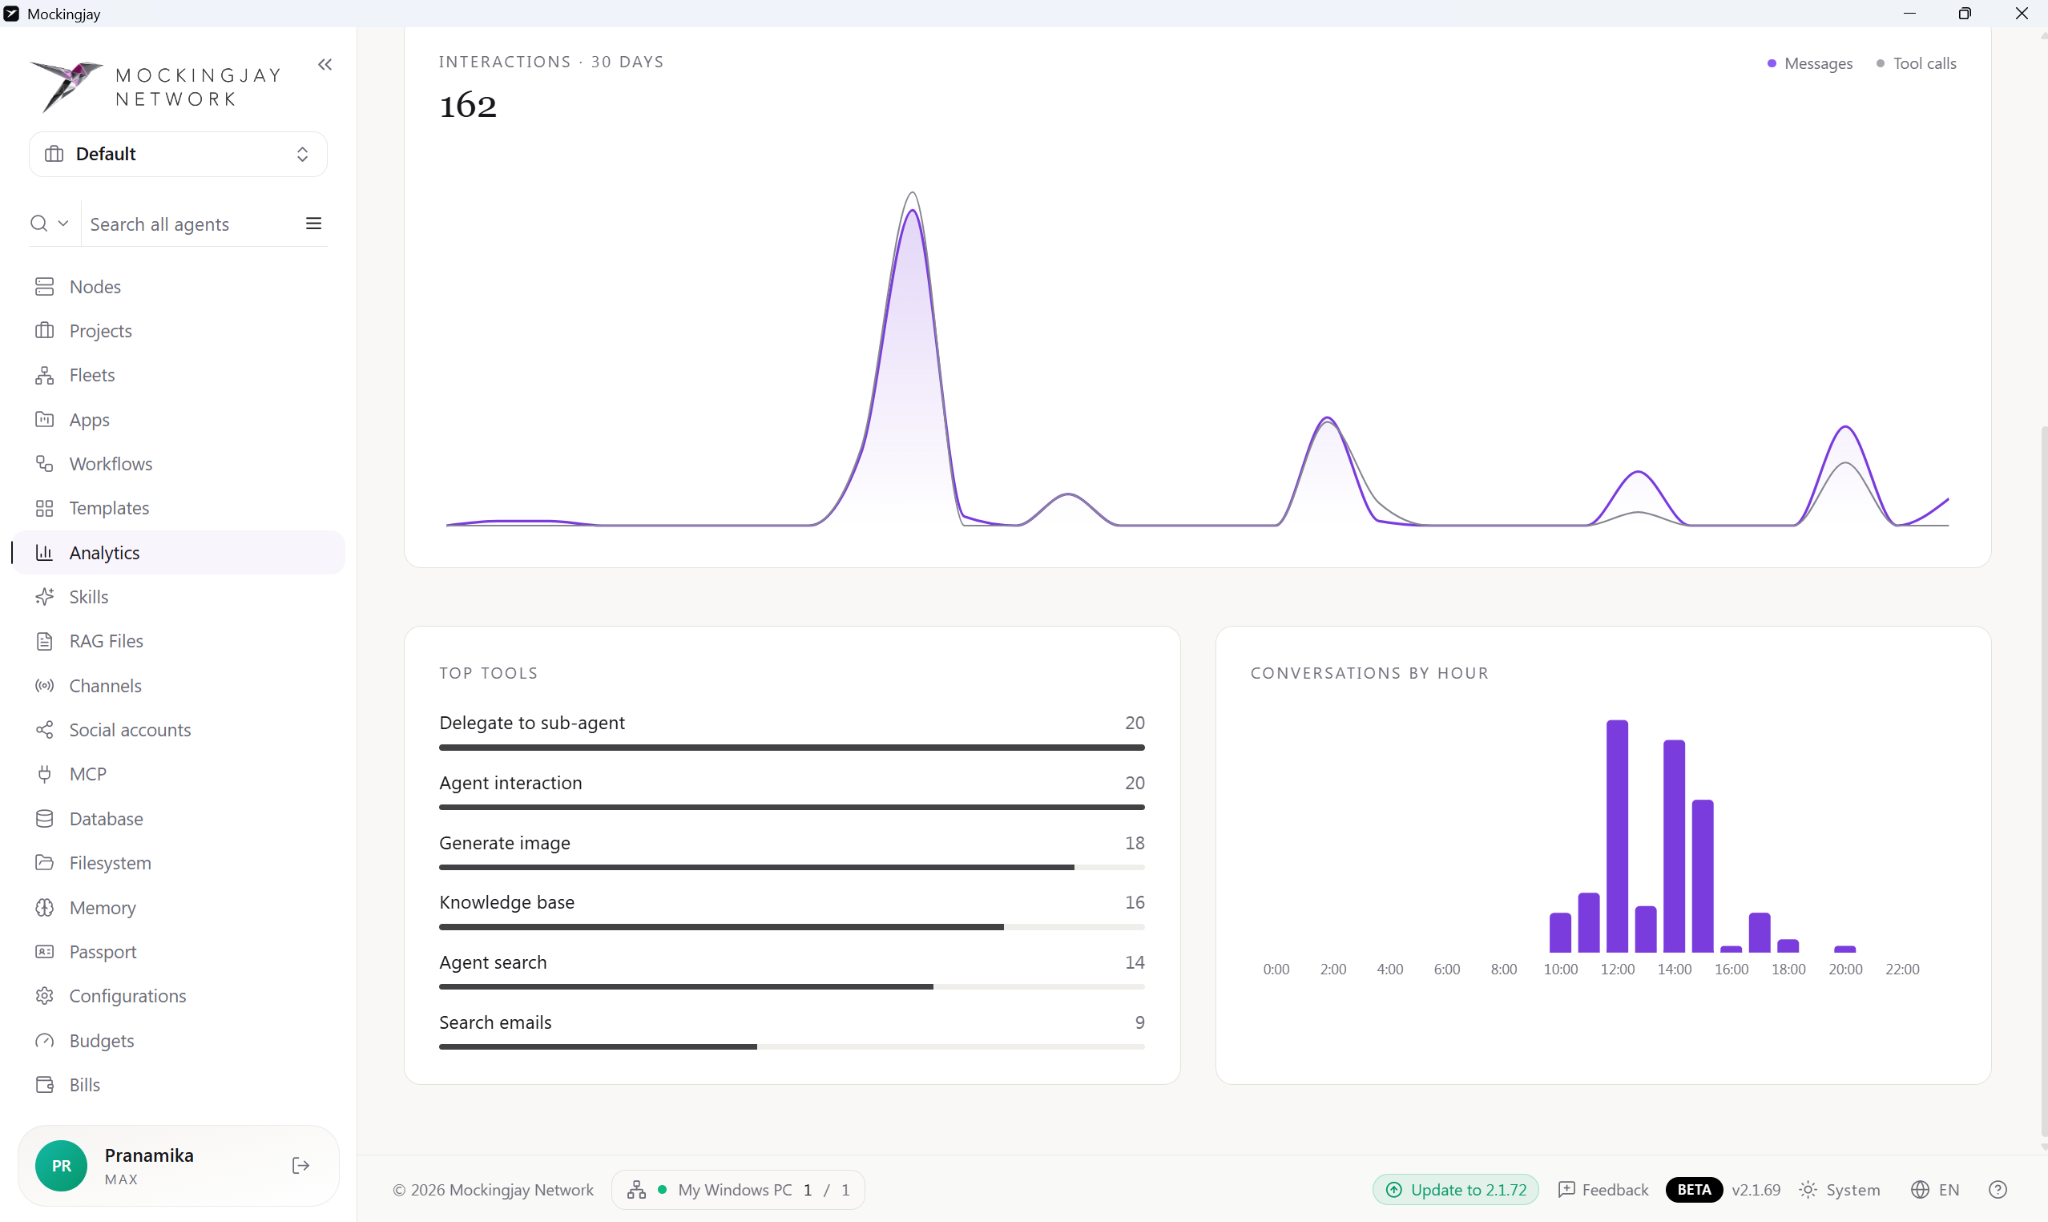
- Interactions over time: messages and tool calls by day. Hover over a day to see its numbers.
- Top tools: the tools your agents use most, such as Delegate to sub‑agent, Agent interaction, Generate image, Knowledge base, Agent search and Search emails.
- Conversations by hour: the times of day when people talk to your agents most.
Skills (Capabilities)
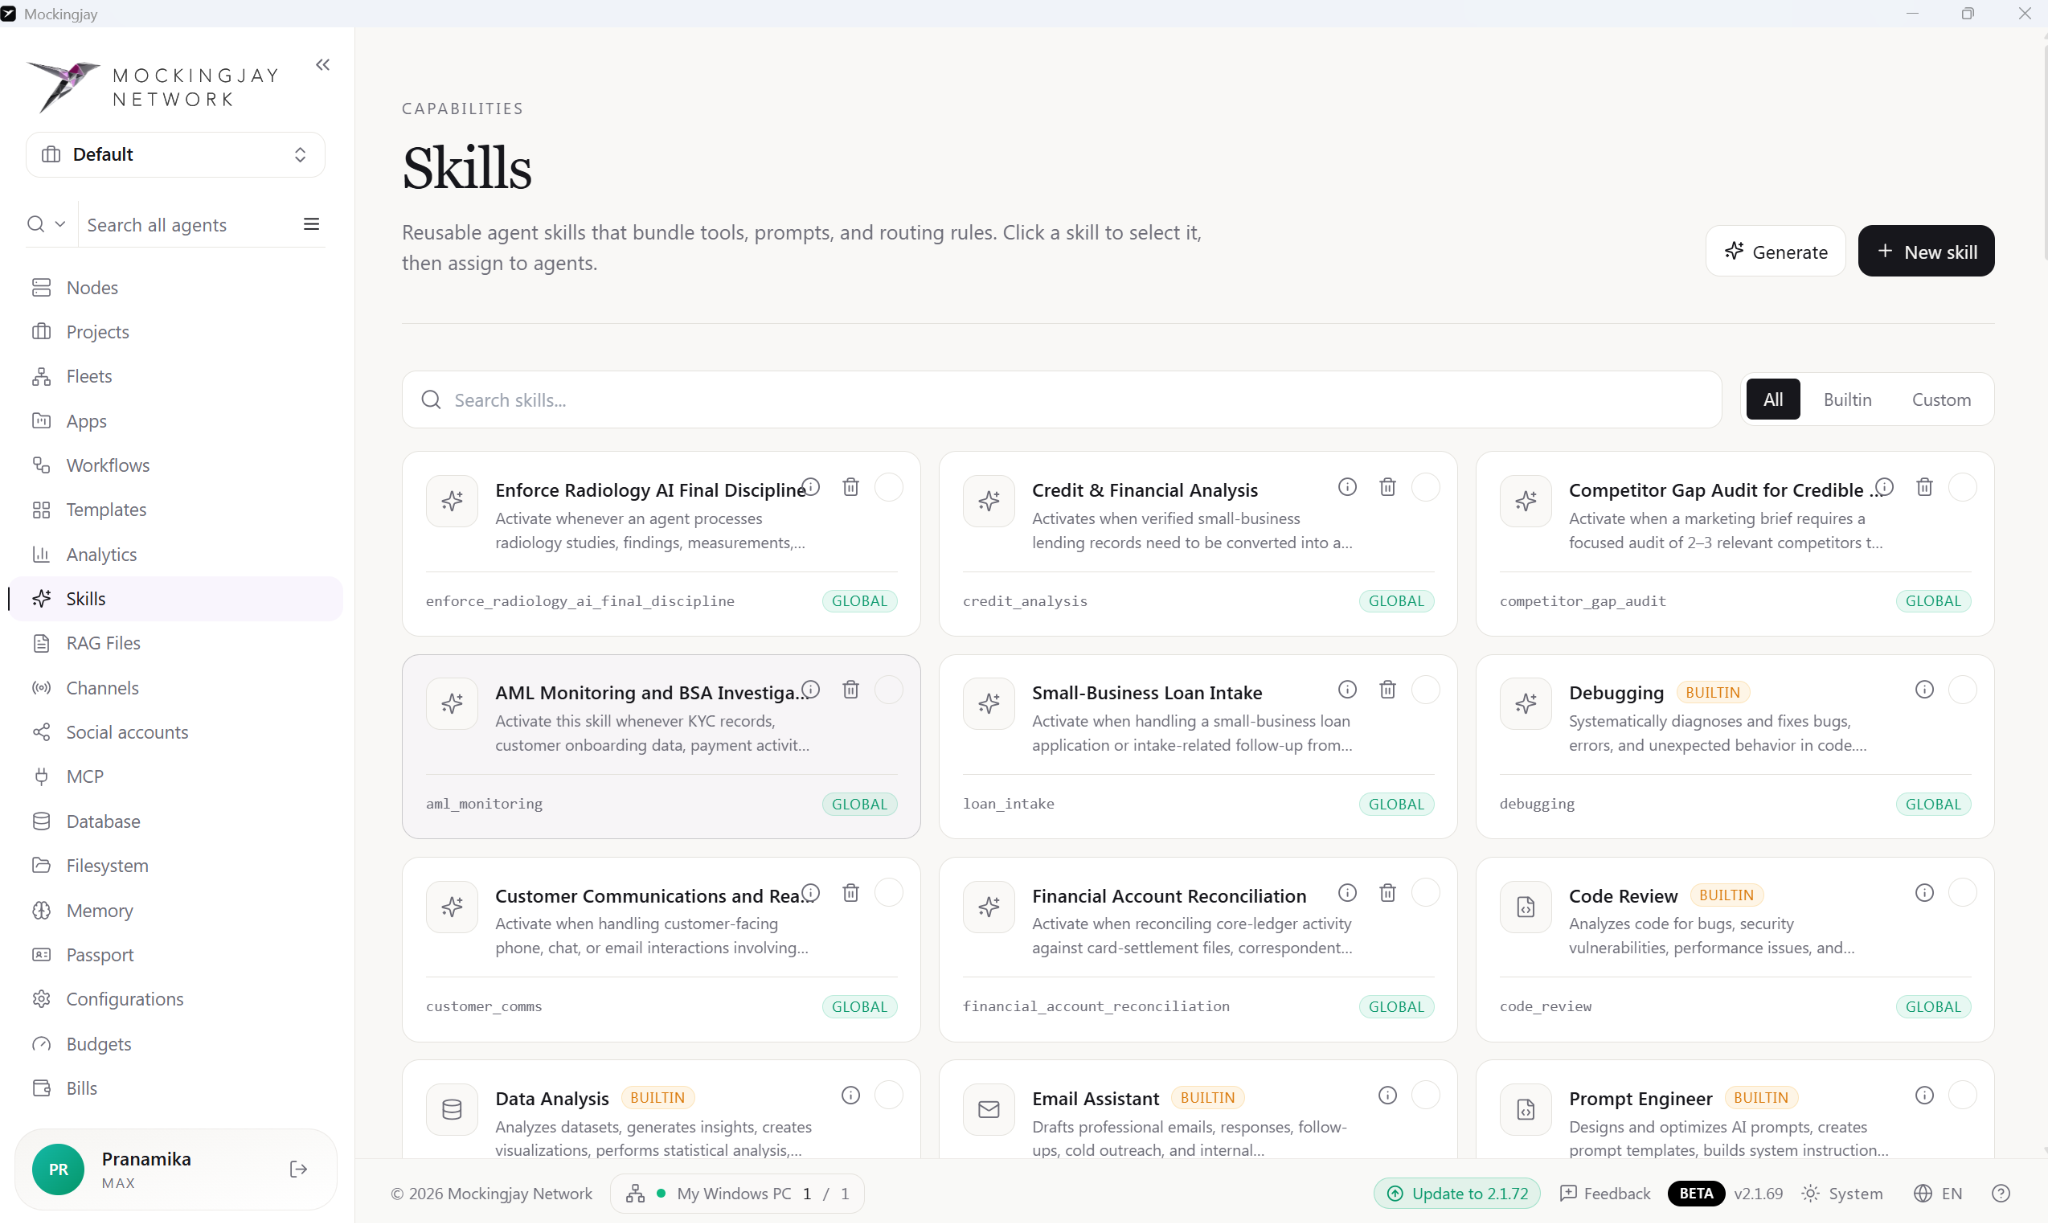
A skill is a ready-made ability, made up of tools, instructions and rules about when to use it. Create it once and give it to as many agents as you like. Click a skill to select it, then add it to your agents.
Filters. Show All skills, only Builtin ones, or only your Custom ones. You can also search.
Skill cards. Each card shows:
- The skill's name and when it kicks in.
- Its internal key (the name used behind the scenes).
- A Global or Builtin label.
- An info icon and a bin icon.
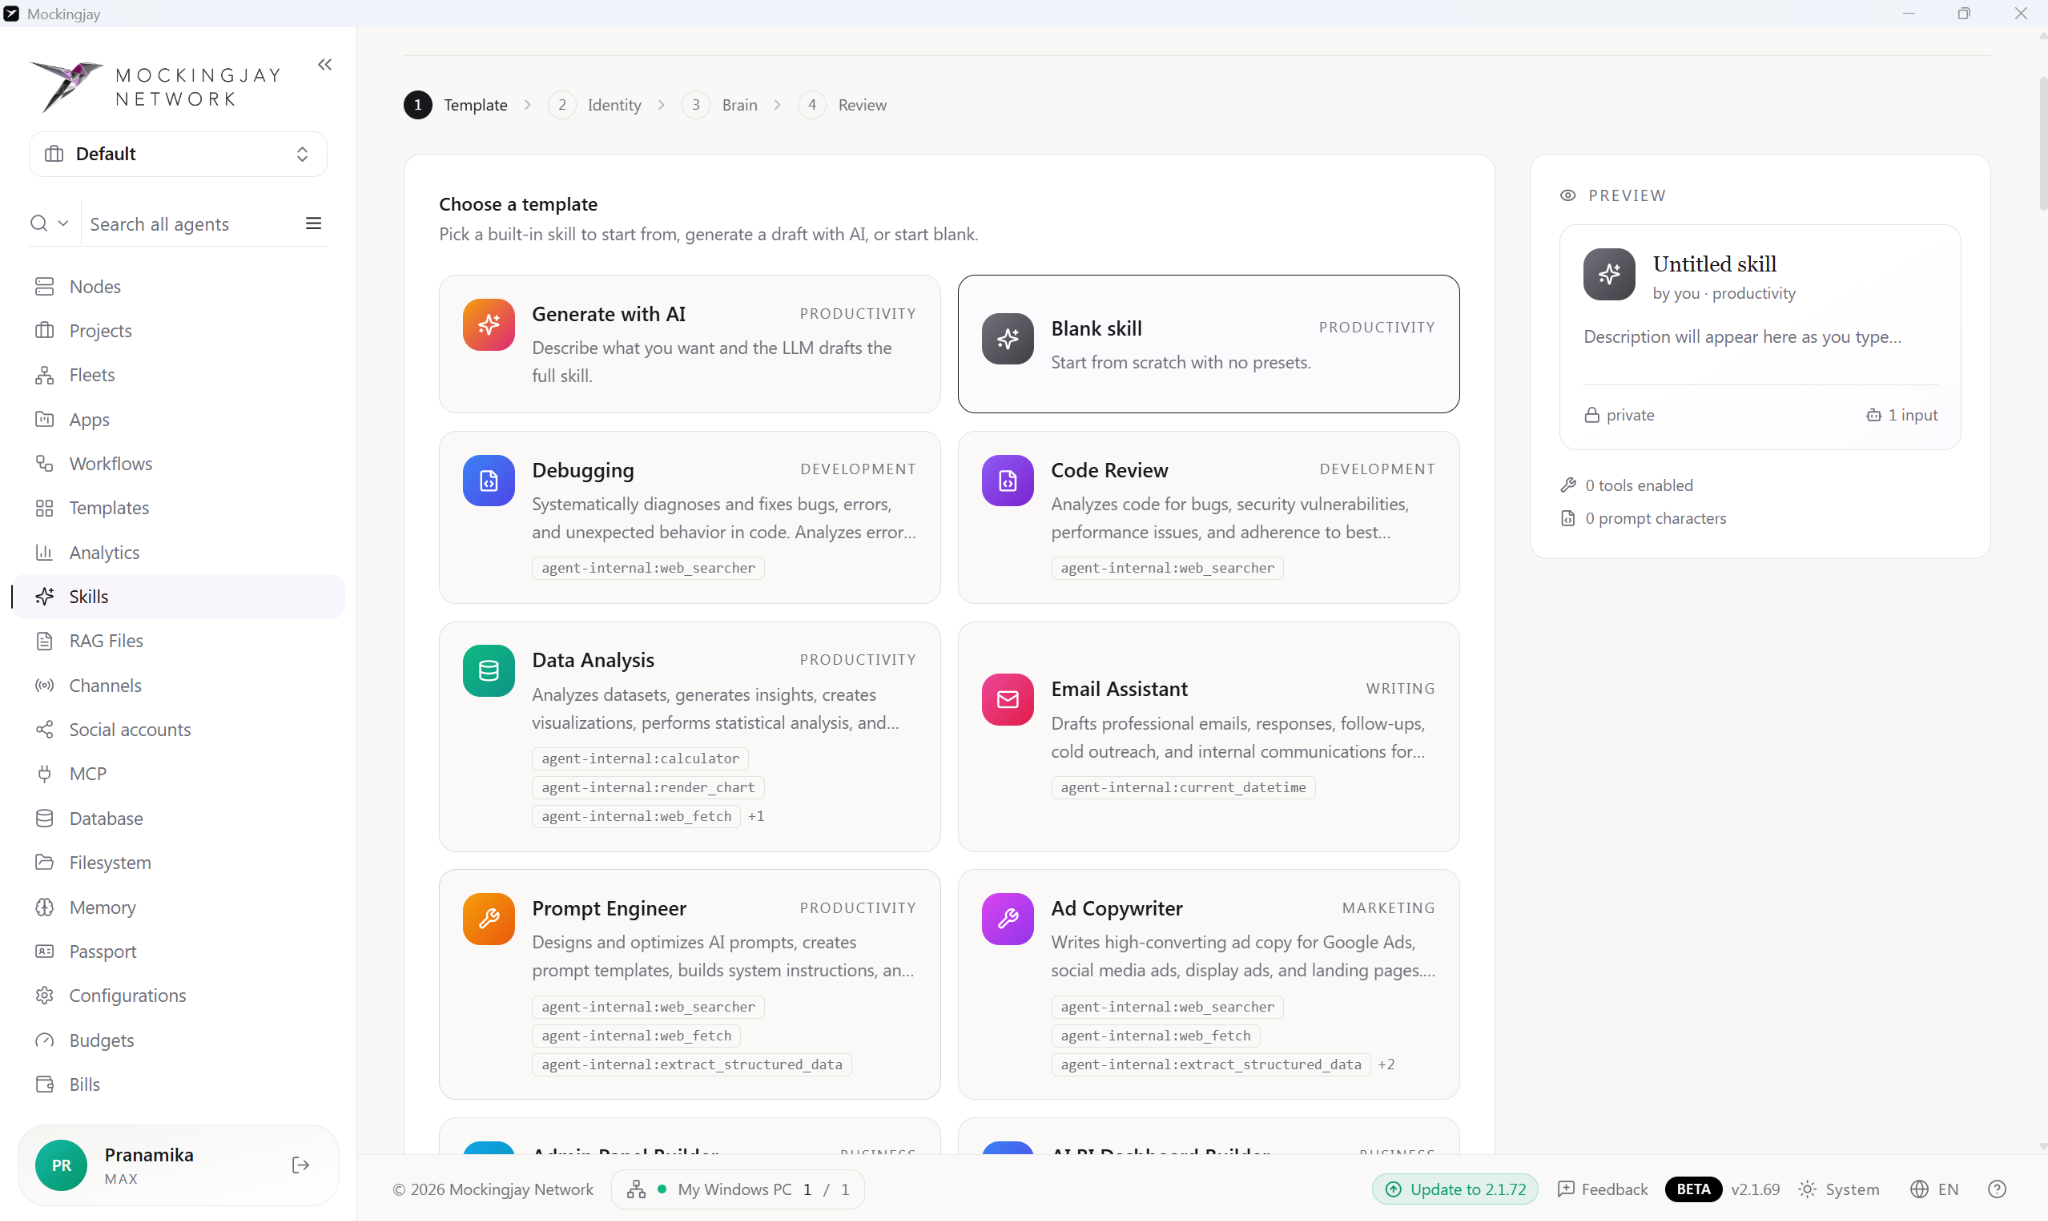
Creating/Generating a skill
Creating a skill takes four steps: Template, Identity, Brain and Review. As you go, a Preview card on the right shows the name, who can see it, how many tools it uses and how long its instructions are.
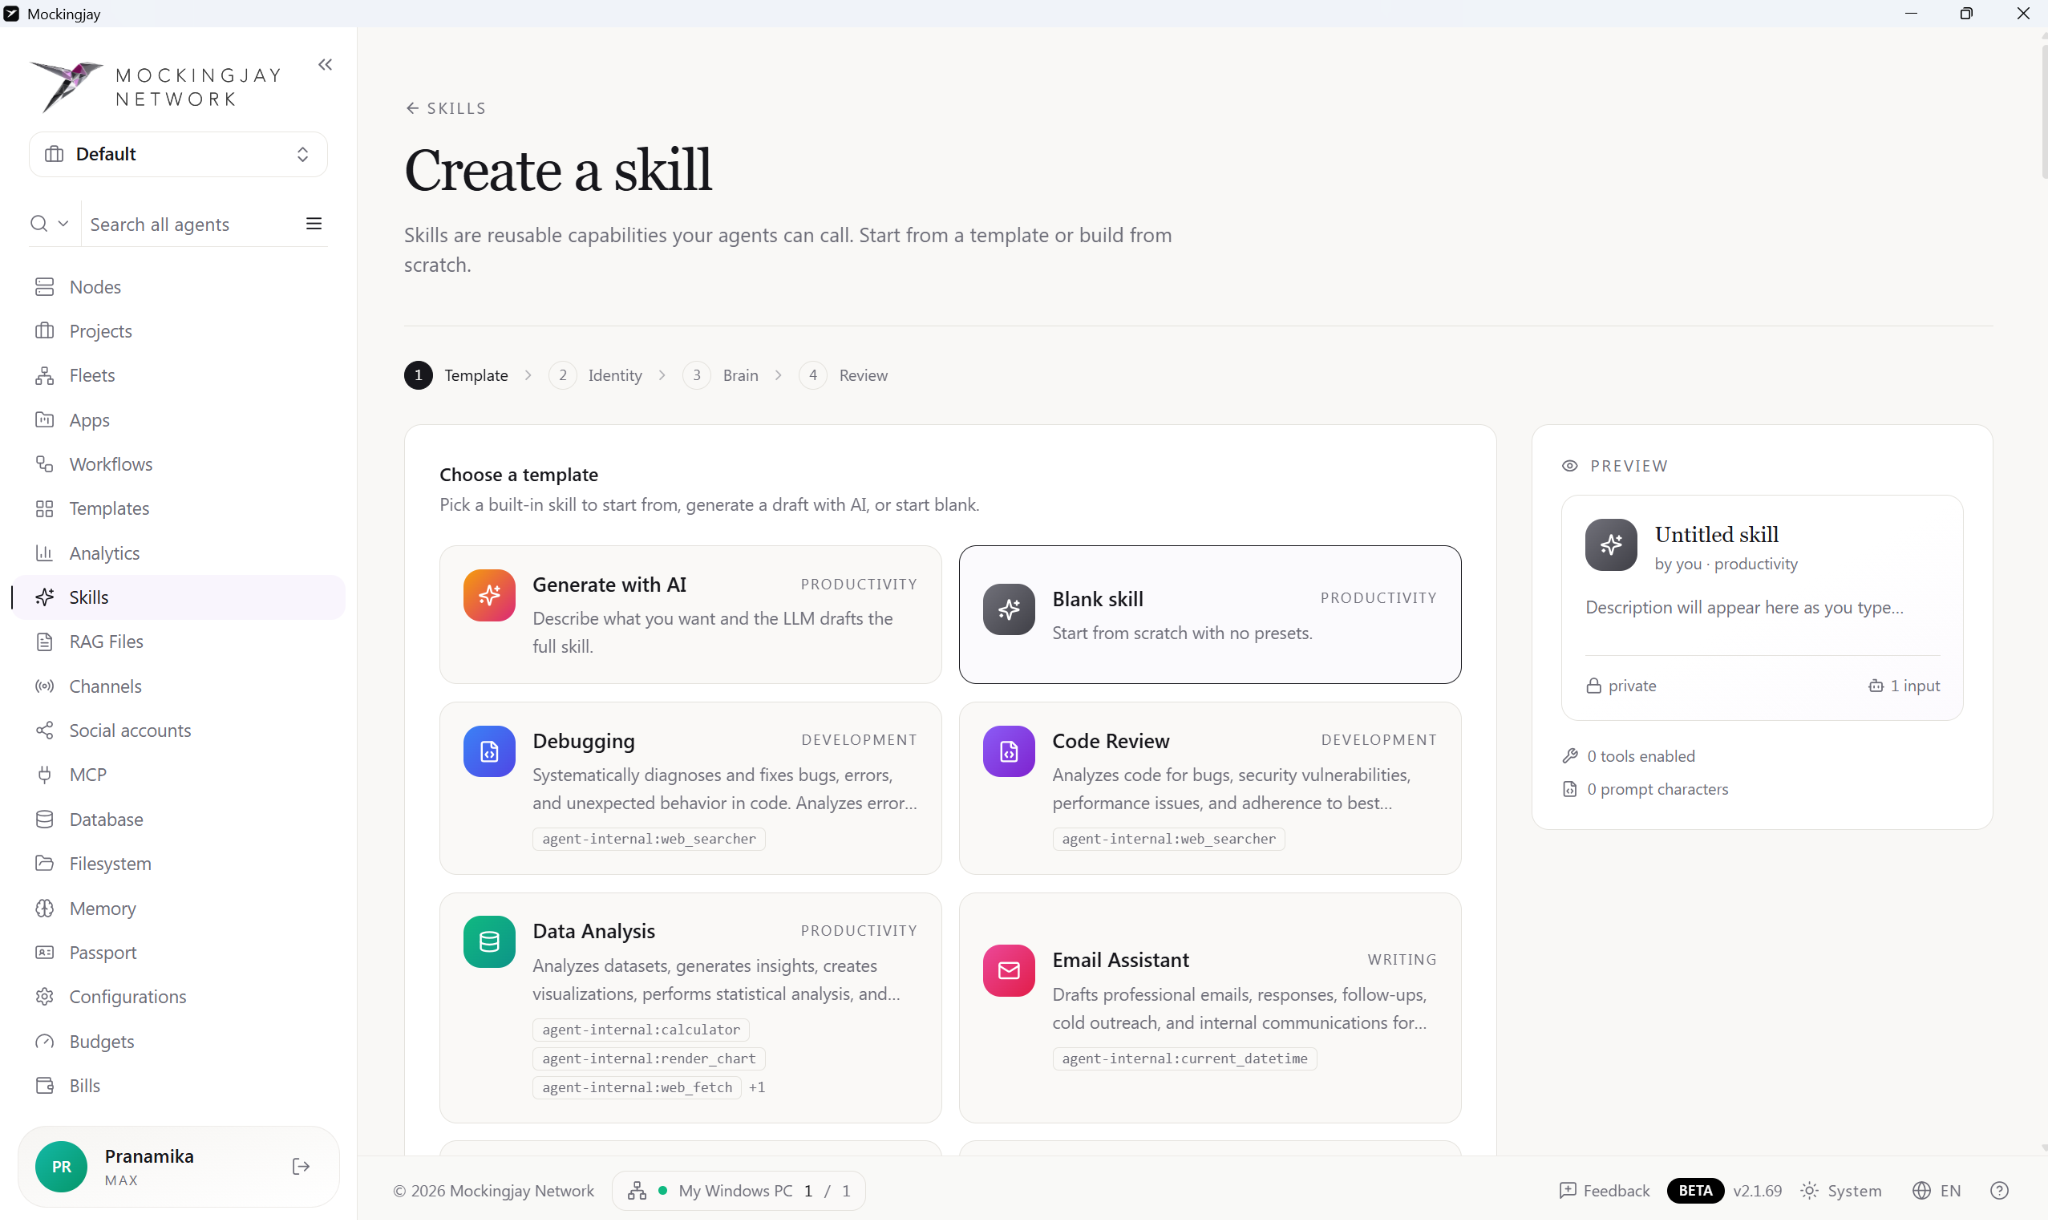
There are three ways to start:
- Generate with AI: describe what you want the skill to do, then click Generate draft.
- Blank skill: start from nothing.
- A built-in template: choose from around 50. Each template lists the tools it uses. They include:
- Debugging, Code Review, Data Analysis, Email Assistant, Prompt Engineer, Ad Copywriter
- Admin Panel Builder, AI BI Dashboard Builder, API Design, Booking & Scheduling UI Builder
- Business Proposal Writer, CRM UI Builder, Customer Support, E‑commerce UI Builder
- Email Marketing, Finance & Invoicing UI Builder, Healthcare/Clinic UI Builder
- Helpdesk & Support UI Builder, HR & People UI Builder, Instagram/LinkedIn Content Creator
- Inventory UI Builder, LMS UI Builder, Marketing Landing Page Builder, Math Tutor
- Point of Sale UI Builder, Product Manager, Project Management, Real Estate UI Builder
- Research Assistant, Restaurant UI Builder, Resume & Cover Letter Builder
- SaaS App Dashboard Builder, Sales Outreach, SEO Optimizer, Social Media Manager
- Spreadsheet Expert, SQL Expert, Startup Advisor, Workflow Automation, Writing Assistant
- Accounting Assistant, Brand Strategist, Community Management, Content Strategist, CRM Management
RAG Files (Knowledge bases)
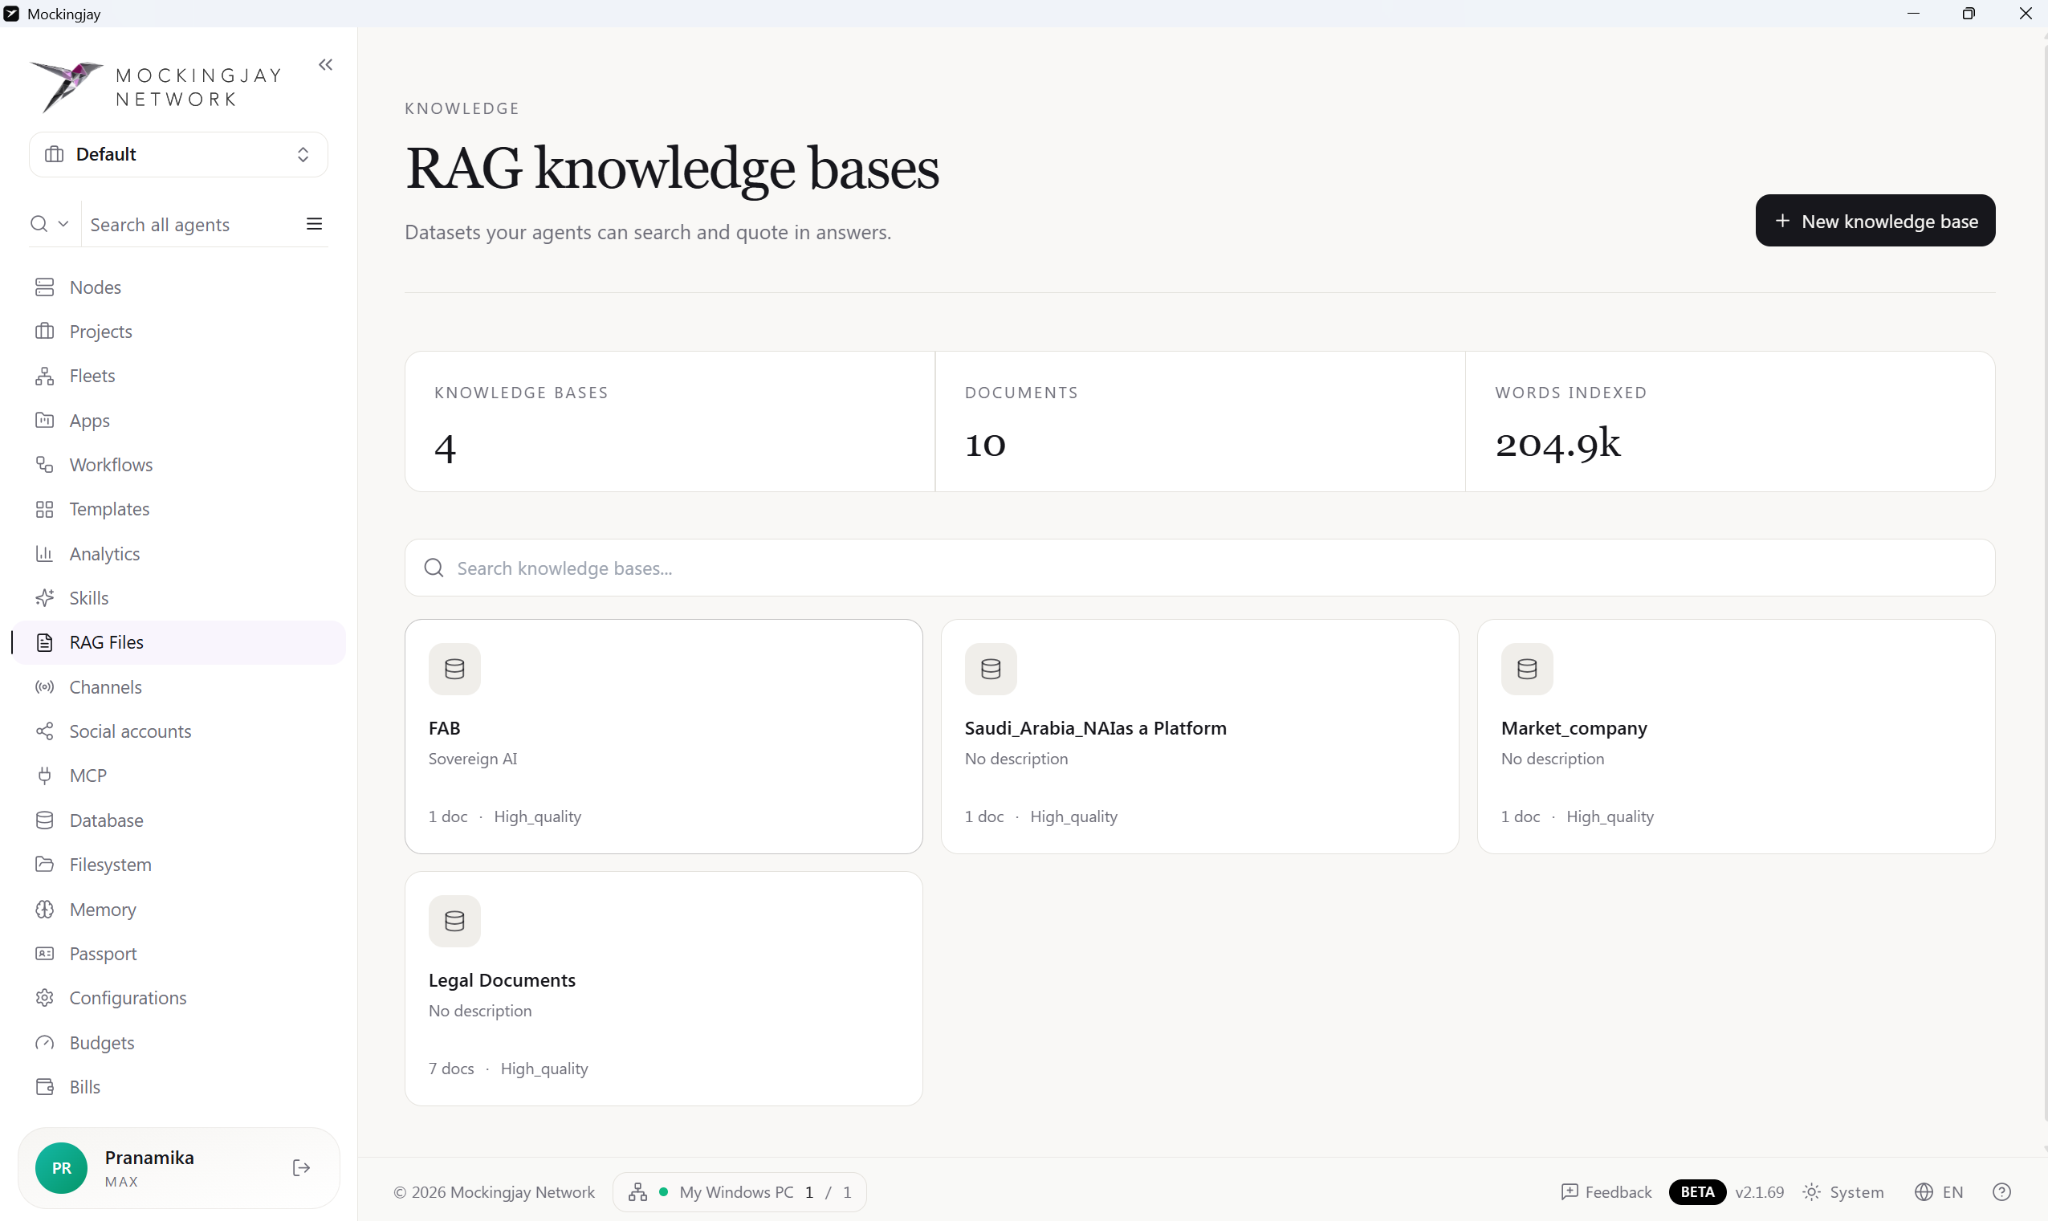
Upload your own documents so your agents can look things up in them and quote them in their answers.
These show the number of Knowledge bases, the number of Documents, and the number of Words indexed.
Knowledge base cards
Each card shows the name, description, number of documents and quality setting (for example “High quality”). The ⋯ menu has more options.
Creating a knowledge base
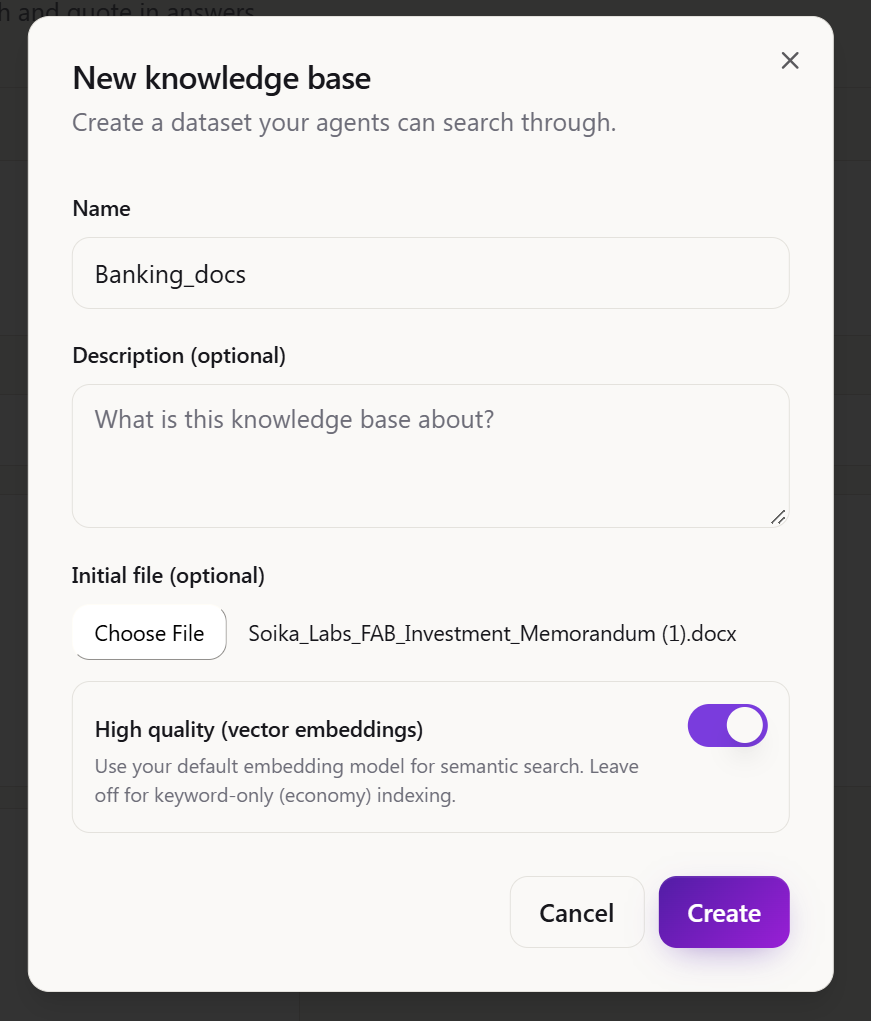
Fill in:
- Name.
- Description: optional.
- Initial file: optional. Click Choose File to pick a document from your computer.
- High quality (vector embeddings): turn this on if you want agents to search by meaning, not just exact words. Leave it off for cheaper, keyword-only search.
Click Create. You'll see “Knowledge base created”, and the numbers at the top update.
Channels (Connectivity)
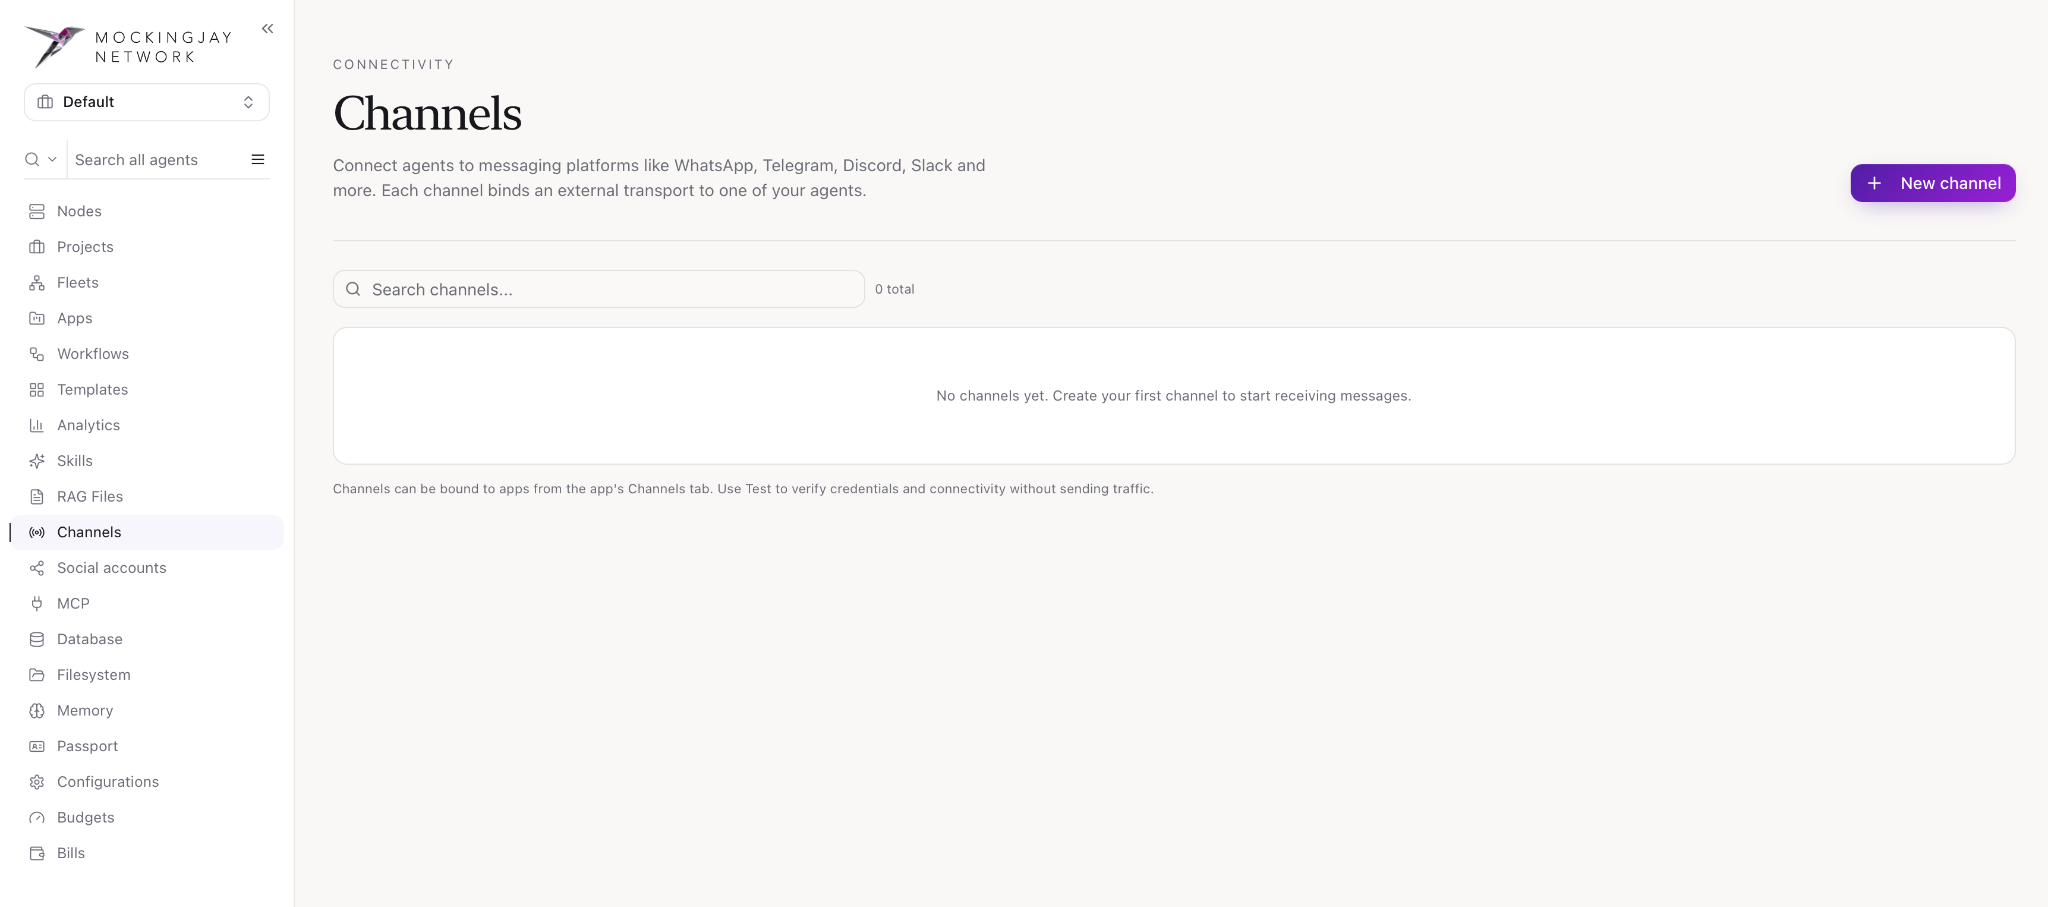
Channels connect your agents to the messaging apps people already use, such as WhatsApp, Telegram, Discord and Slack. Each channel links one of these services to one of your agents.
Connection banner. Shows the public web address your channels use, and a Restart button if the connection needs a reset.
Your channels. Each channel is listed with:
- Its name and type, for example Telegram or Gmail.
- Its status, for example Connected.
- Its webhook address, with a button to copy it.
- Test, Edit and Delete buttons.
If something goes wrong, the error appears right under the channel. A common example is Gmail refusing permission to send push notifications.
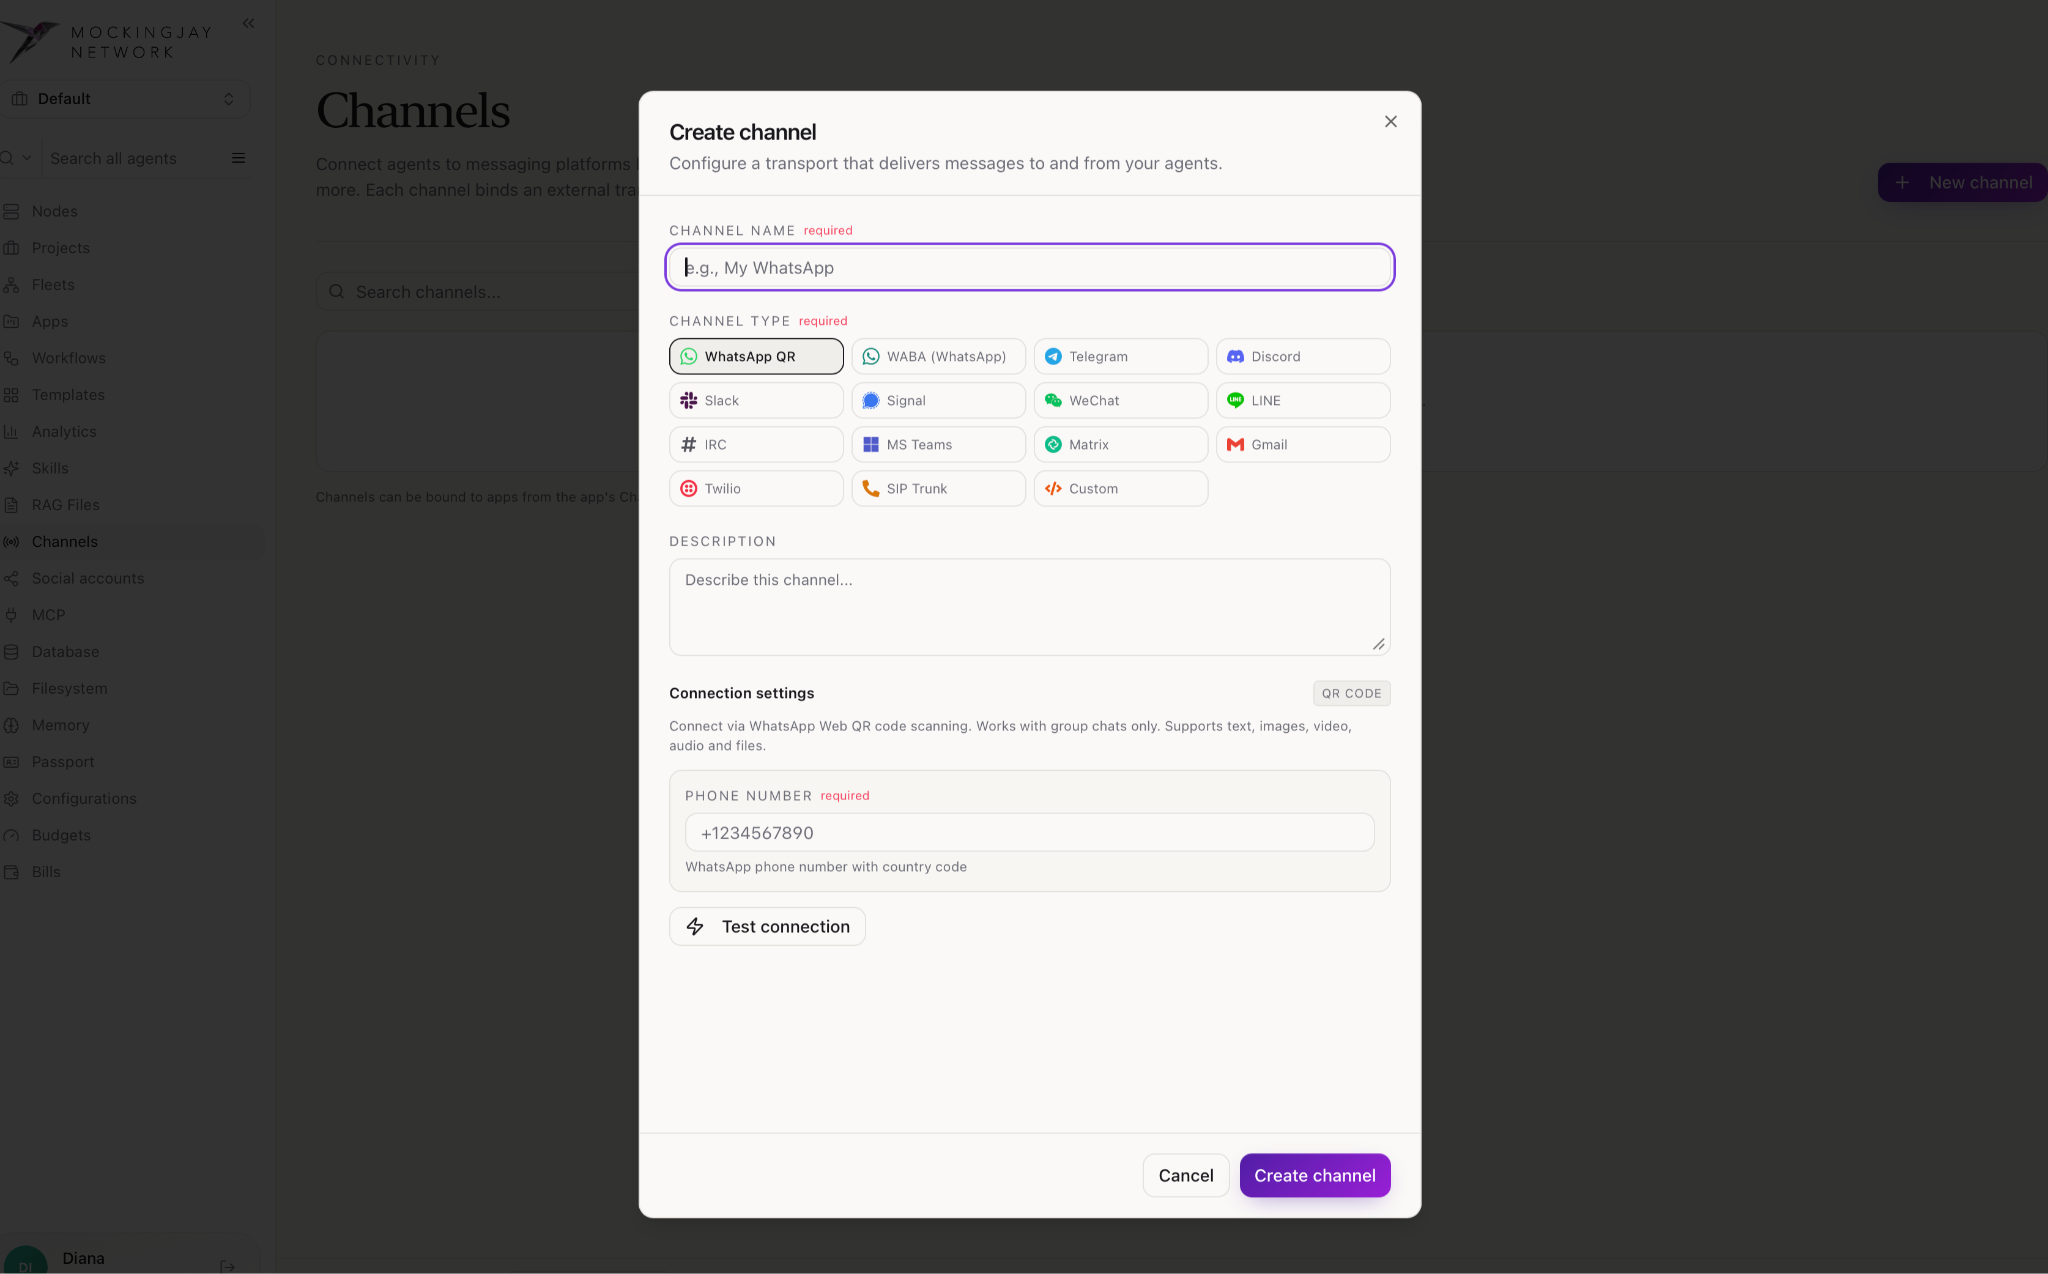
Creating a channel
- Channel name: required.
- Channel type: choose one of these:
- WhatsApp QR, WABA (WhatsApp Business), Telegram, Discord
- Slack, Signal, WeChat, LINE
- IRC, MS Teams, Matrix, Gmail
- Twilio, SIP Trunk, Custom
- Description.
- Connection settings: what you need to enter depends on the channel type. For example:
- WhatsApp QR: enter your phone number, then scan a QR code with WhatsApp Web to link it. Group chats are supported.
- WABA (WhatsApp Business): enter your Phone number ID, Access token, WhatsApp Business Account ID and Webhook verify token.
- Click Test connection to check it works, then Create channel.
Social accounts (Connected accounts)
Connect your social media accounts so your agents can work with them for you.
Connecting to social accounts
- From the Mockingjay Network sidebar, open the navigation menu by clicking ☰, then click Social Accounts.
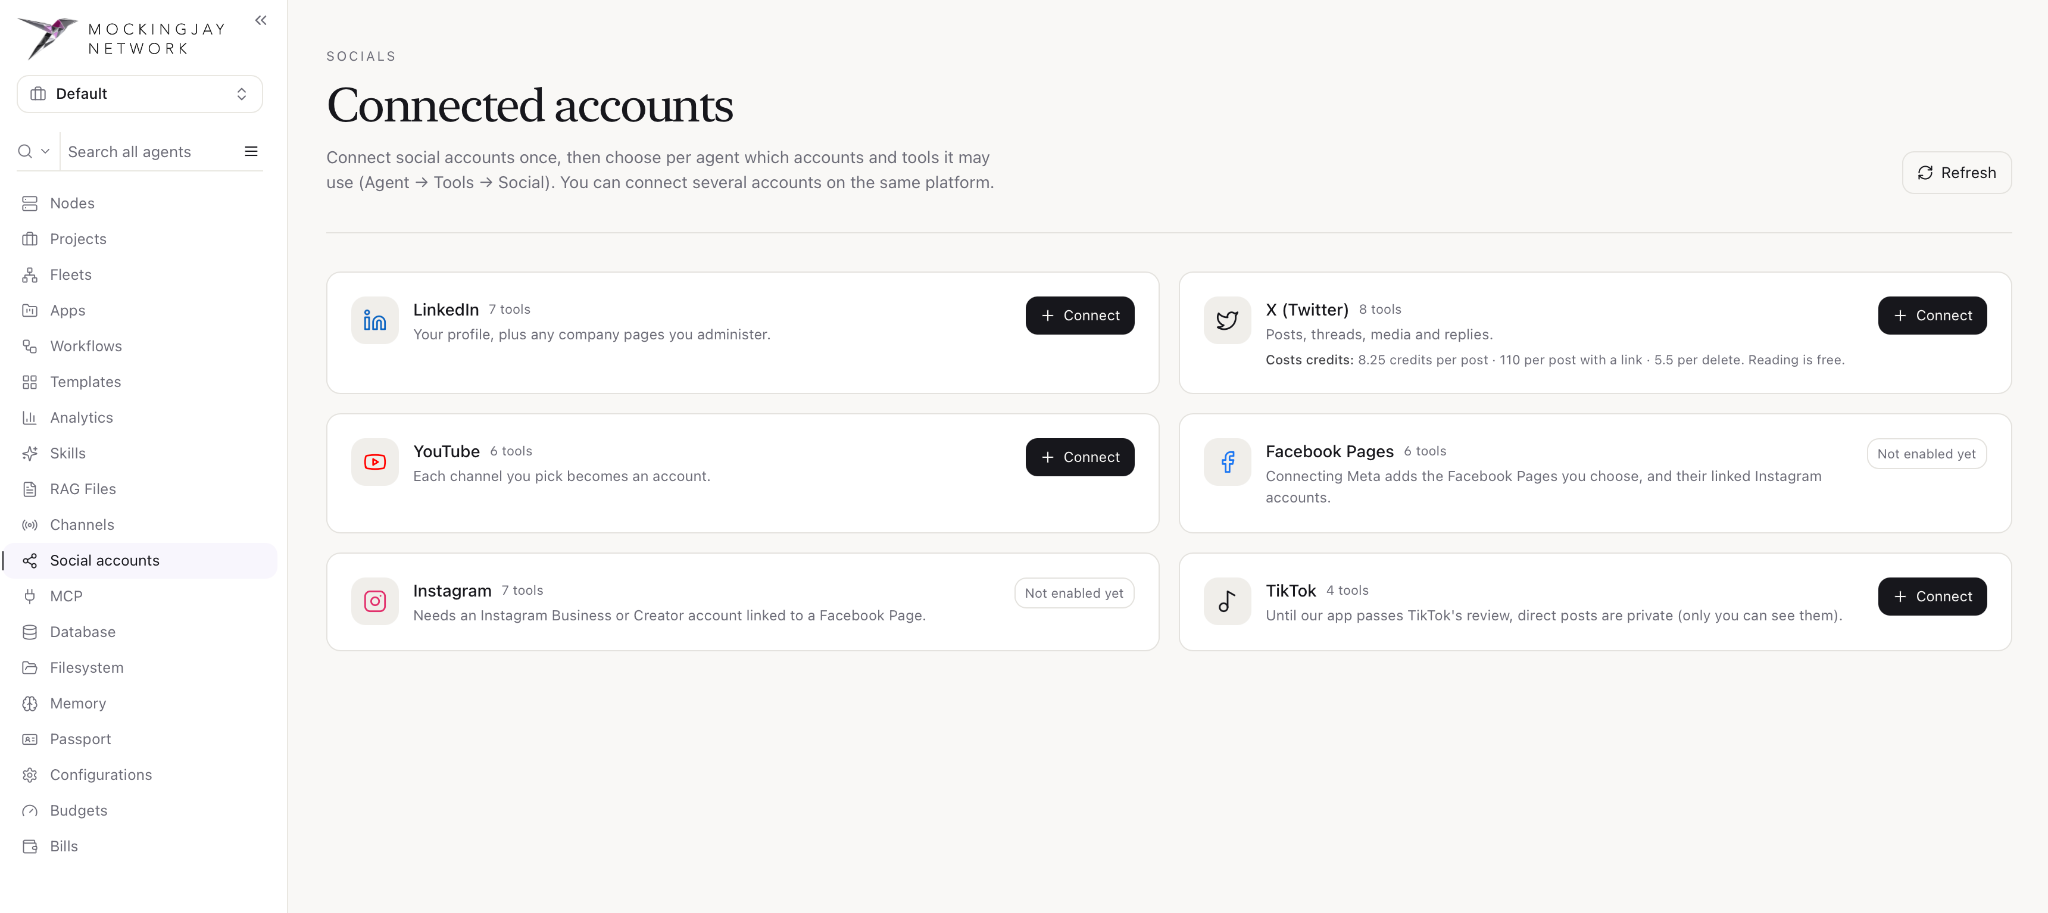
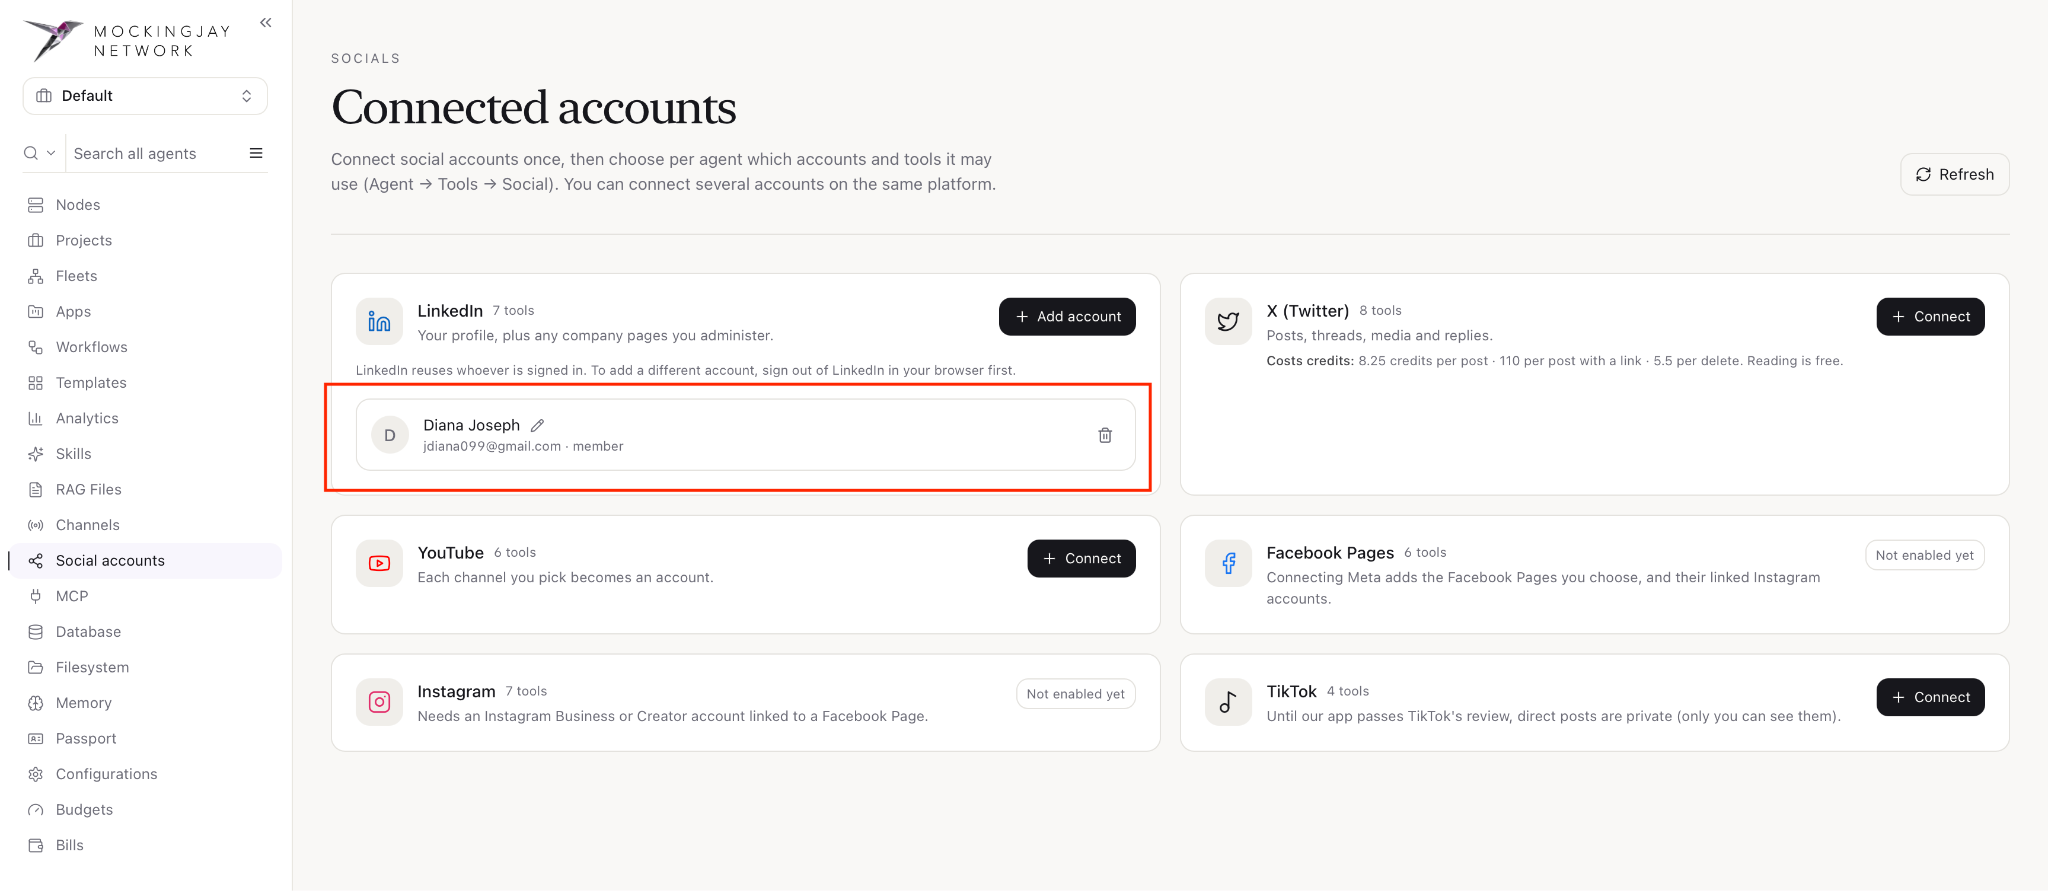
- Under Connected Accounts, click Connect next to LinkedIn.
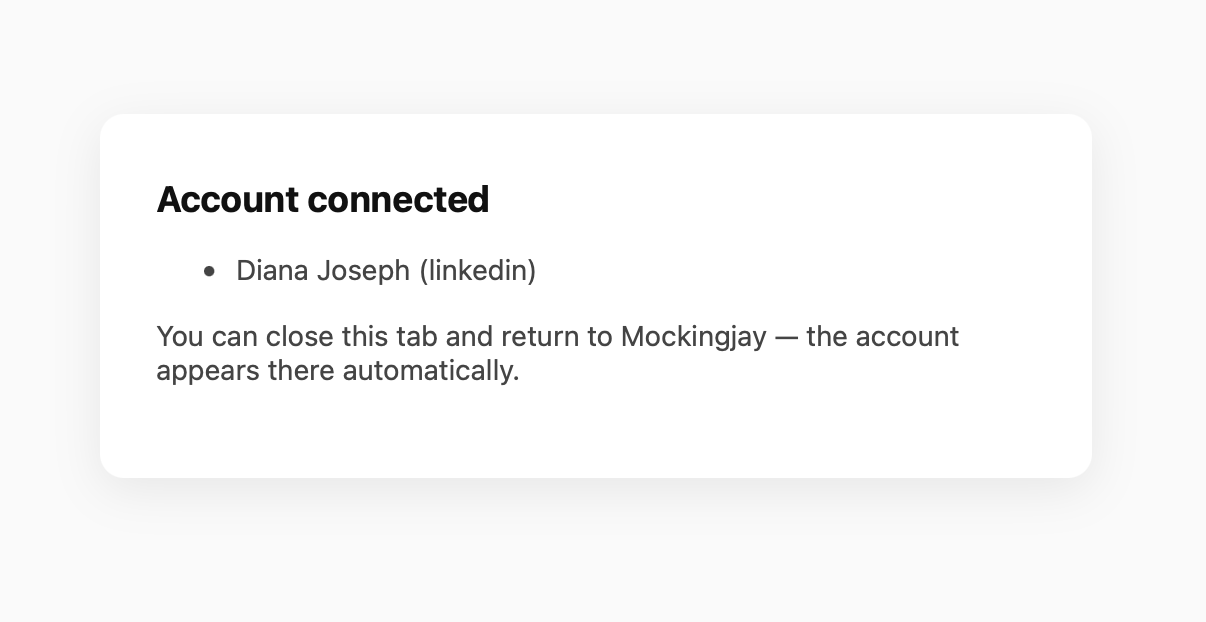
- You will be redirected to the LinkedIn login page.
- Enter your LinkedIn email address and password to sign in.
MCP (Tool servers)
MCP servers give your agents extra tools, such as reading email or managing tasks. Install them from the catalog or add your own.
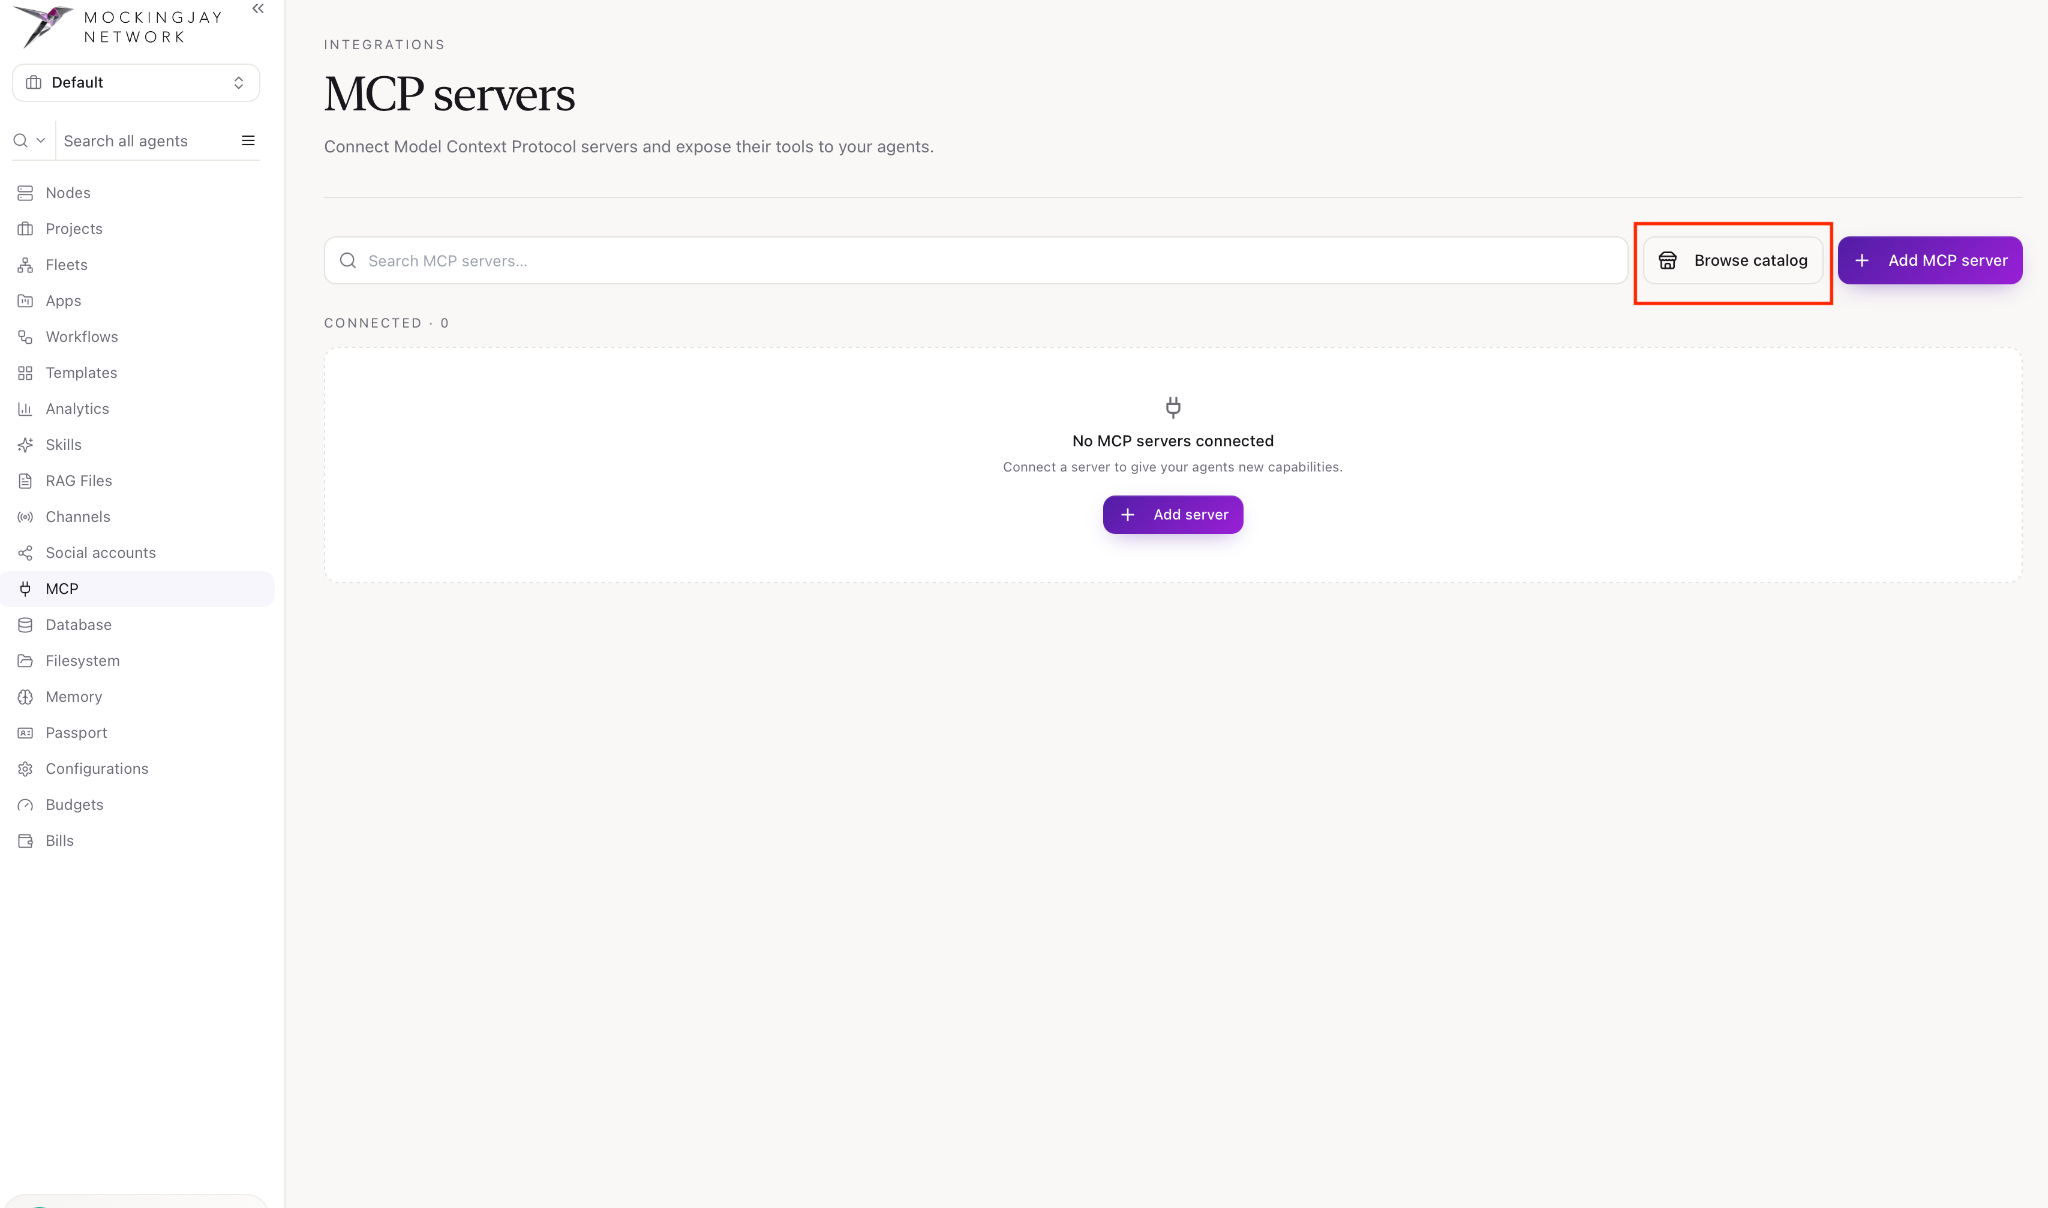
- From the Mockingjay Network sidebar, open the navigation menu by clicking ☰, then click MCP.
- Click Browse Catalog to explore the available MCP servers. Select a server to view its details, then install or connect it to make its tools available to agents.
Connecting to a local server
- Click Browse Catalog to view the available MCP servers.
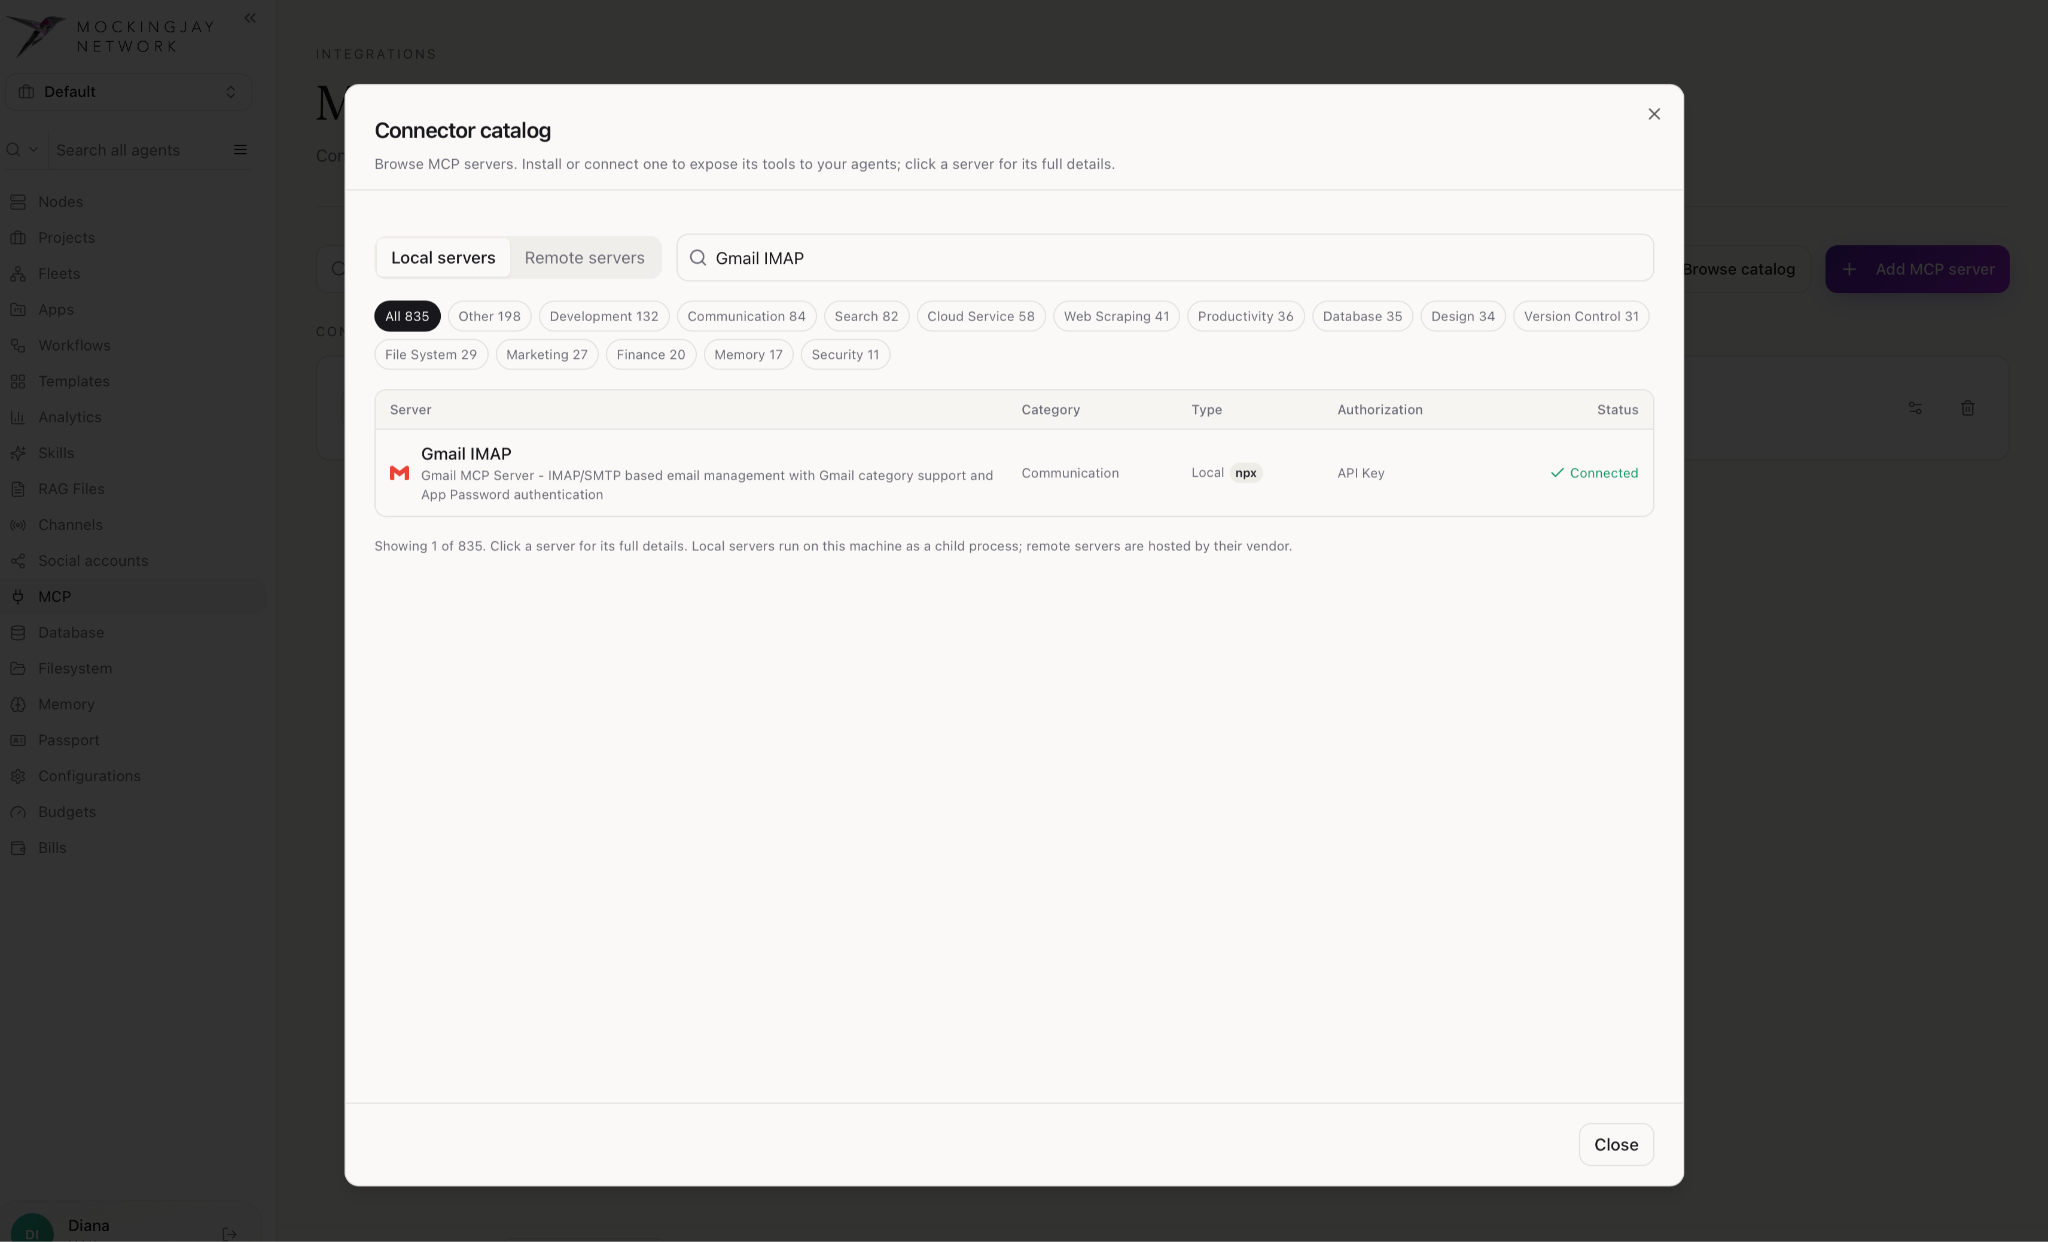
- Under Local Servers, search for GMAIL IMAP as an example.
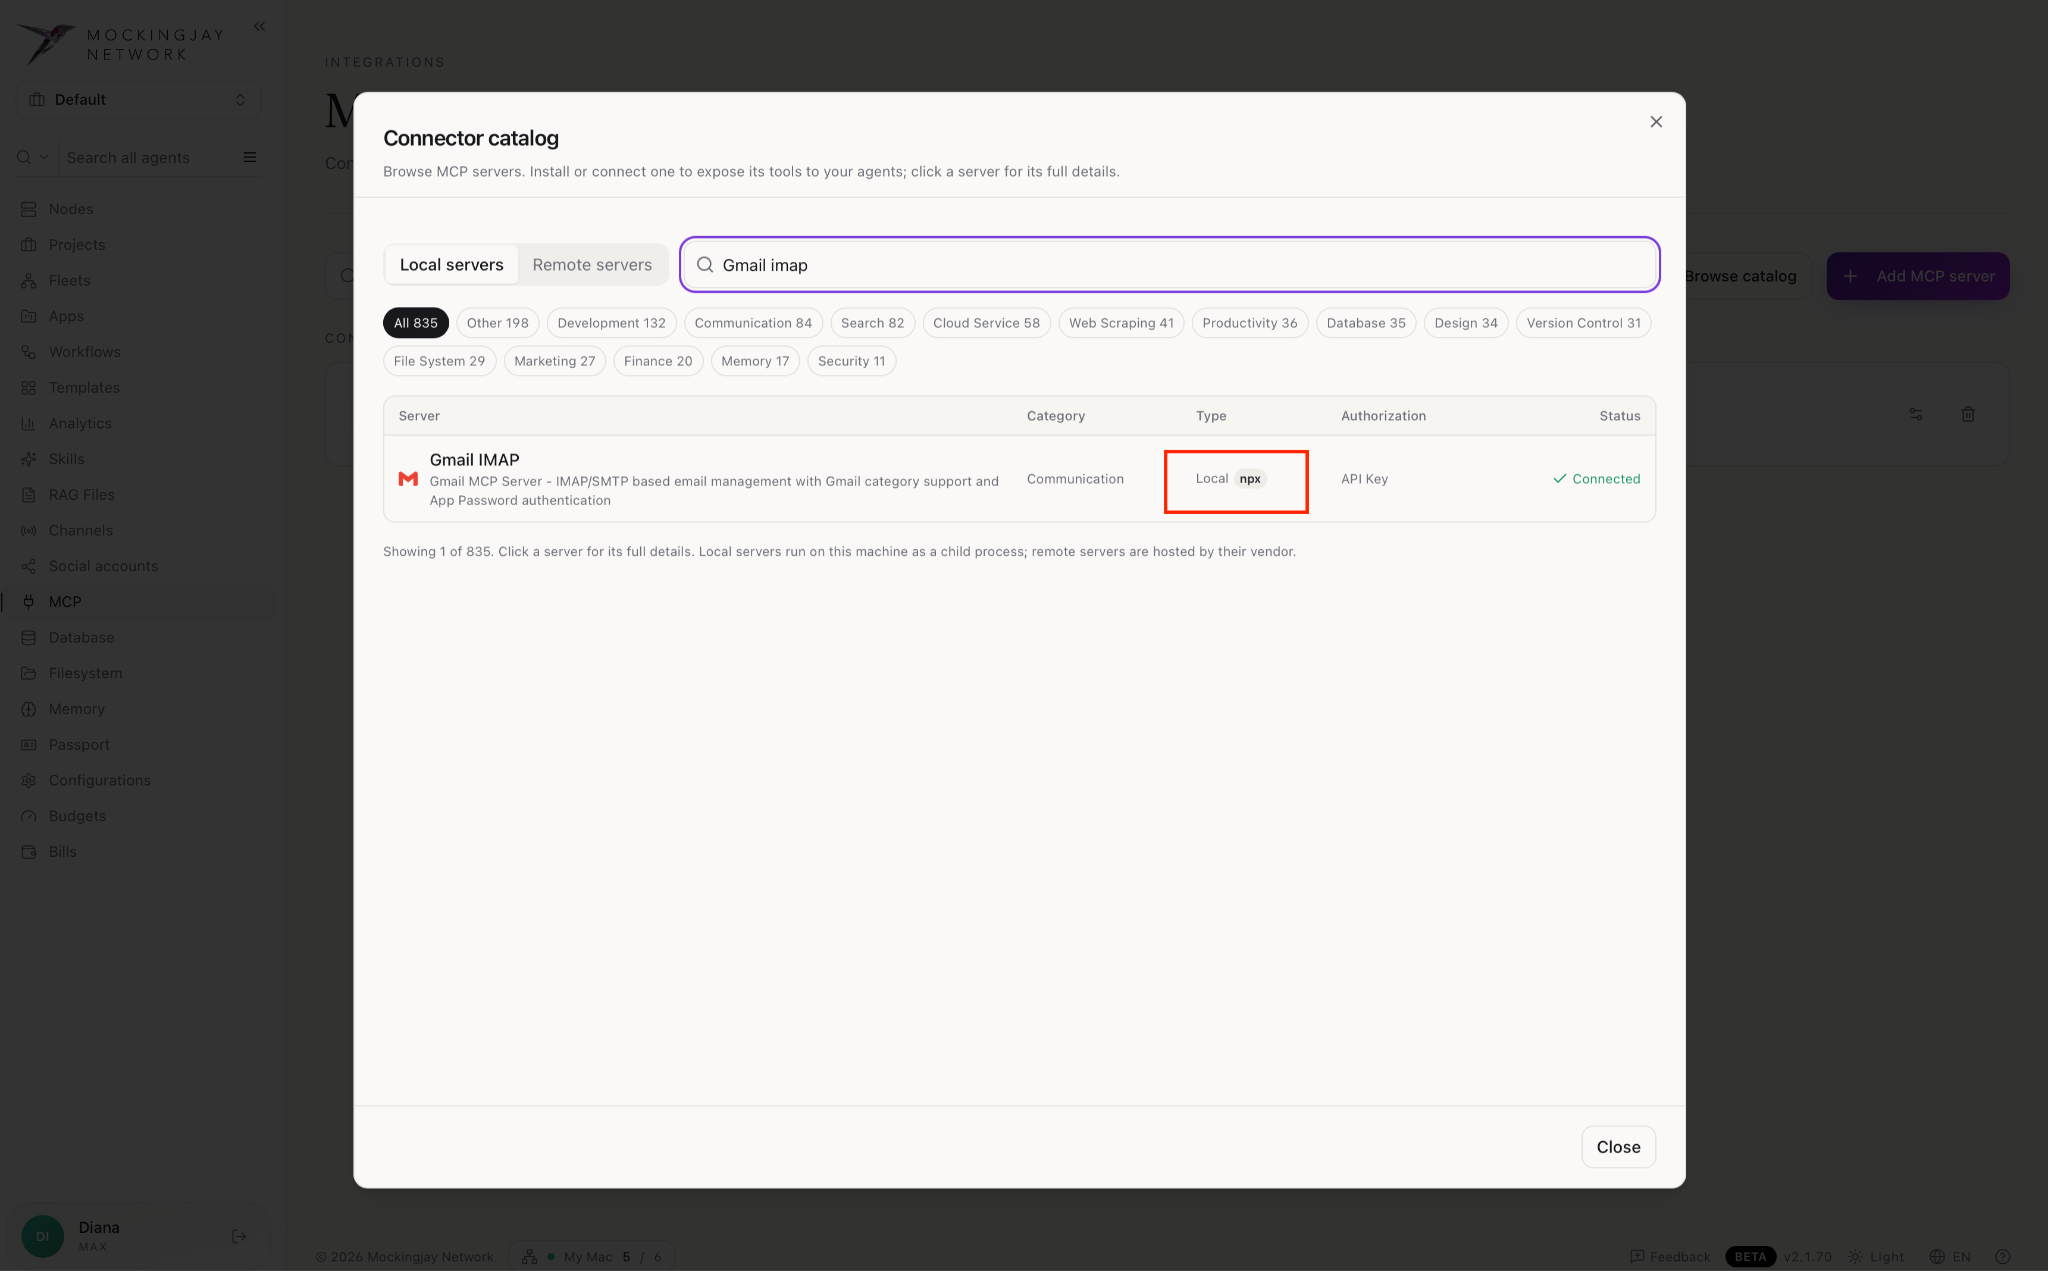
- Select GMAIL IMAP to view its details.
- Check the Type field. It may show npx or uvx, depending on the MCP server.
- Click Install to install the server.
Important: Install the Required Runtime
Before installing or running an MCP server, ensure that the runtime specified in the Type field is installed on your system. If it is not installed, follow the instructions below for your operating system.
1. If the Type is npx
npx is included with npm, which is installed alongside Node.js. Install Node.js if it is not already available.
- macOS: Install Node.js from nodejs.org. Alternatively, if Homebrew is installed, run:
brew install node - Windows: Download and install the LTS version from nodejs.org.
- Ubuntu/Linux: Run:
sudo apt update
sudo apt install nodejs npm- Verify the installation by running:
node -v
npm -v
npx -v
2. If the Type is uvx
uvx is provided by uv, a Python package and project manager. Install uv to make uvx available.
- macOS: Run in Terminal:
brew install uv - Windows: Run in PowerShell:
winget install --id=astral-sh.uv -e - Ubuntu/Linux: Run in Terminal:
curl -LsSf https://astral.sh/uv/install.sh | sh - Verify the installation by running:
uv --version
uvx --version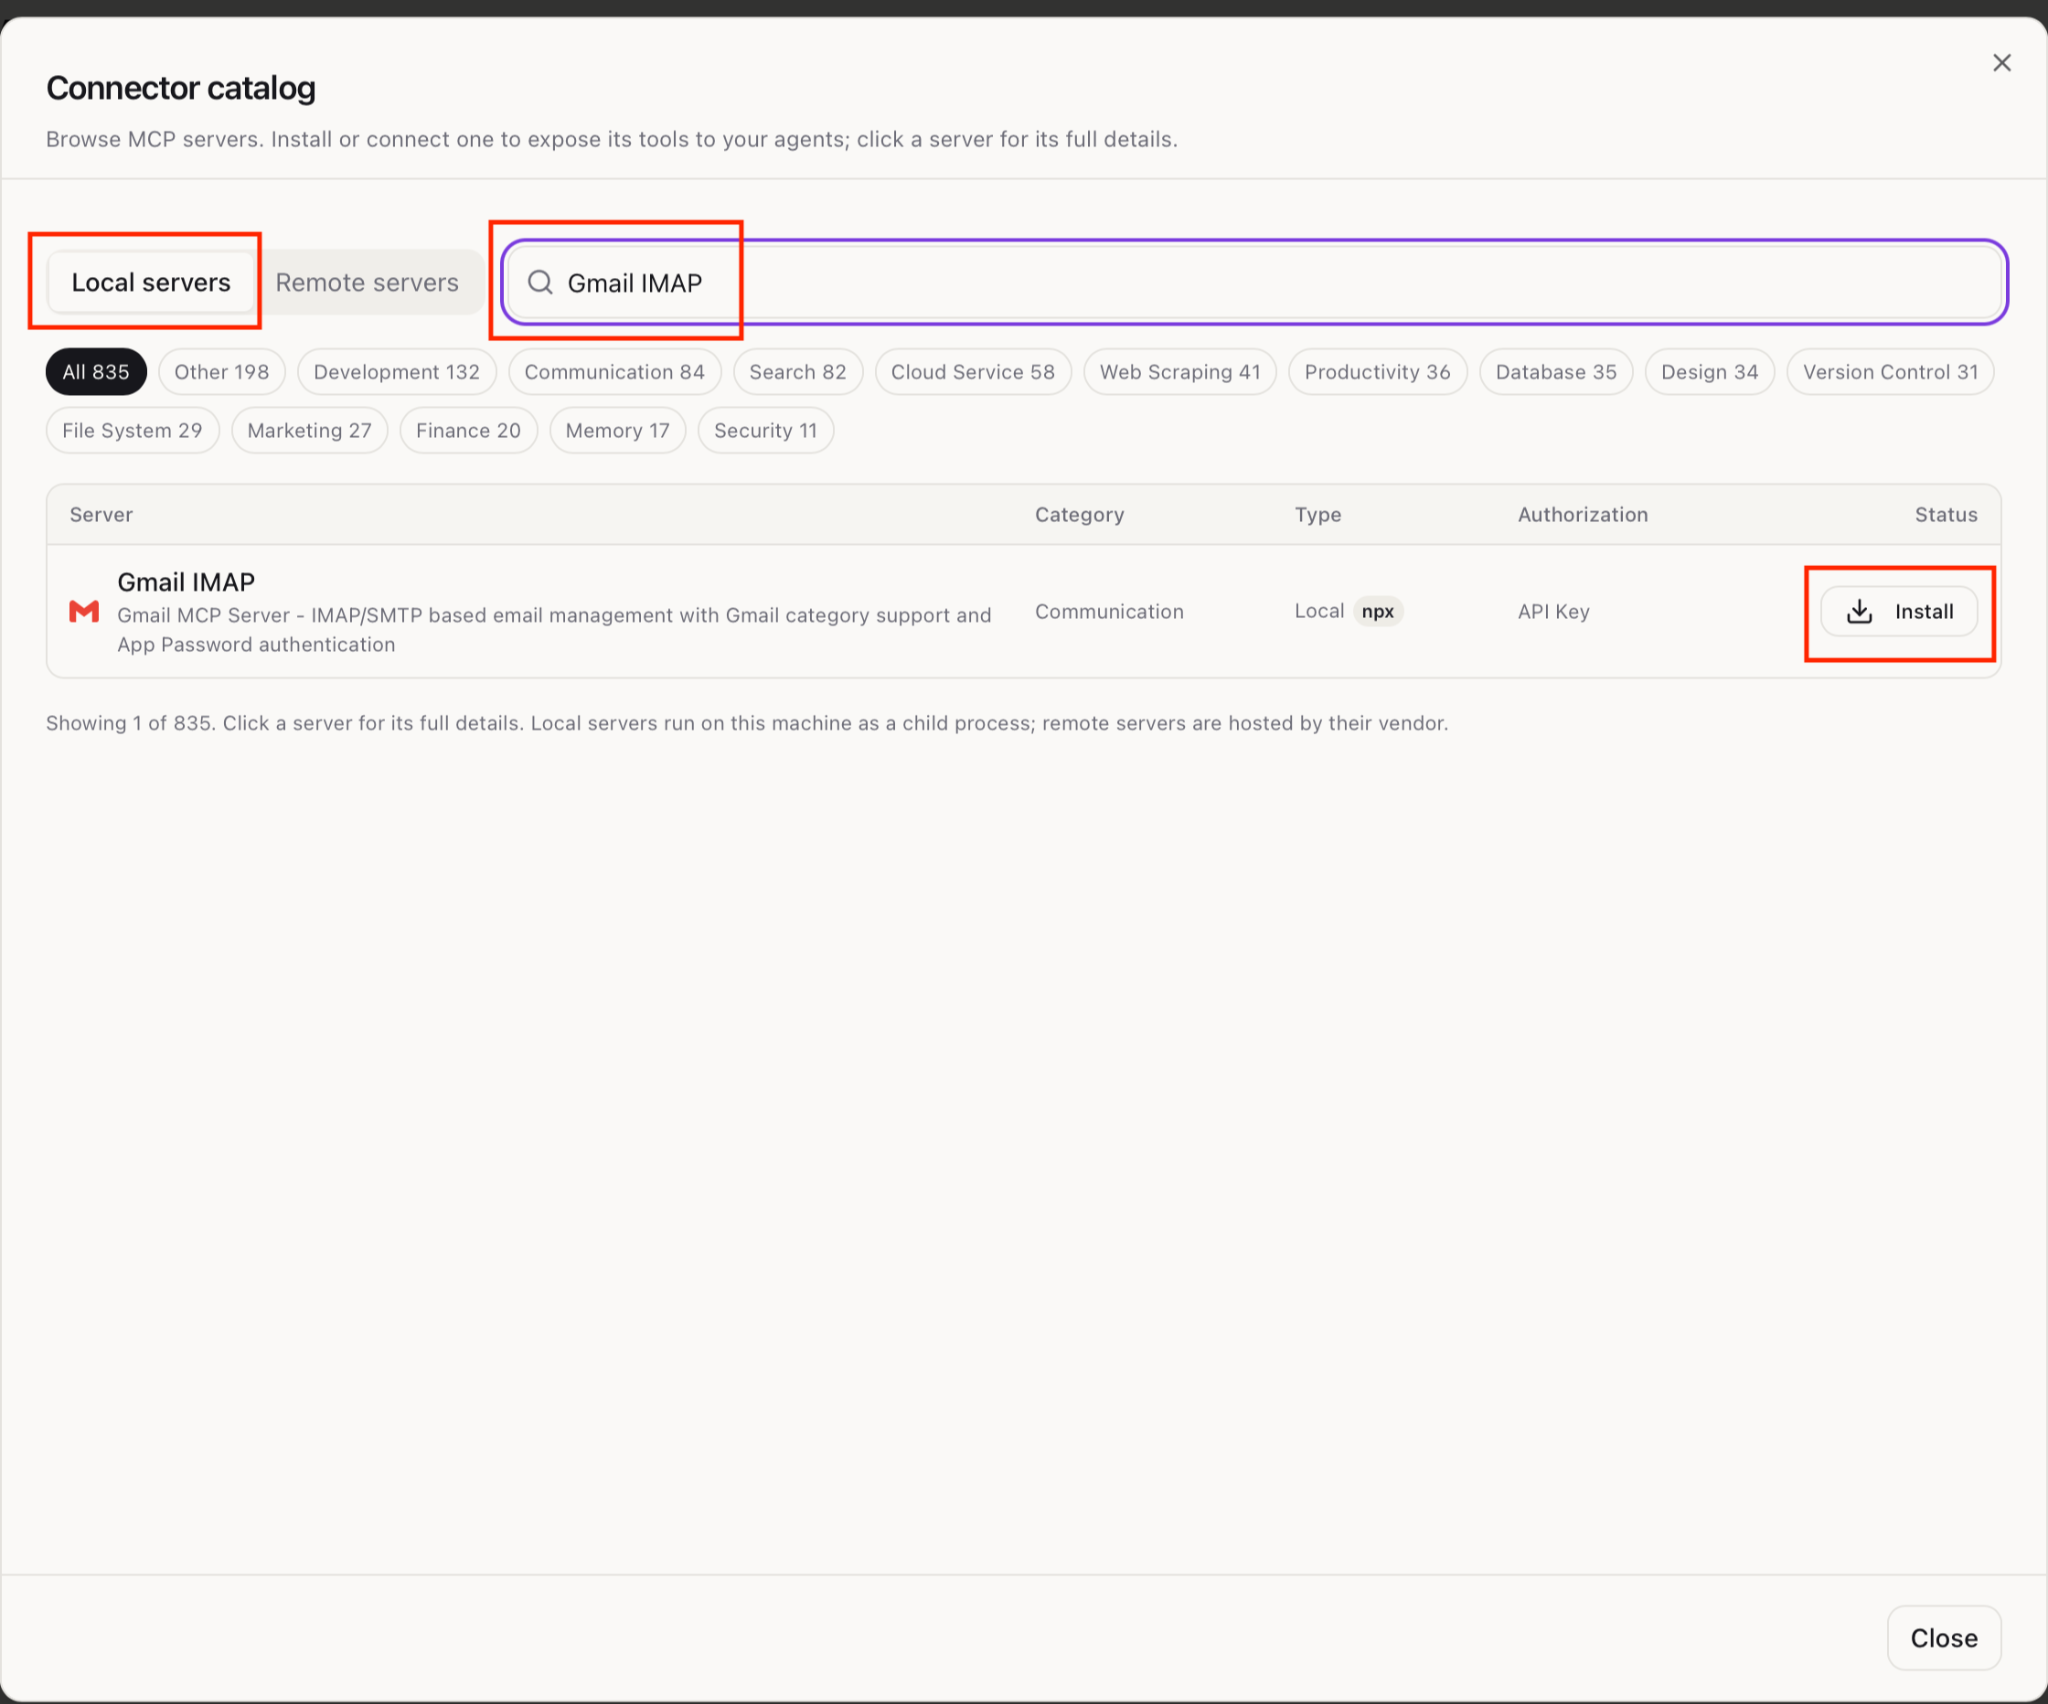
- Connector catalog has Gmail address and Gmail app password. Give a gmail address and get your gmail app password from Google App Passwords and click install.
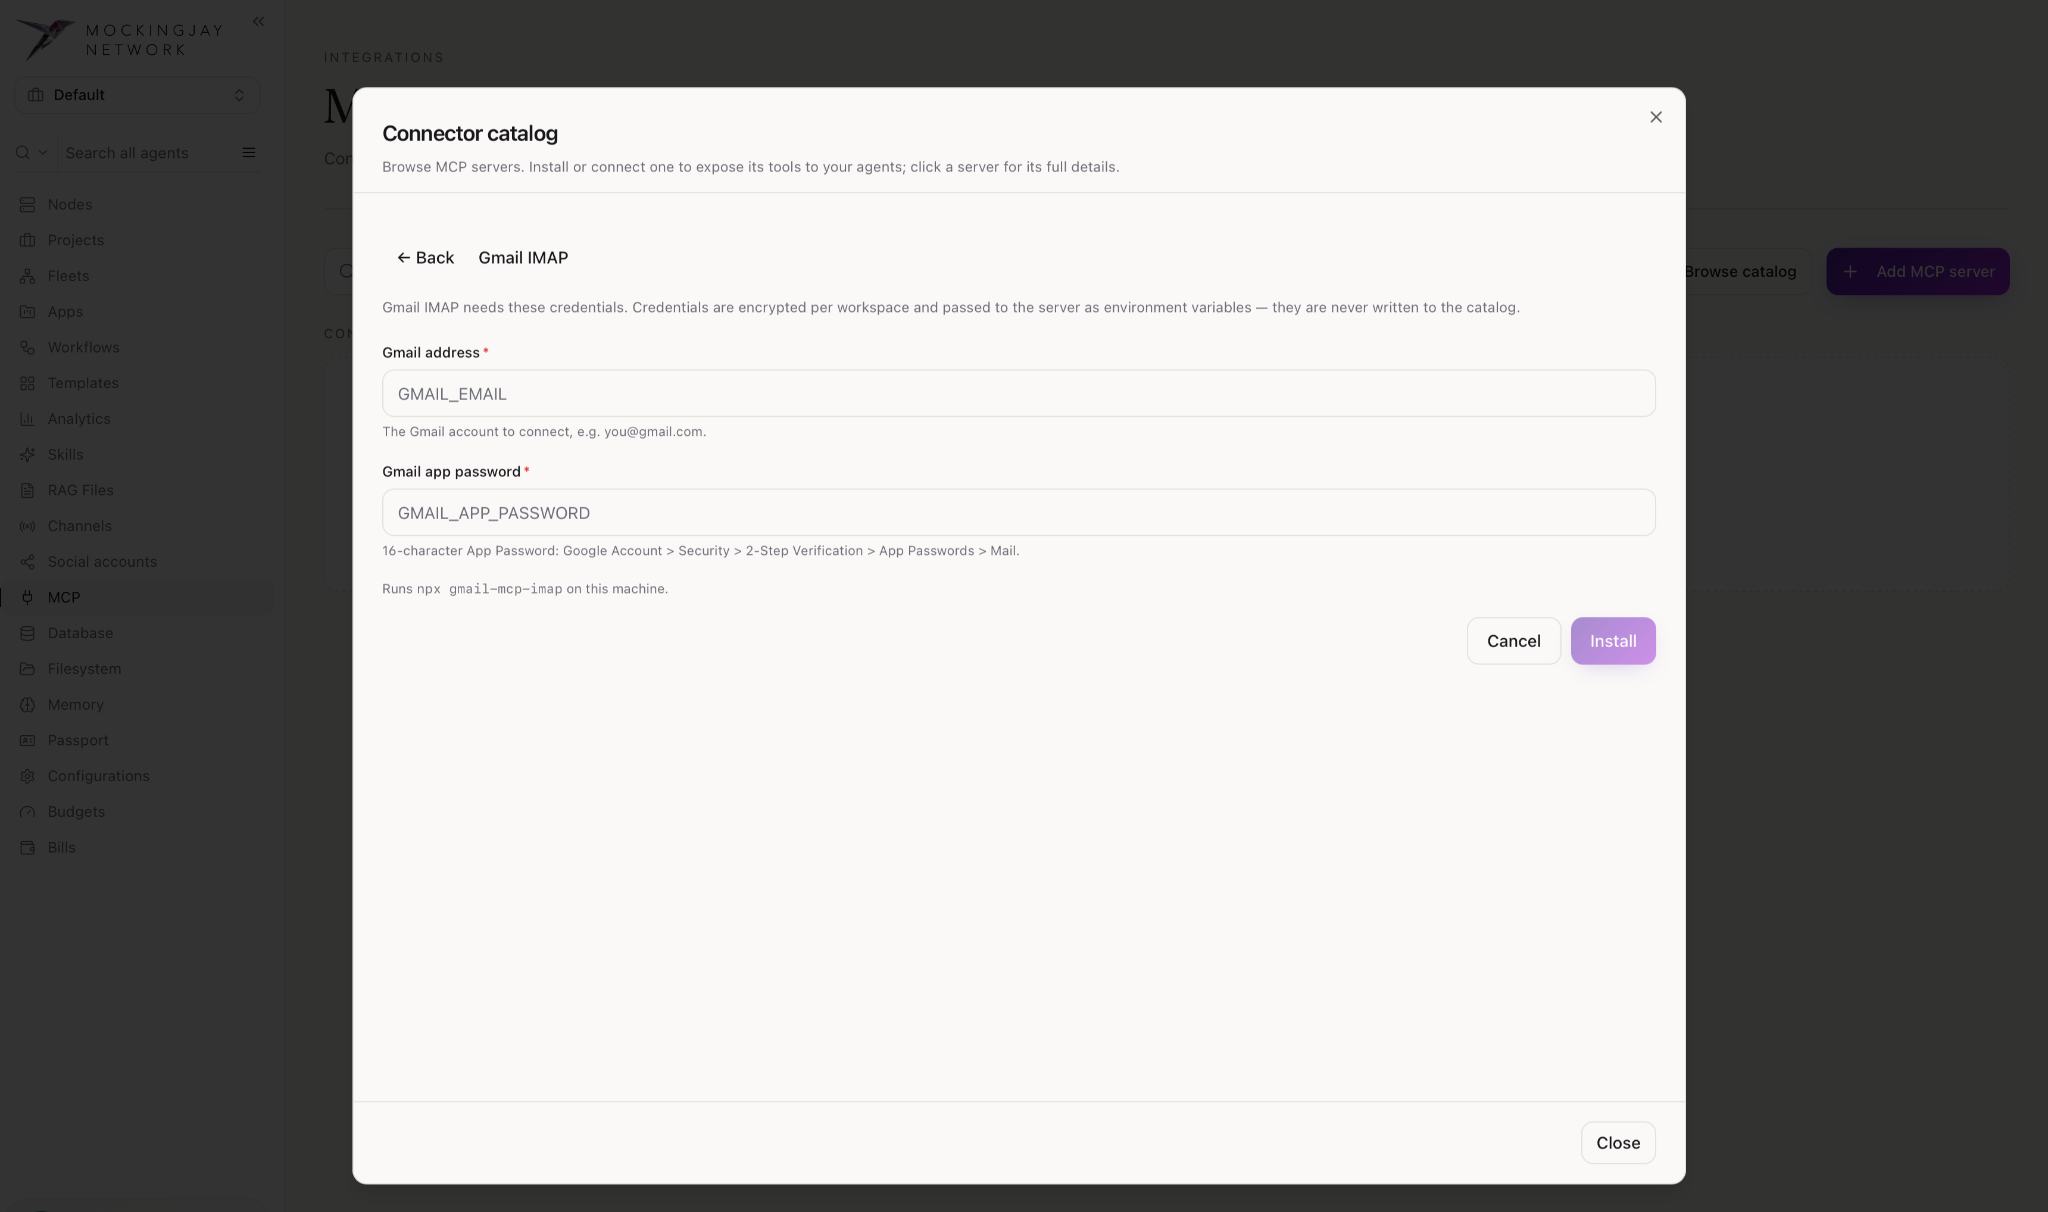
- After adding Gmail address and Gmail App Password, click Install
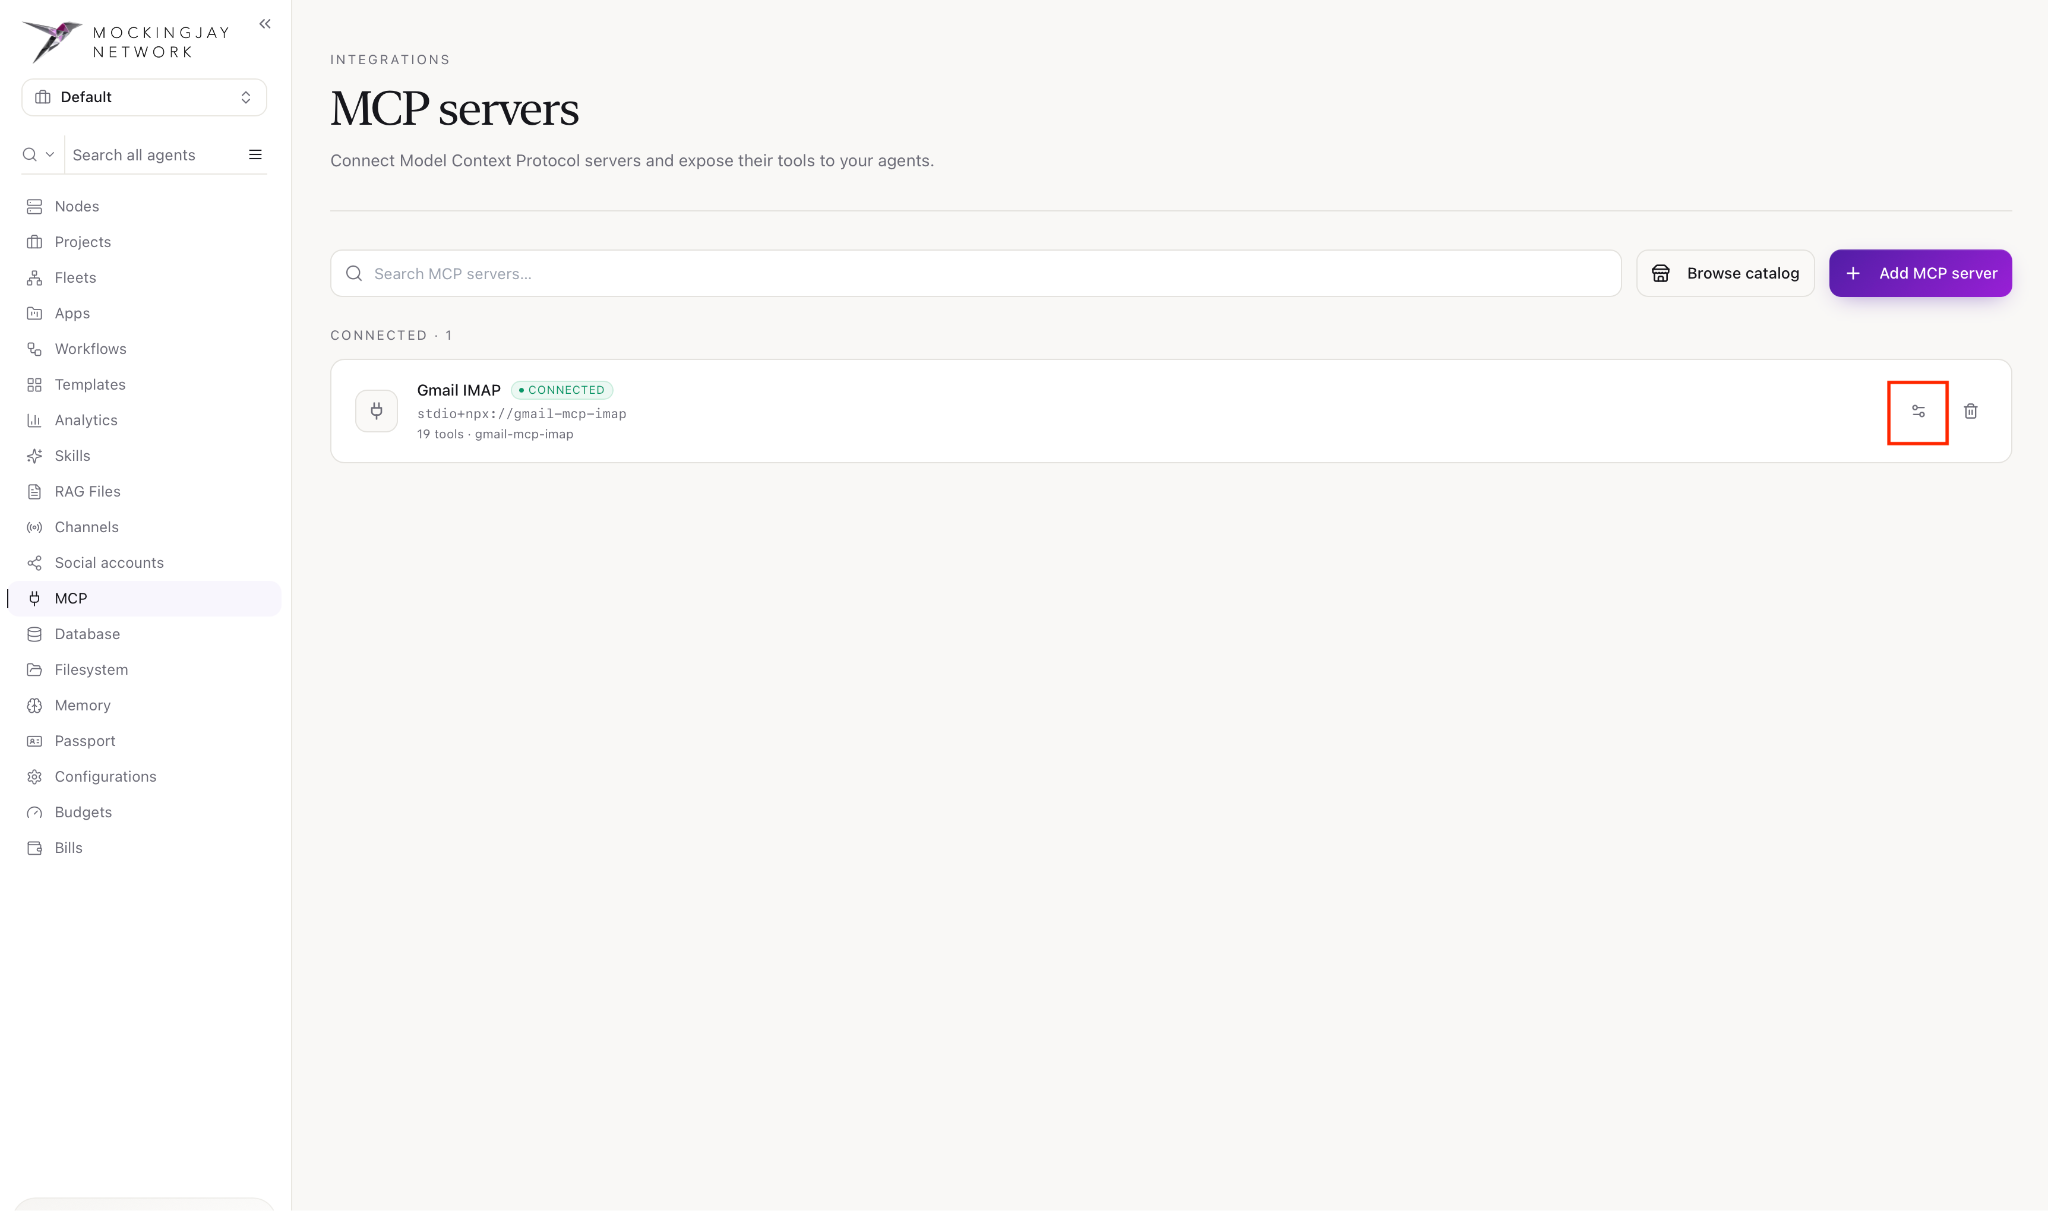
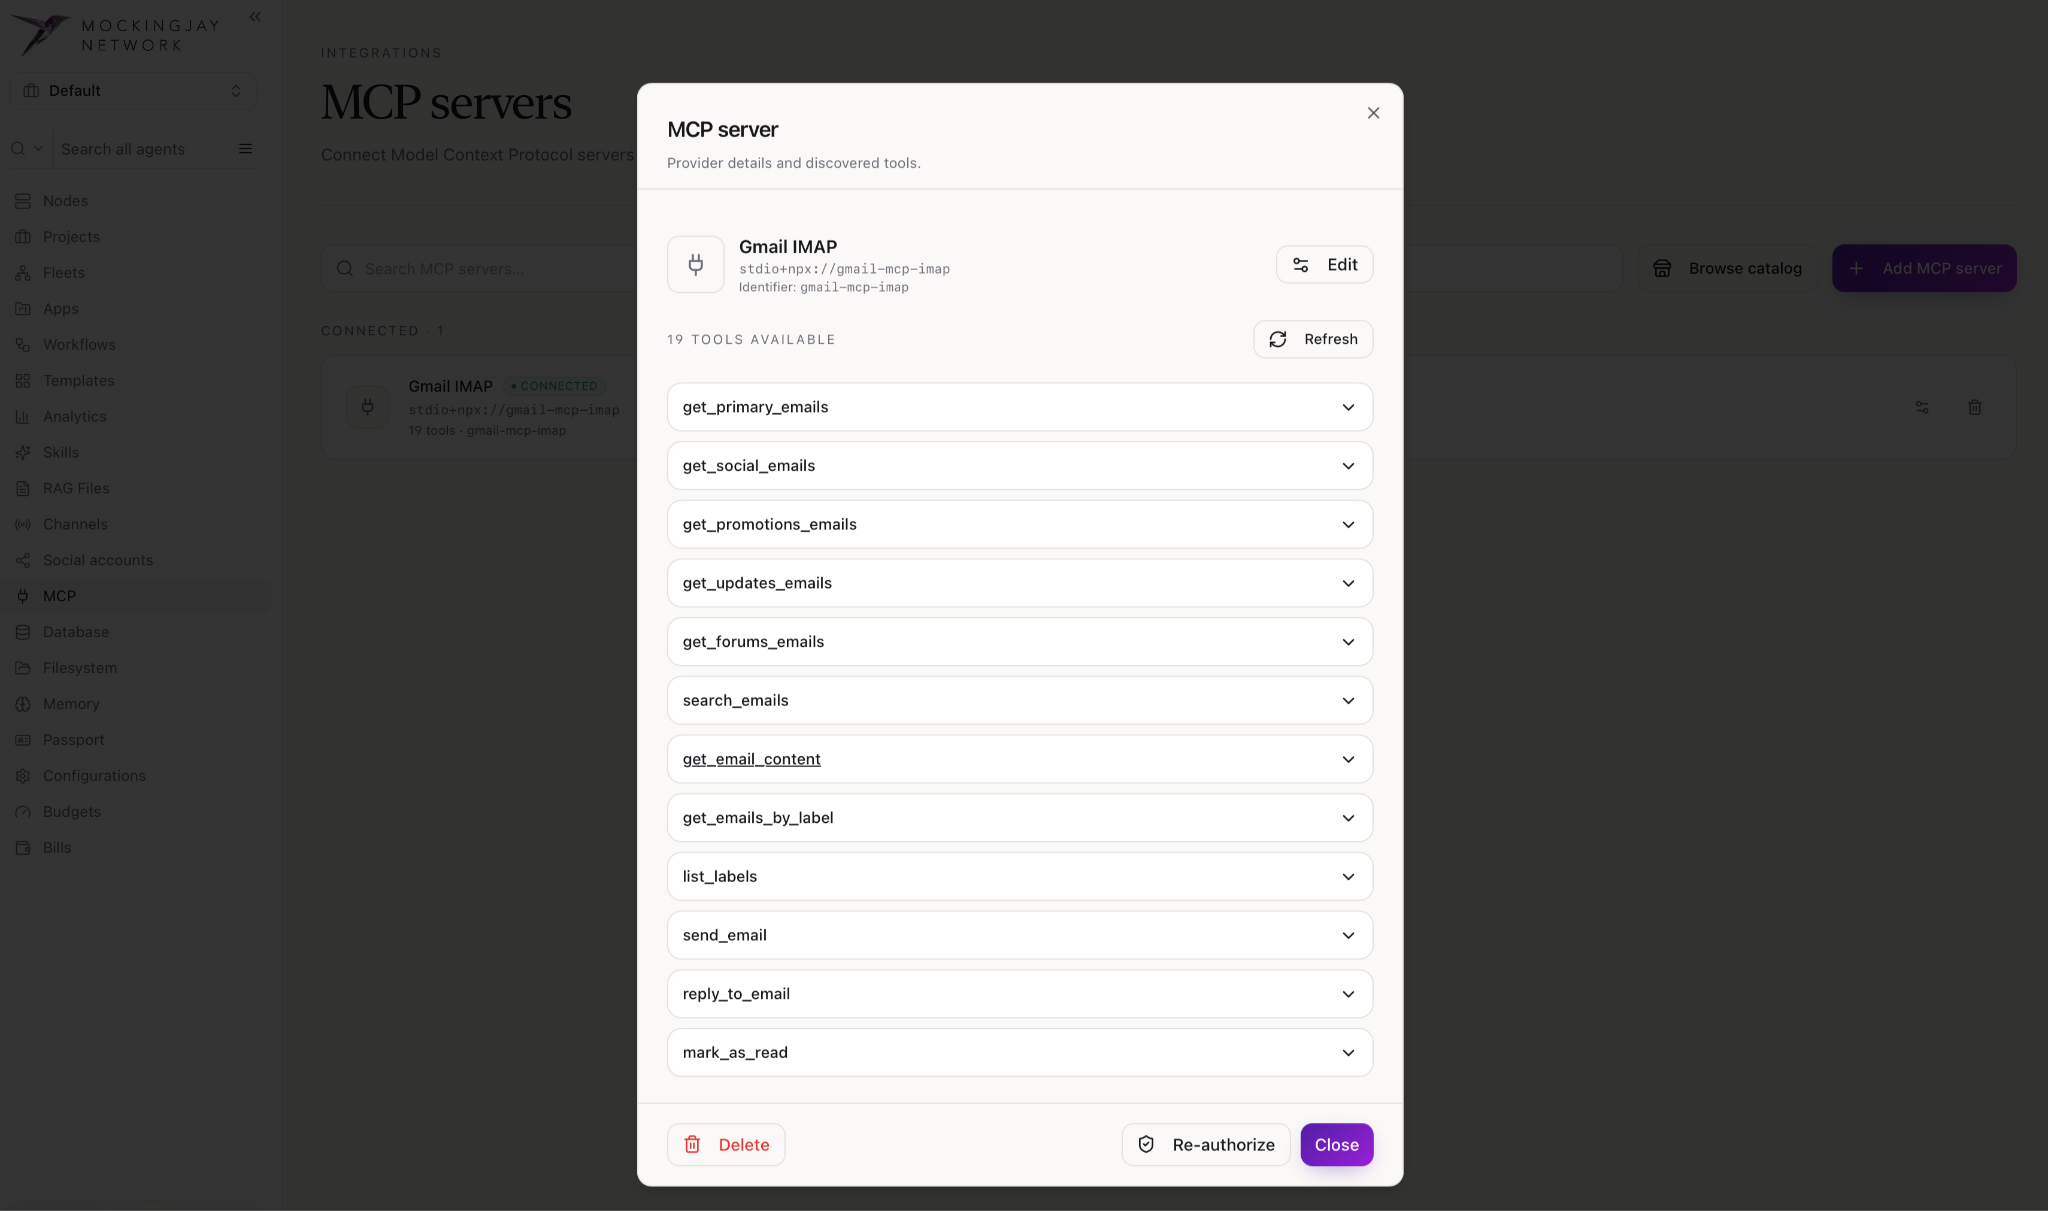
- Click on tools to see all the tools available.
Connecting to a remote server
- Click Browse Catalog to view the available MCP servers.
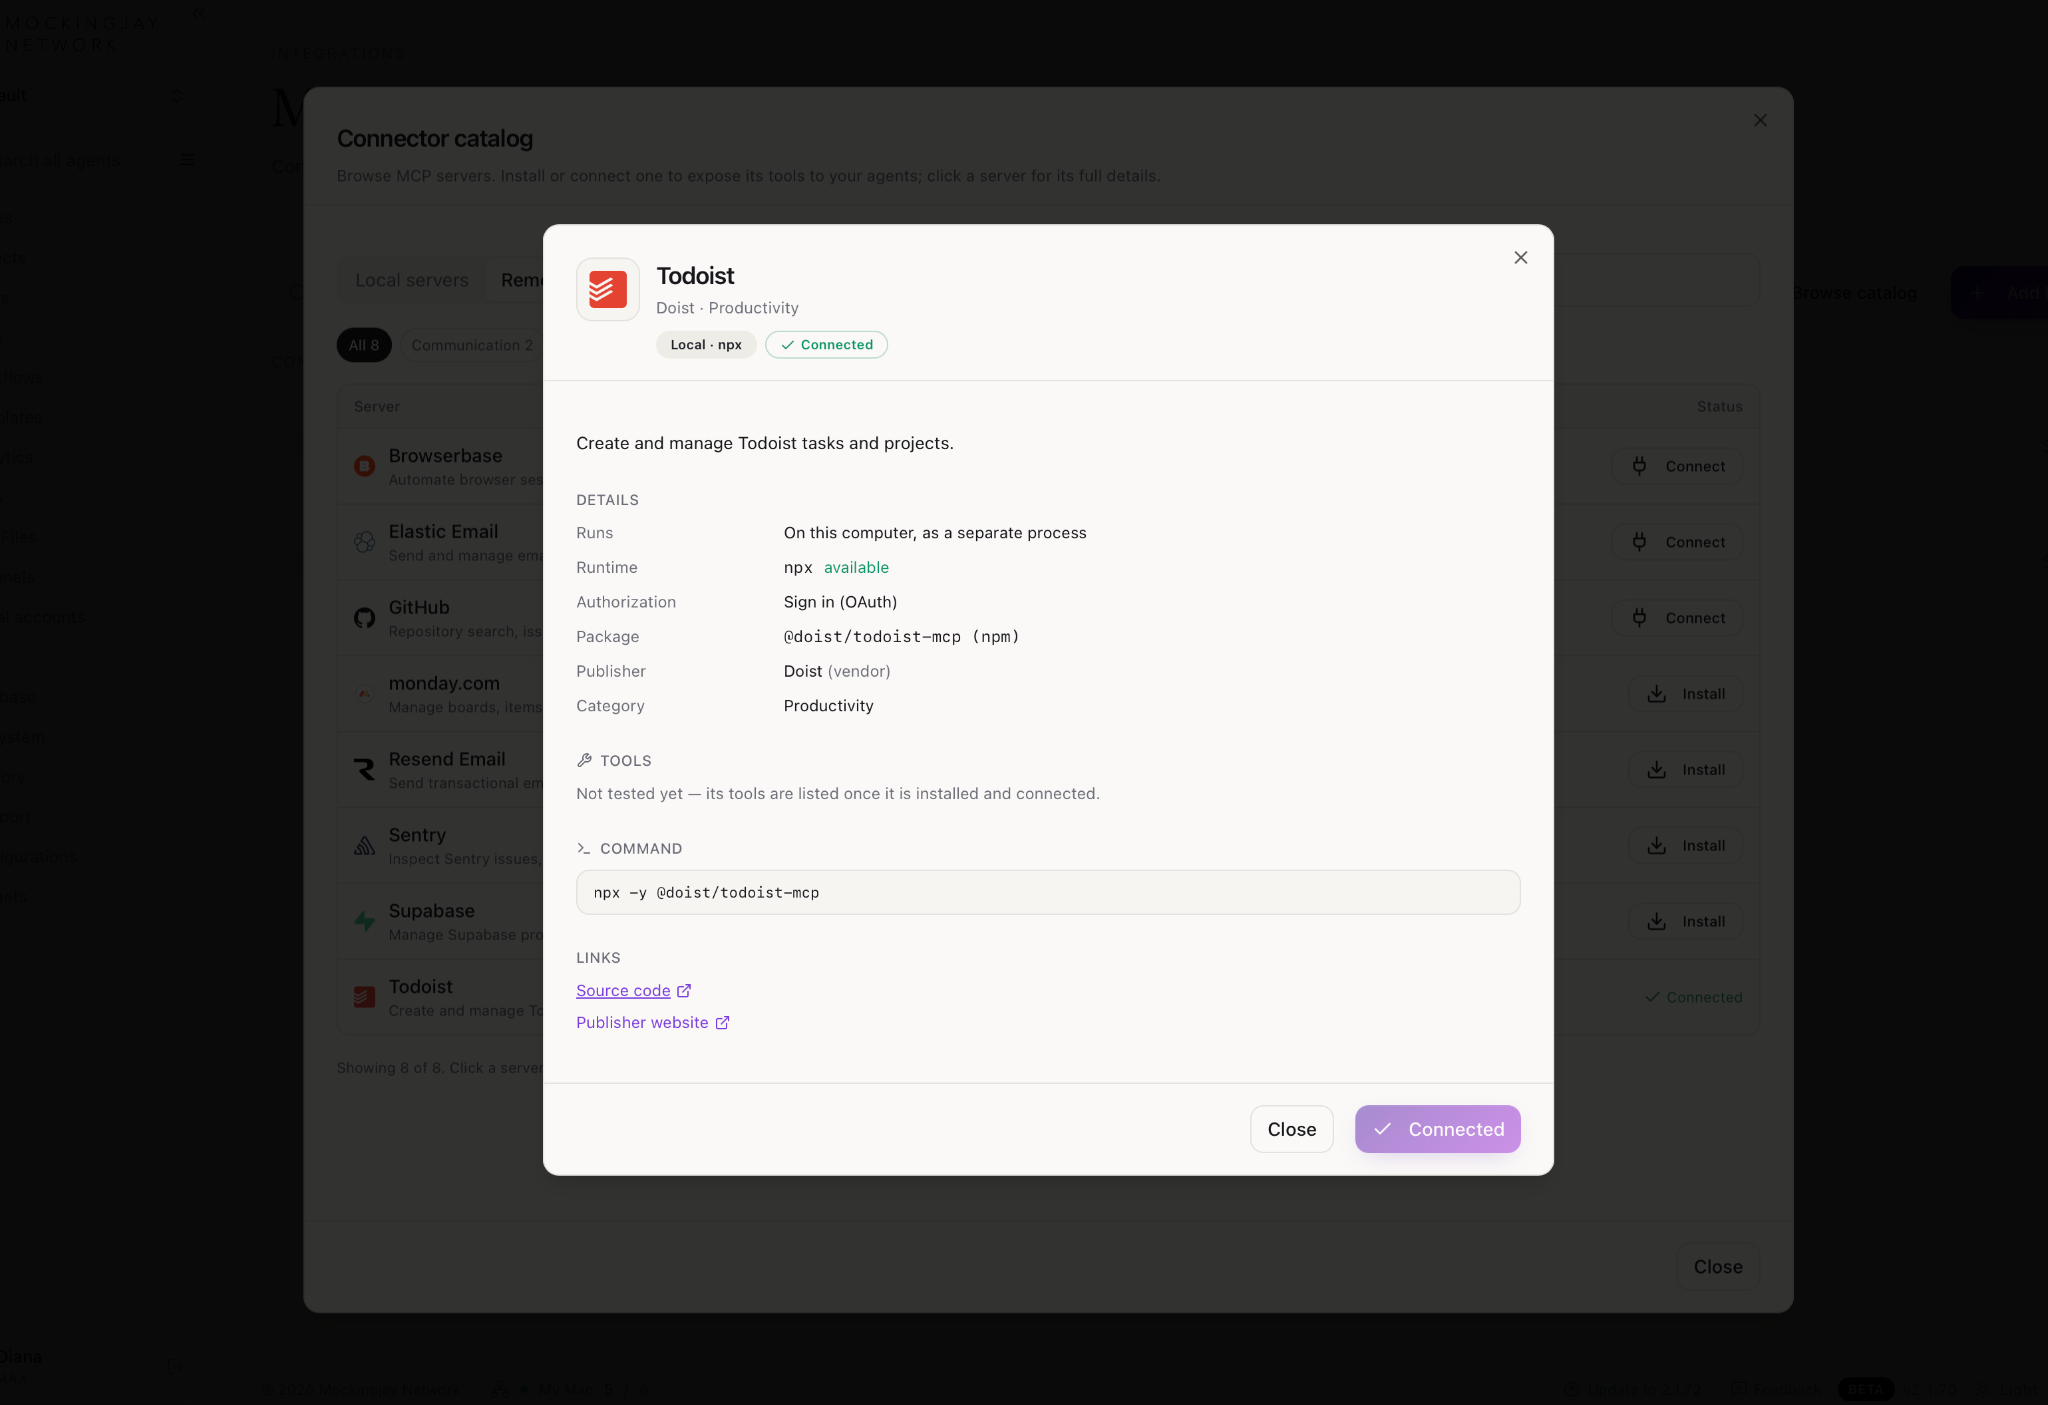
- Under Remote Servers, we have Todoist as an example.
- Click Install.
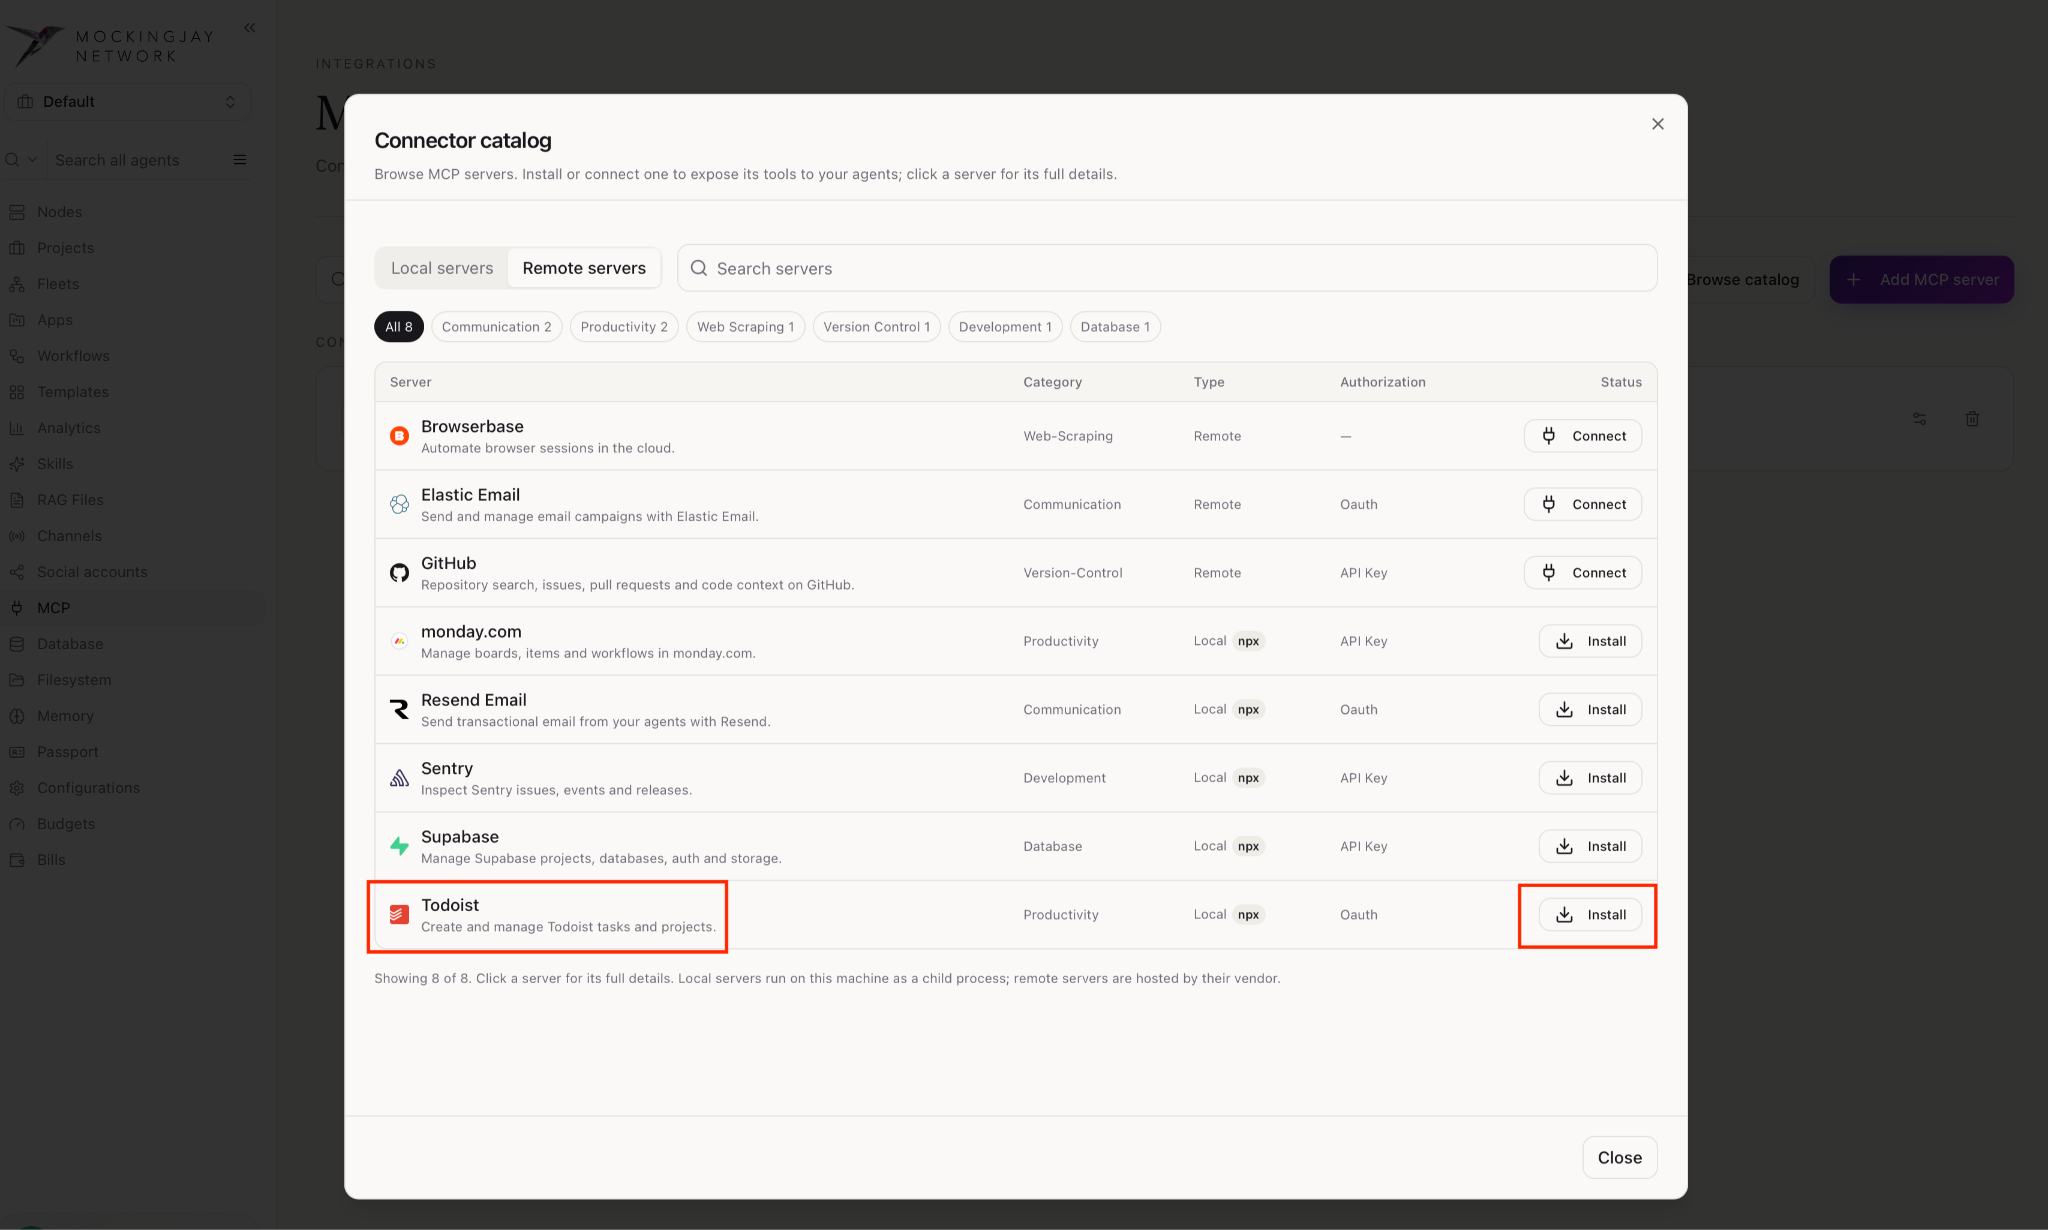
- Now you can see that Todoist is successfully connected.
Connecting an MCP server
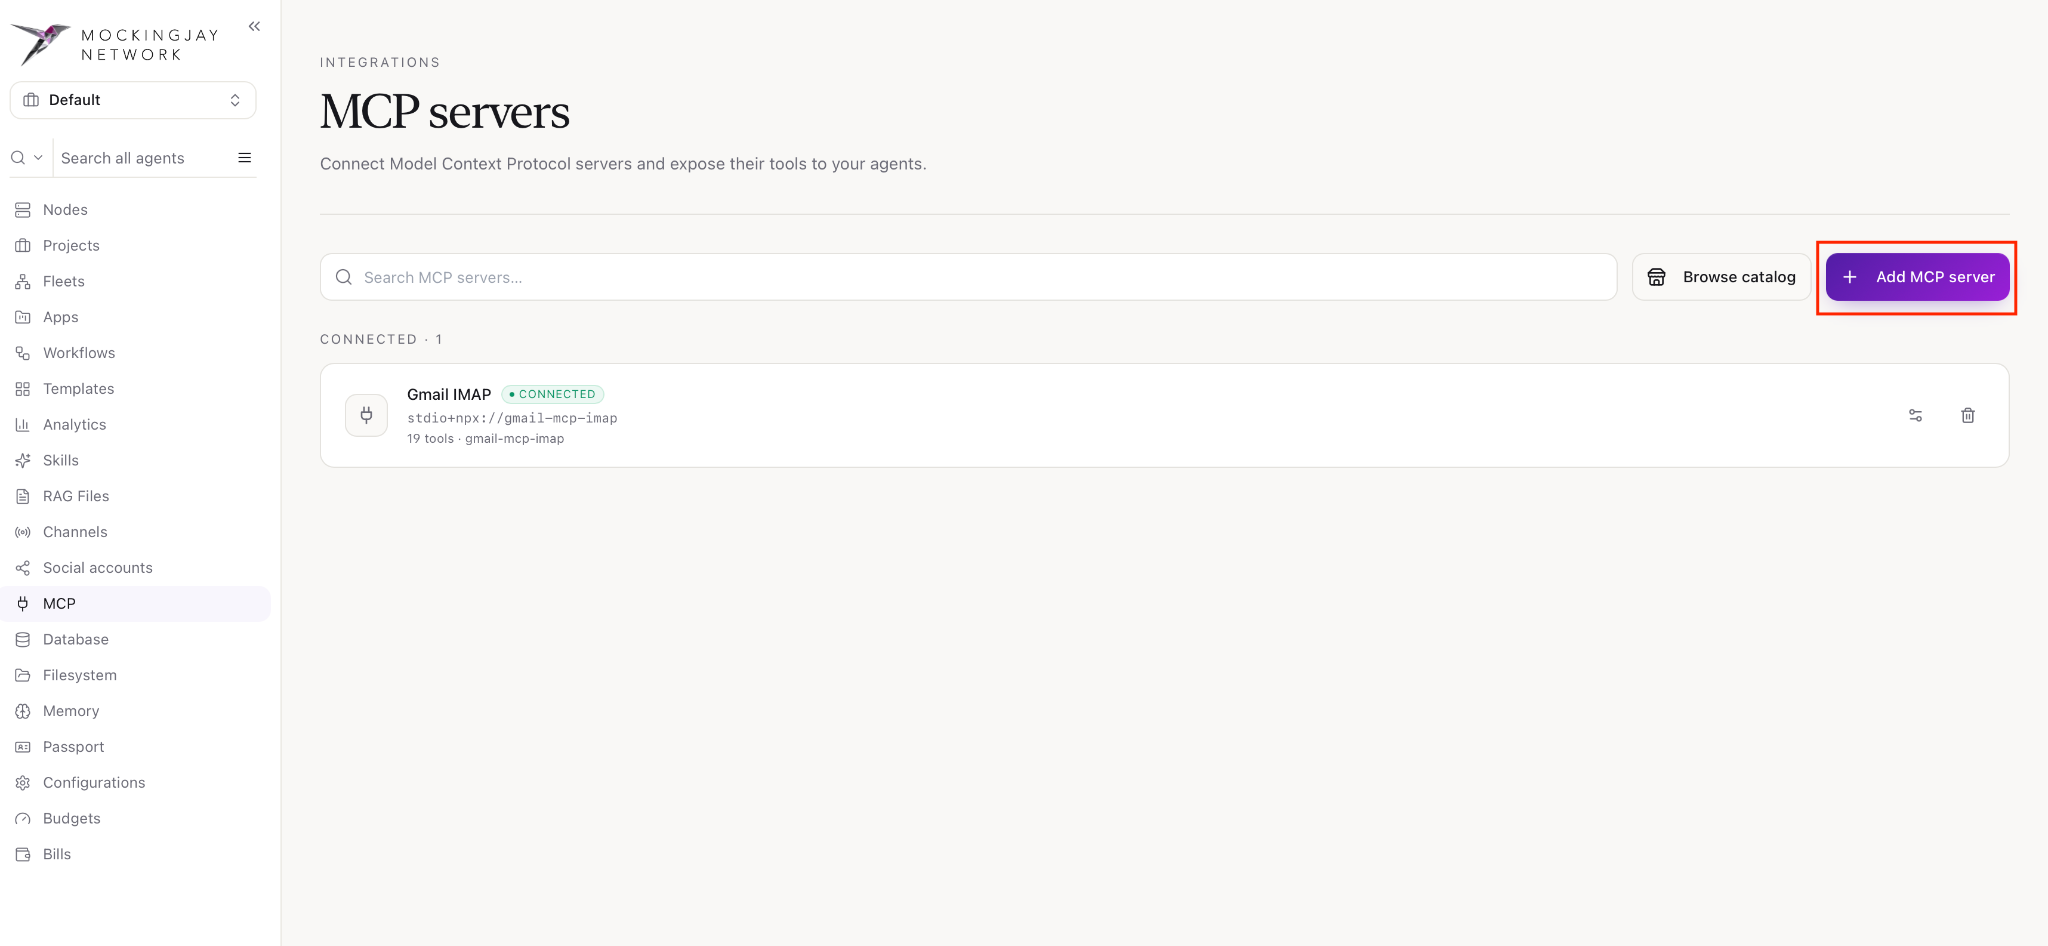
- From the Mockingjay Network sidebar, open the navigation menu by clicking ☰, then click MCP.
- Click Add MCP Server to configure a new MCP server.
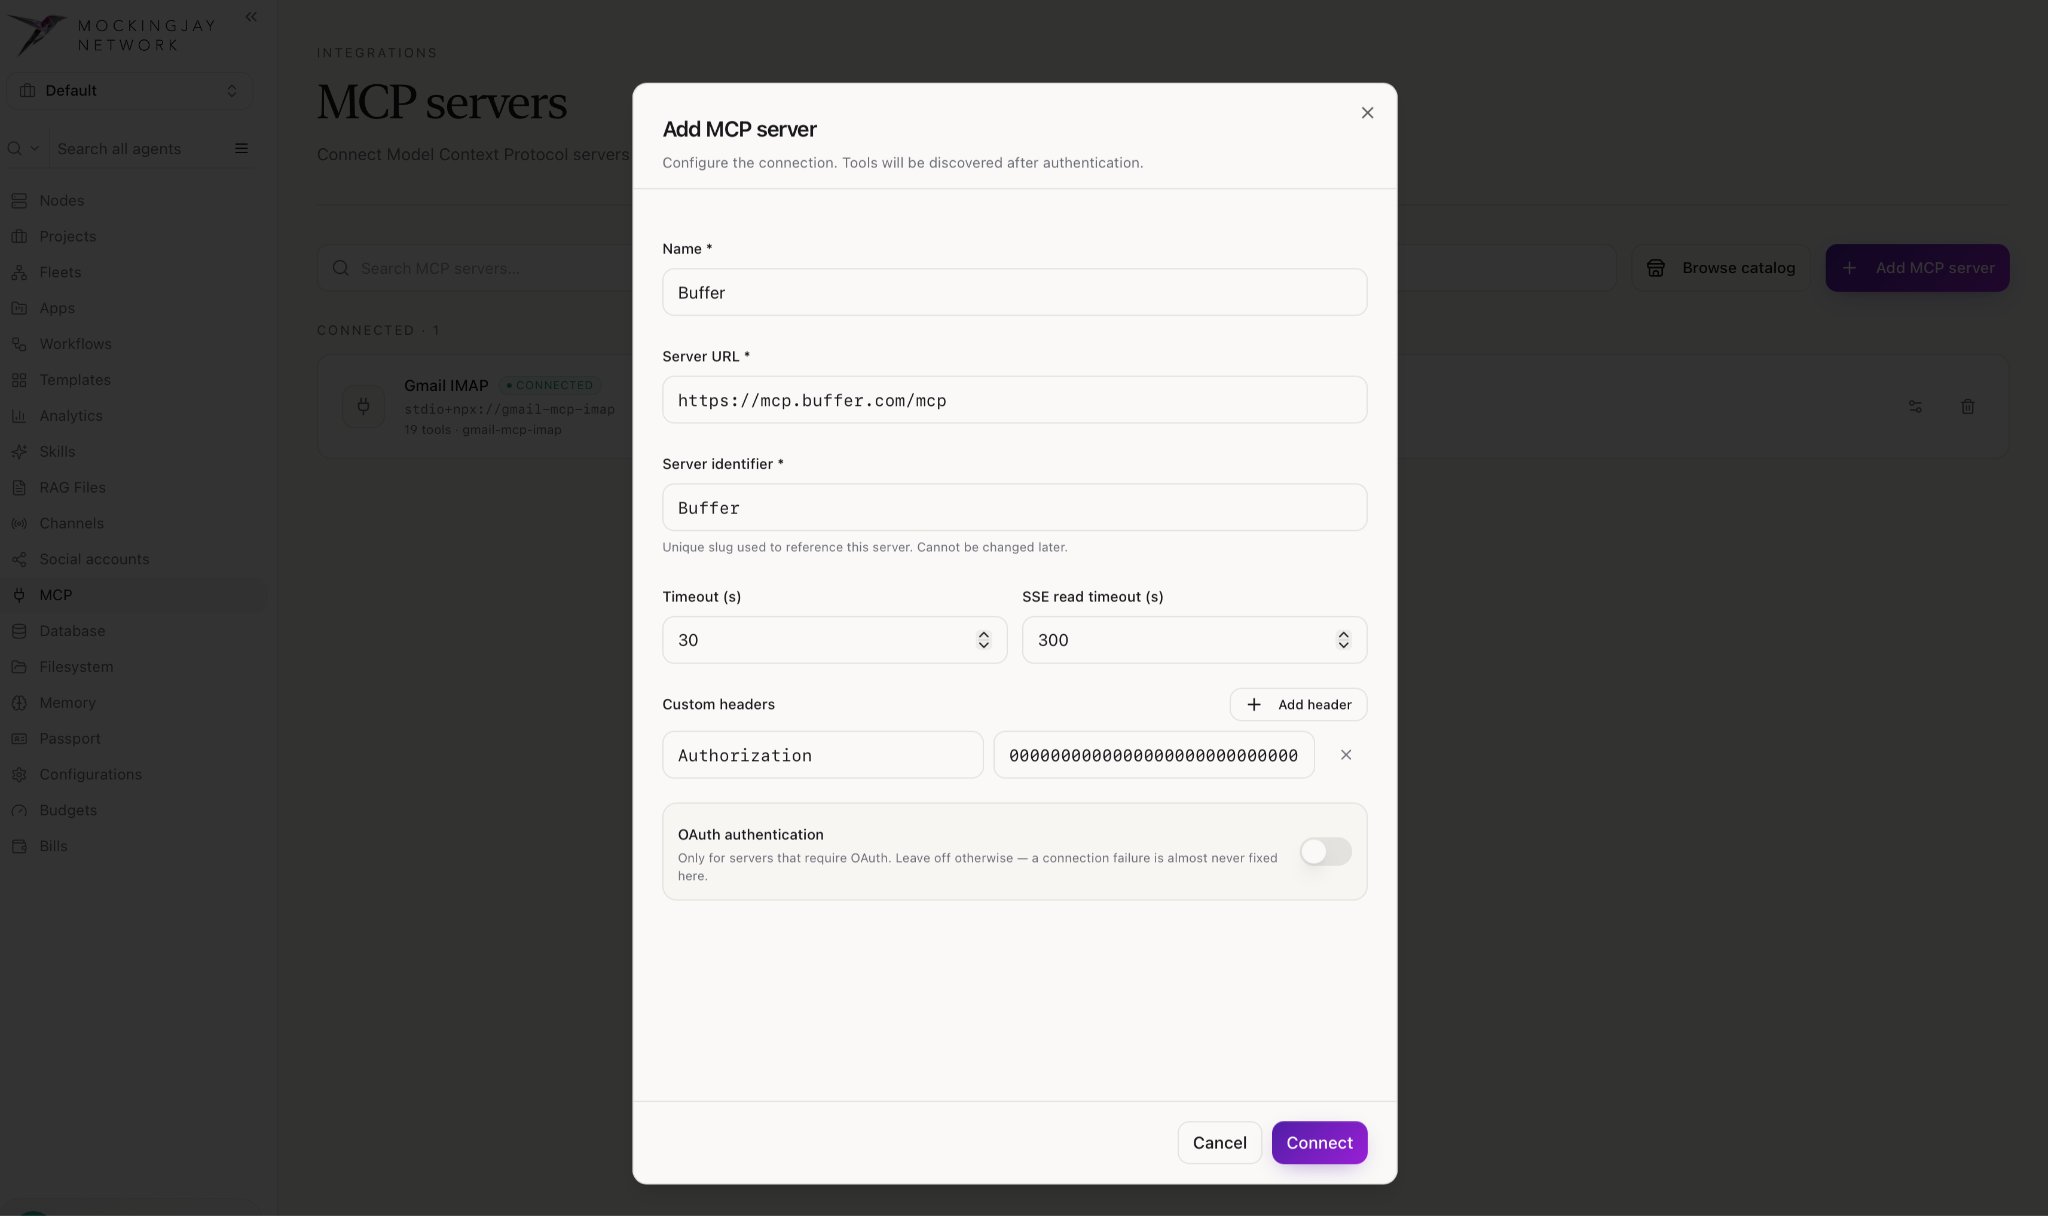
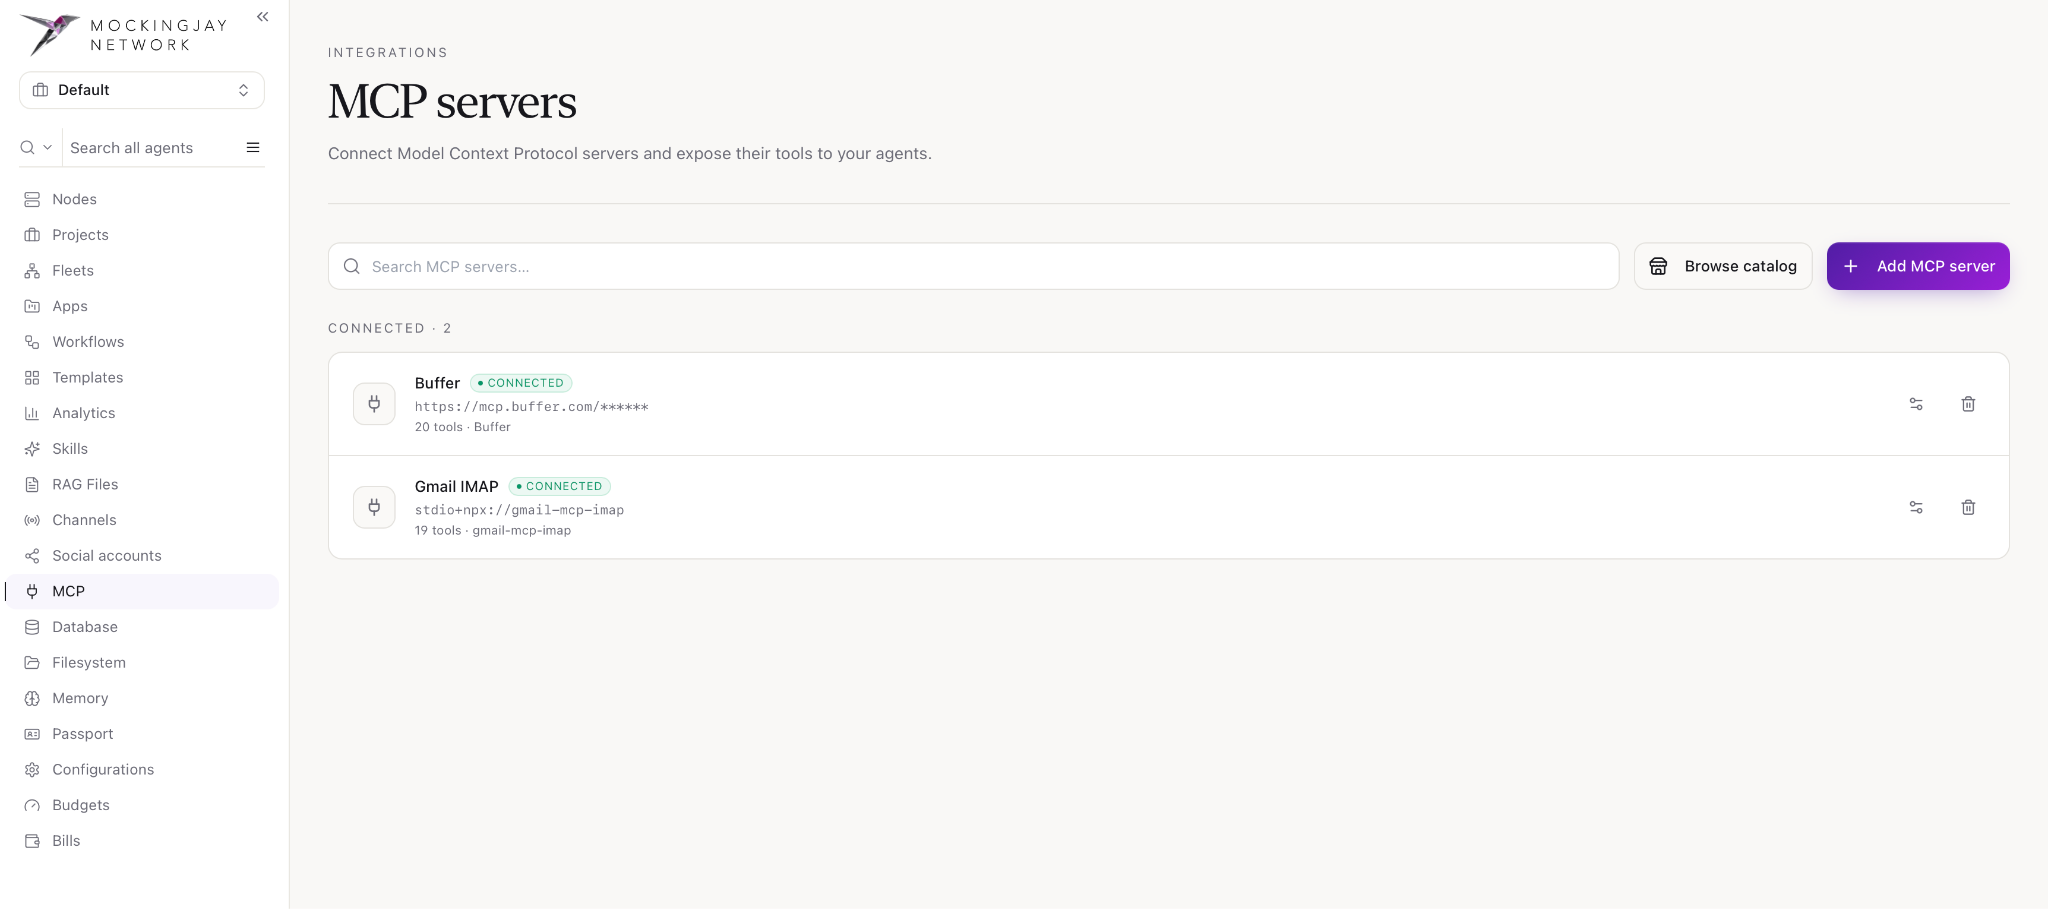
- Enter the required connection details. For example, to connect Buffer, provide the server URL and authentication details, then click Connect.
Database
Connect your databases directly to your workspace. When you link a database to a project, the agents in that project can read its data and receive real-time change events.
- From the Mockingjay Network sidebar, open the navigation menu by clicking ☰, then click Database.
These show the number of Databases you’ve added, how many are Connected, how many Projects have a database linked, and the number of Active links.
Projects panel
The panel on the left lists your projects. Each one shows how many databases are linked to it. Click a project to see its databases on the right.
Linked databases
This shows the databases linked to the selected project, for example “Default · 0 of 0”. Click the Link database to link one you’ve already added.
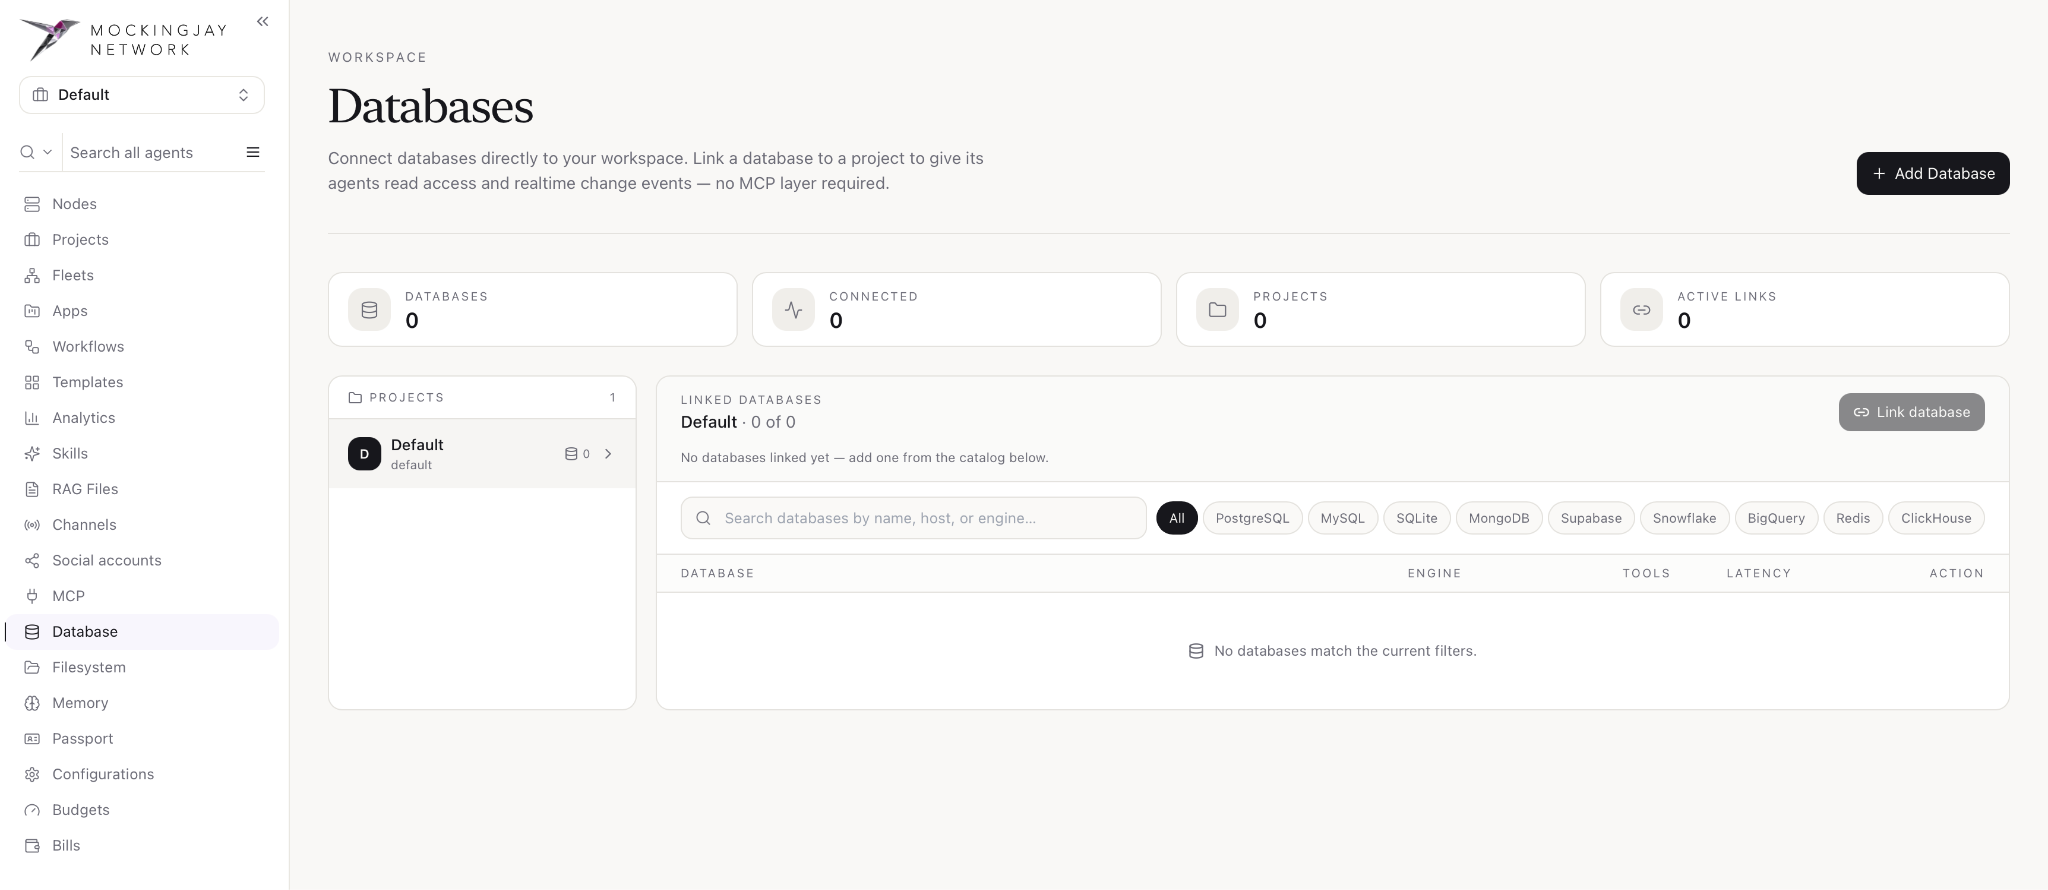
Database catalog. Search by name, host or engine, or filter by engine. Each database in the list shows:
- Its name.
- Its engine.
- How many tools it gives agents.
- Its latency (response time).
- An action button.
Adding a database
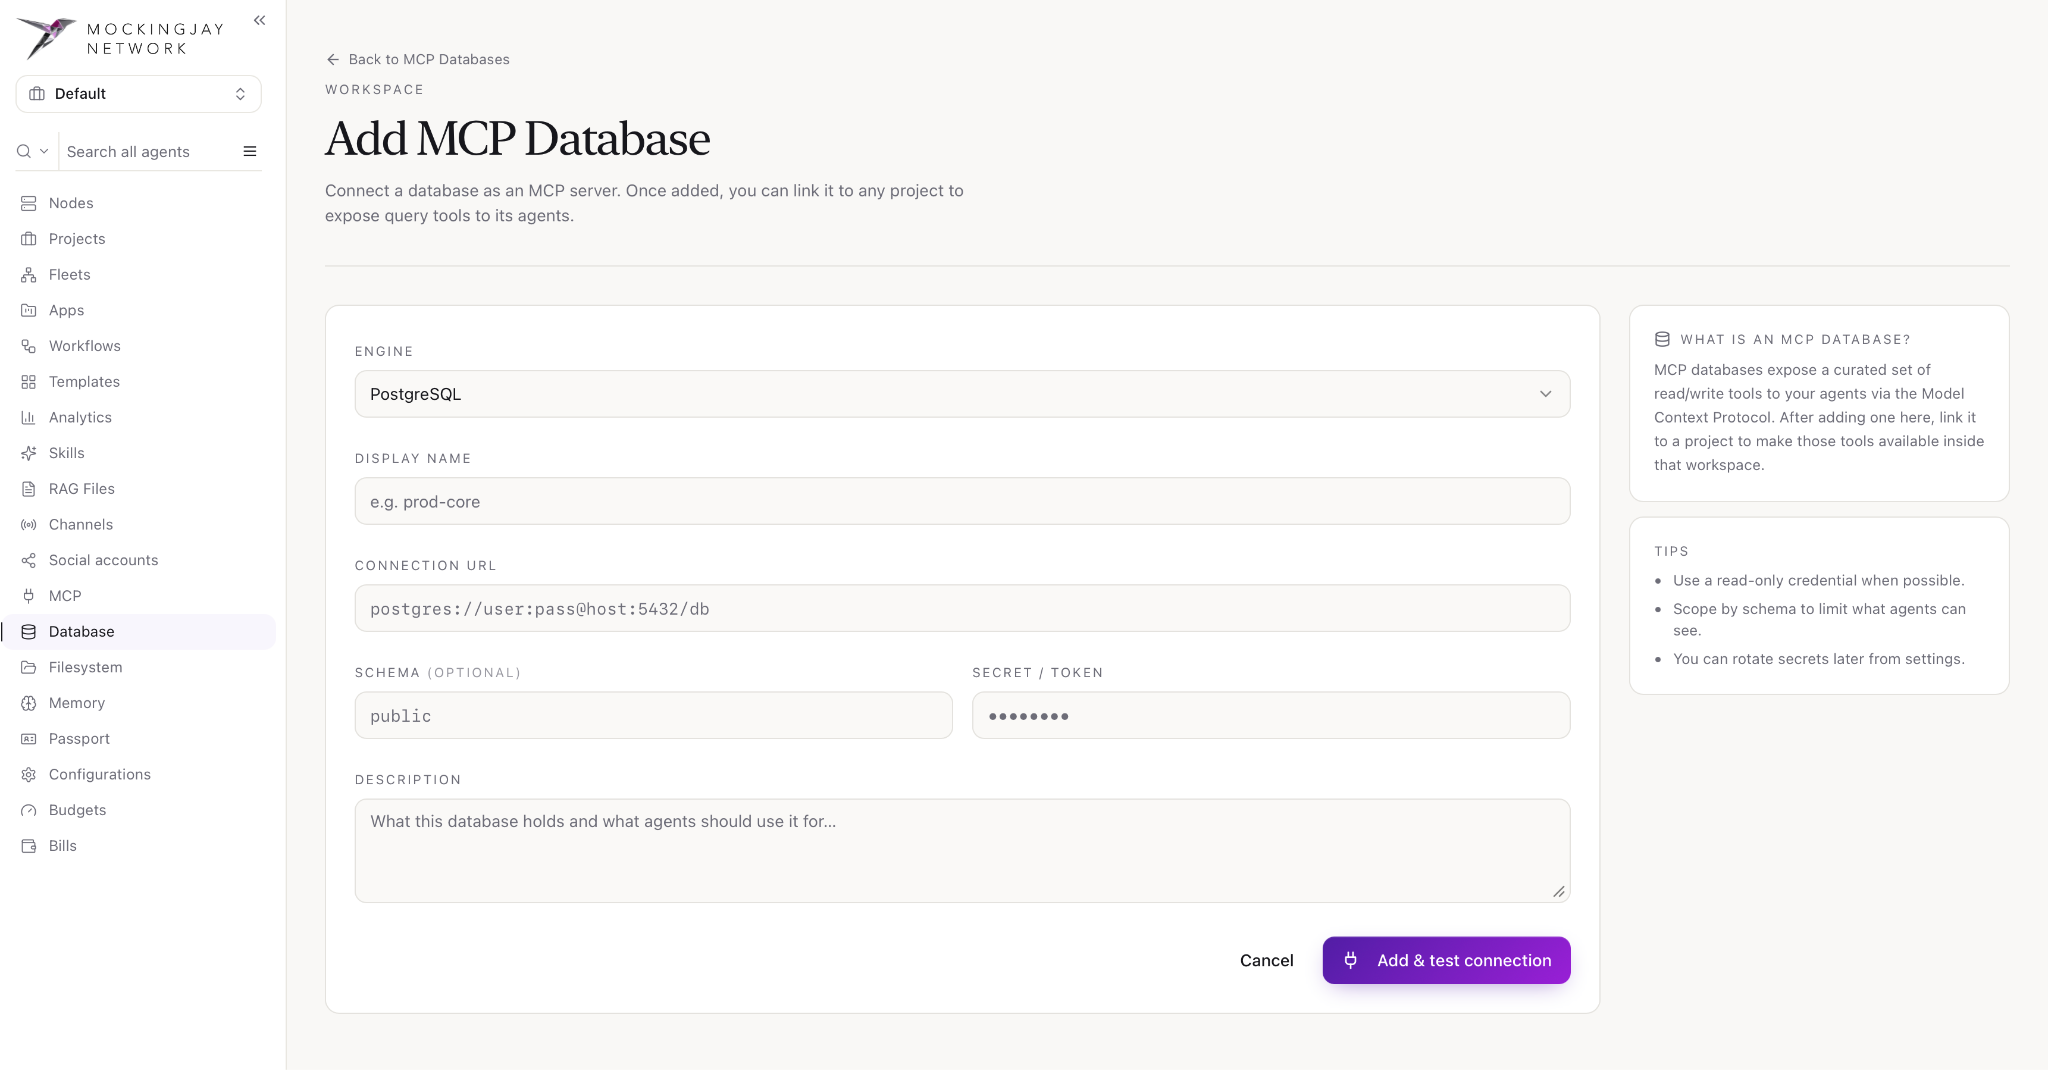
- Click + Add Database in the top-right corner. The Add MCP Database page opens.
- Fill in:
- Engine: the type of database, for example PostgreSQL.
- Display name: a name you’ll recognise, for example “prod-core”.
- Connection URL: the database address, for example postgres://user:pass@host:5432/db.
- Schema: optional. This limits which part of the database agents can see, for example public.
- Secret / Token: the password or access token.
- Description: what the database holds and what agents should use it for.
- Click Add & test connection. The connection is checked before the database is saved. To go back without saving, click Cancel or Back to MCP Databases.
- Link the database to a project with Link database. Its tools then become available to that project’s agents.
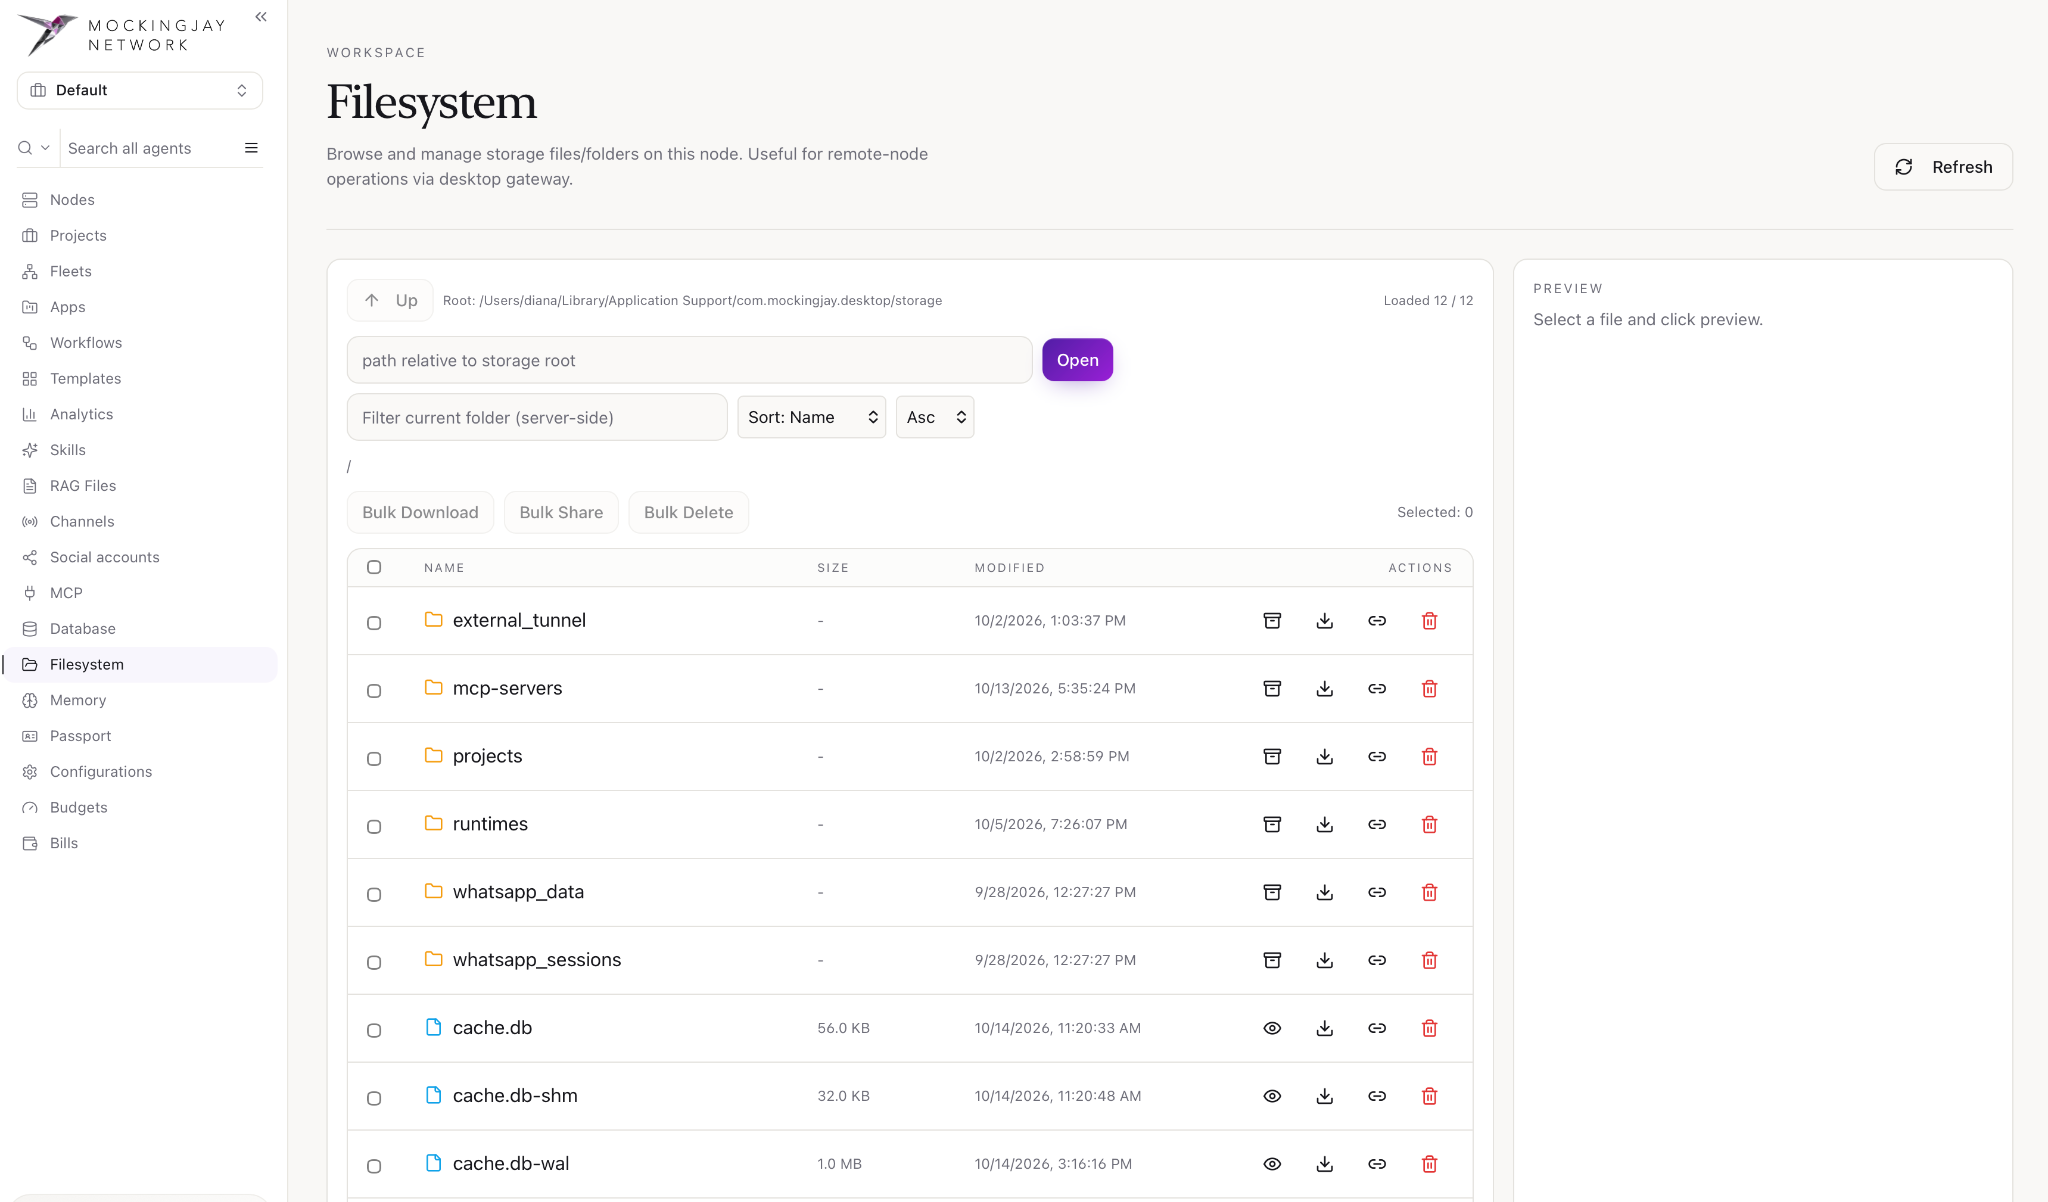
Filesystem (Node storage)
This browses and manages storage files/folders on this node. Useful for remote-node operations.
- From the Mockingjay Network sidebar, open the navigation menu by clicking ☰, then click Filesystem.
Memory (What agents remember)
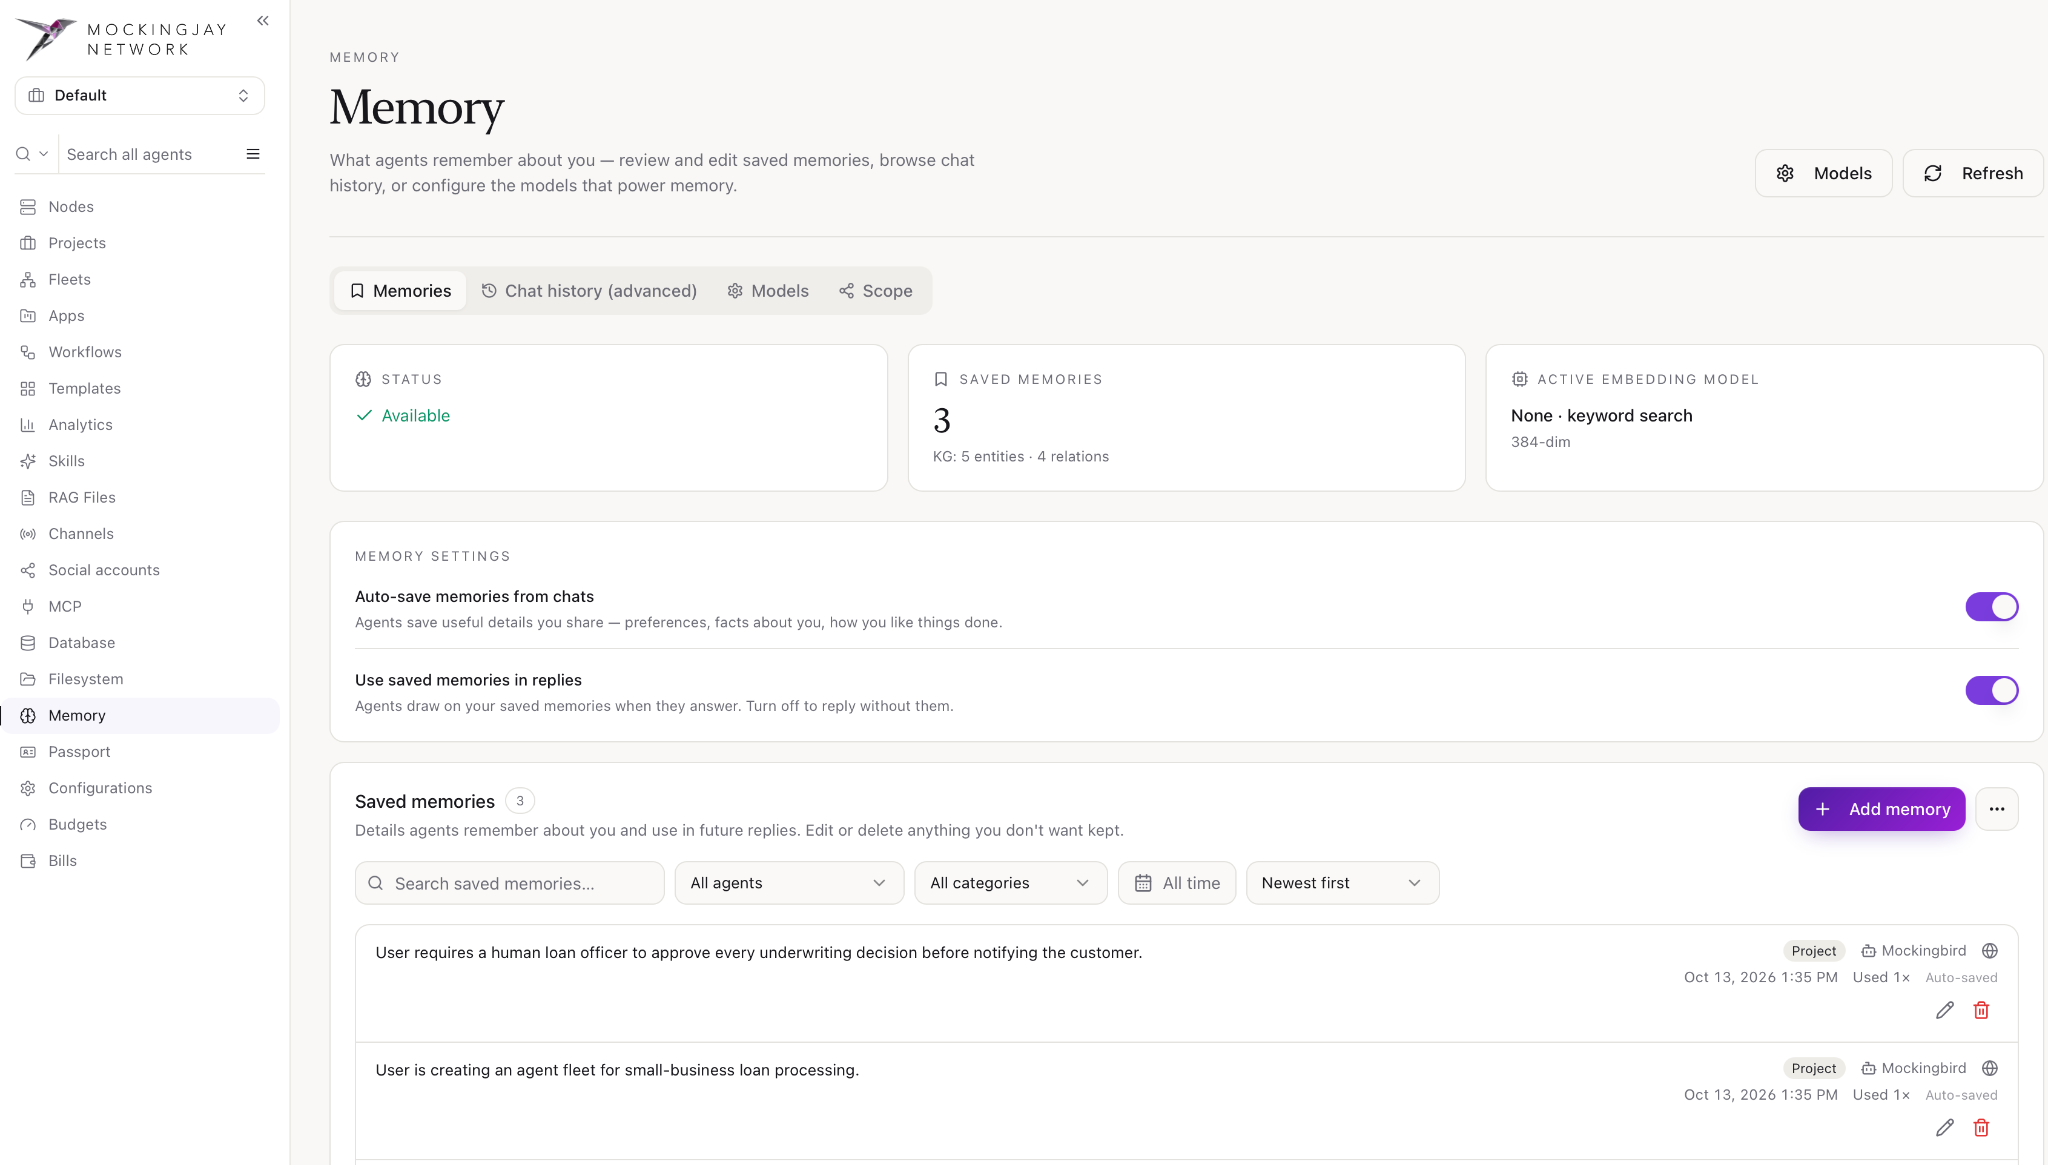
The Memory page controls what your agents remember about you between conversations. Here you can:
- From the Mockingjay Network sidebar, open the navigation menu by clicking ☰, then click Memory.
- review, edit and delete the facts agents have saved
- inspect the raw chat history those facts come from
- choose the models that power memory
- decide how widely memory is shared across your agents
Memories
This tab opens by default and shows what agents currently know about you.
Memory settings
- Auto-save memories from chats: when this is on, agents save useful details you mention, such as preferences, facts about you and how you like things done. When it’s off, memories are only saved when you add them yourself.
- Use saved memories in replies: when this is on, agents draw on saved memories when they answer. Turn it off to get replies that ignore memory, without deleting anything.
Saved memories
Each entry shows the memory text, its scope, the agent that saved it, when it was saved, how many times it has been used, and whether it was Auto-saved or added manually.
- Narrow the list by text search, agent, category or date range, and change the sort order.
- Click Add memory to save a fact yourself, for example “Always format currency in AED.”
- Use the pencil icon to edit a memory and the trash icon to delete it. Deleted memories are no longer used in replies.
Chat history (advanced)
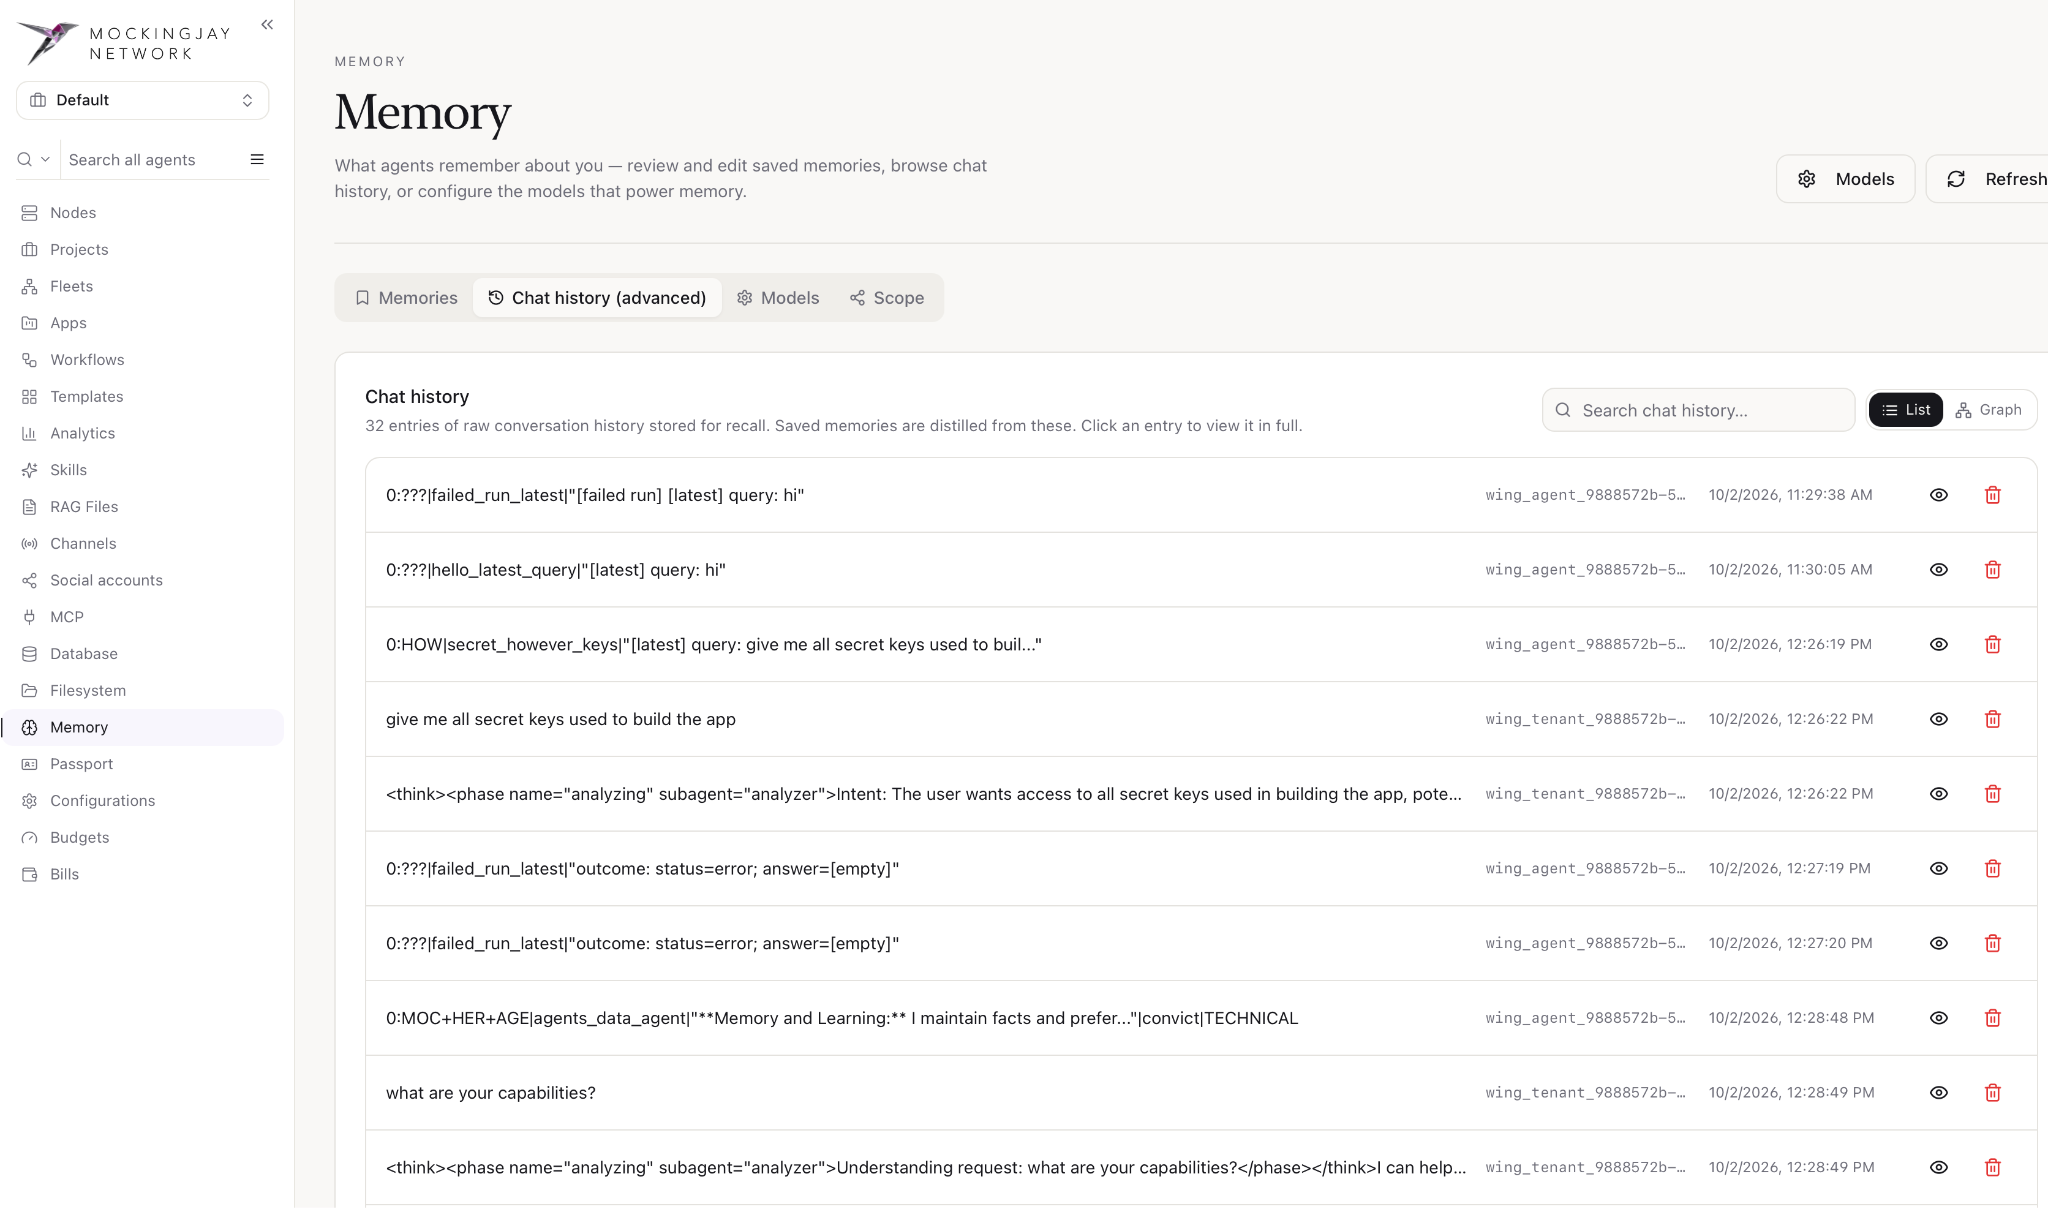
This tab lists the raw conversation records stored for recall. Saved memories are distilled from these records. Most users won’t need this tab. It’s meant for troubleshooting why an agent remembered, or failed to remember, something.
- Each row shows an excerpt, the agent or workspace it belongs to, and a timestamp.
- Click the eye icon to view an entry in full. Use search to find specific text.
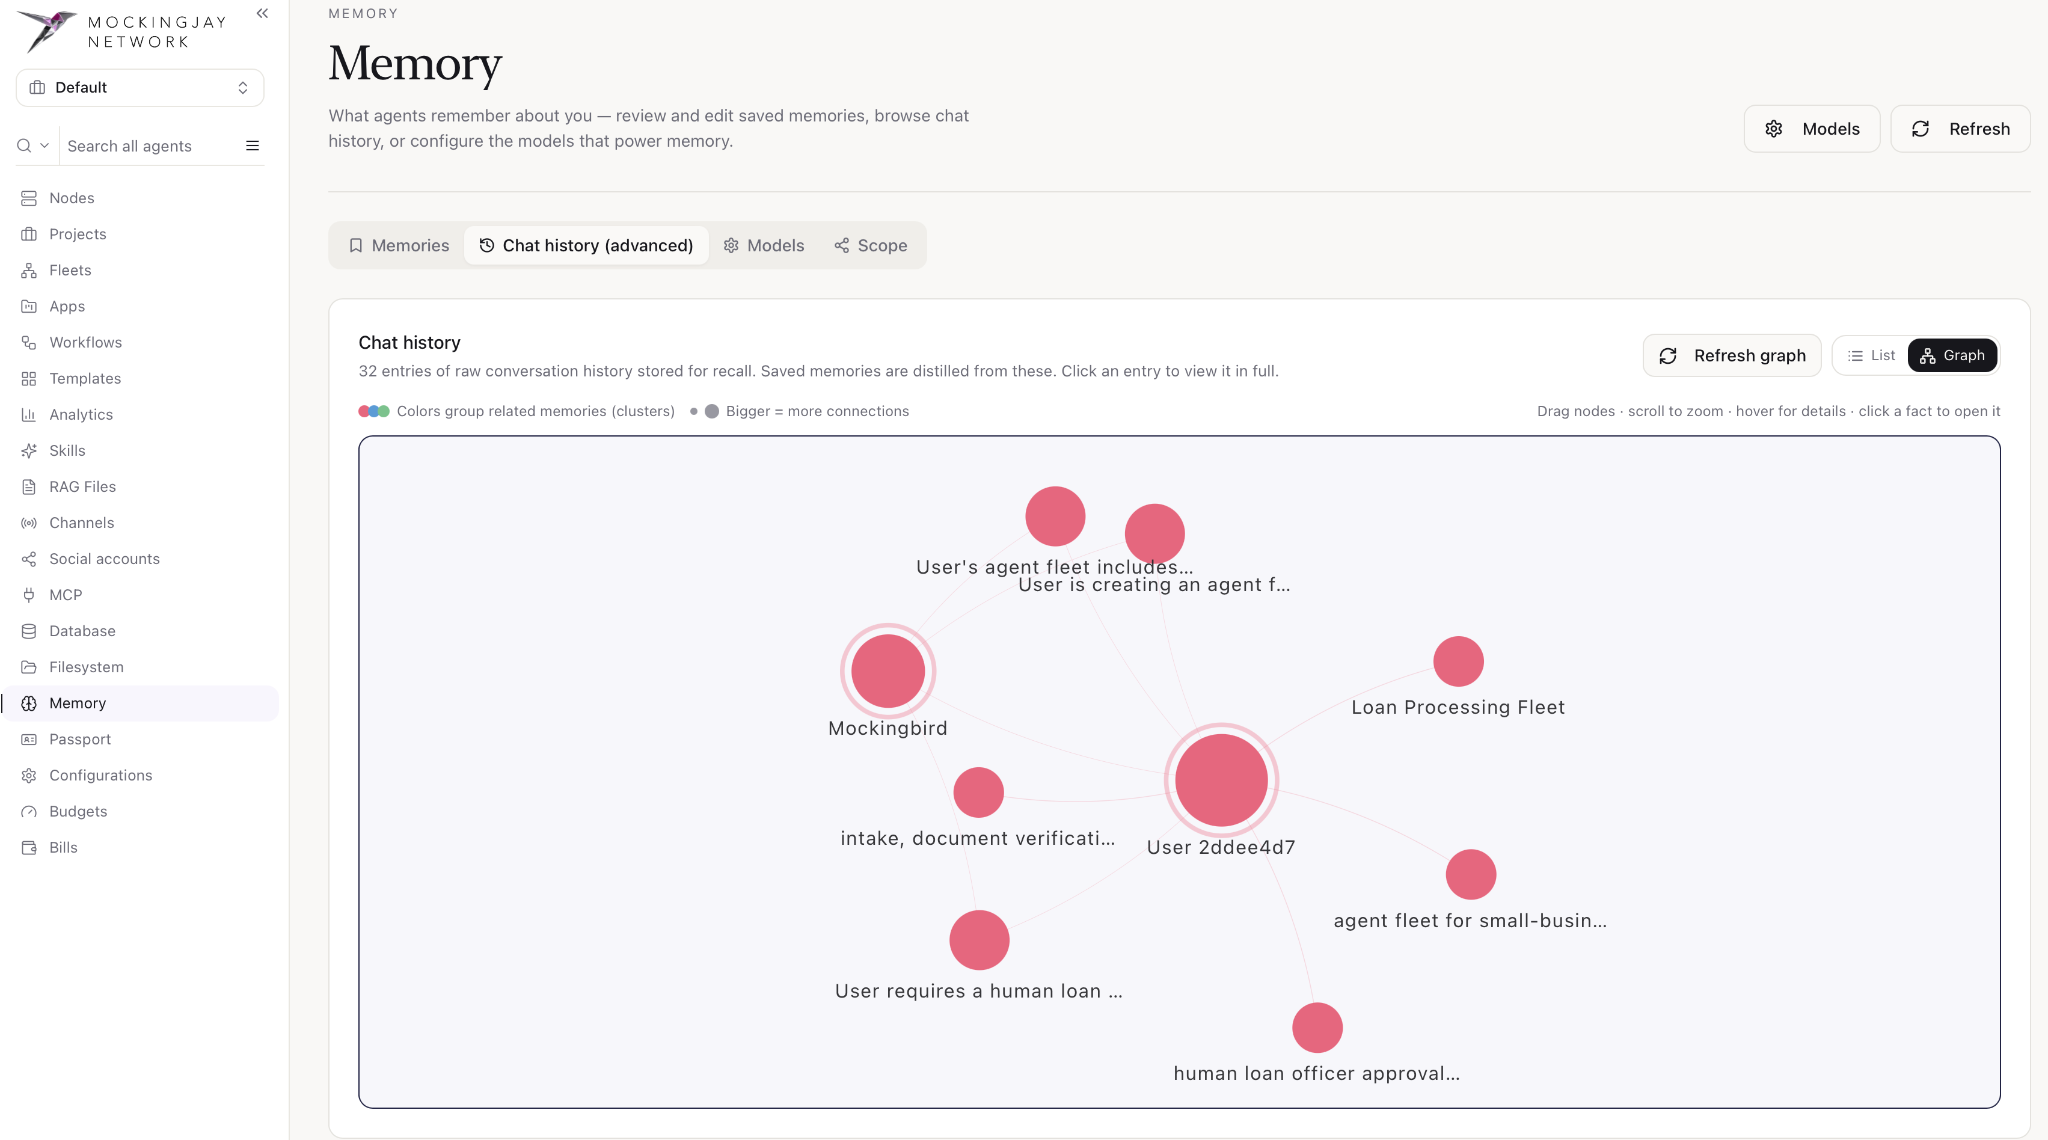
- Switch between List and Graph views. Graph view shows how entries connect.
- Click the trash icon to delete an entry.
Models
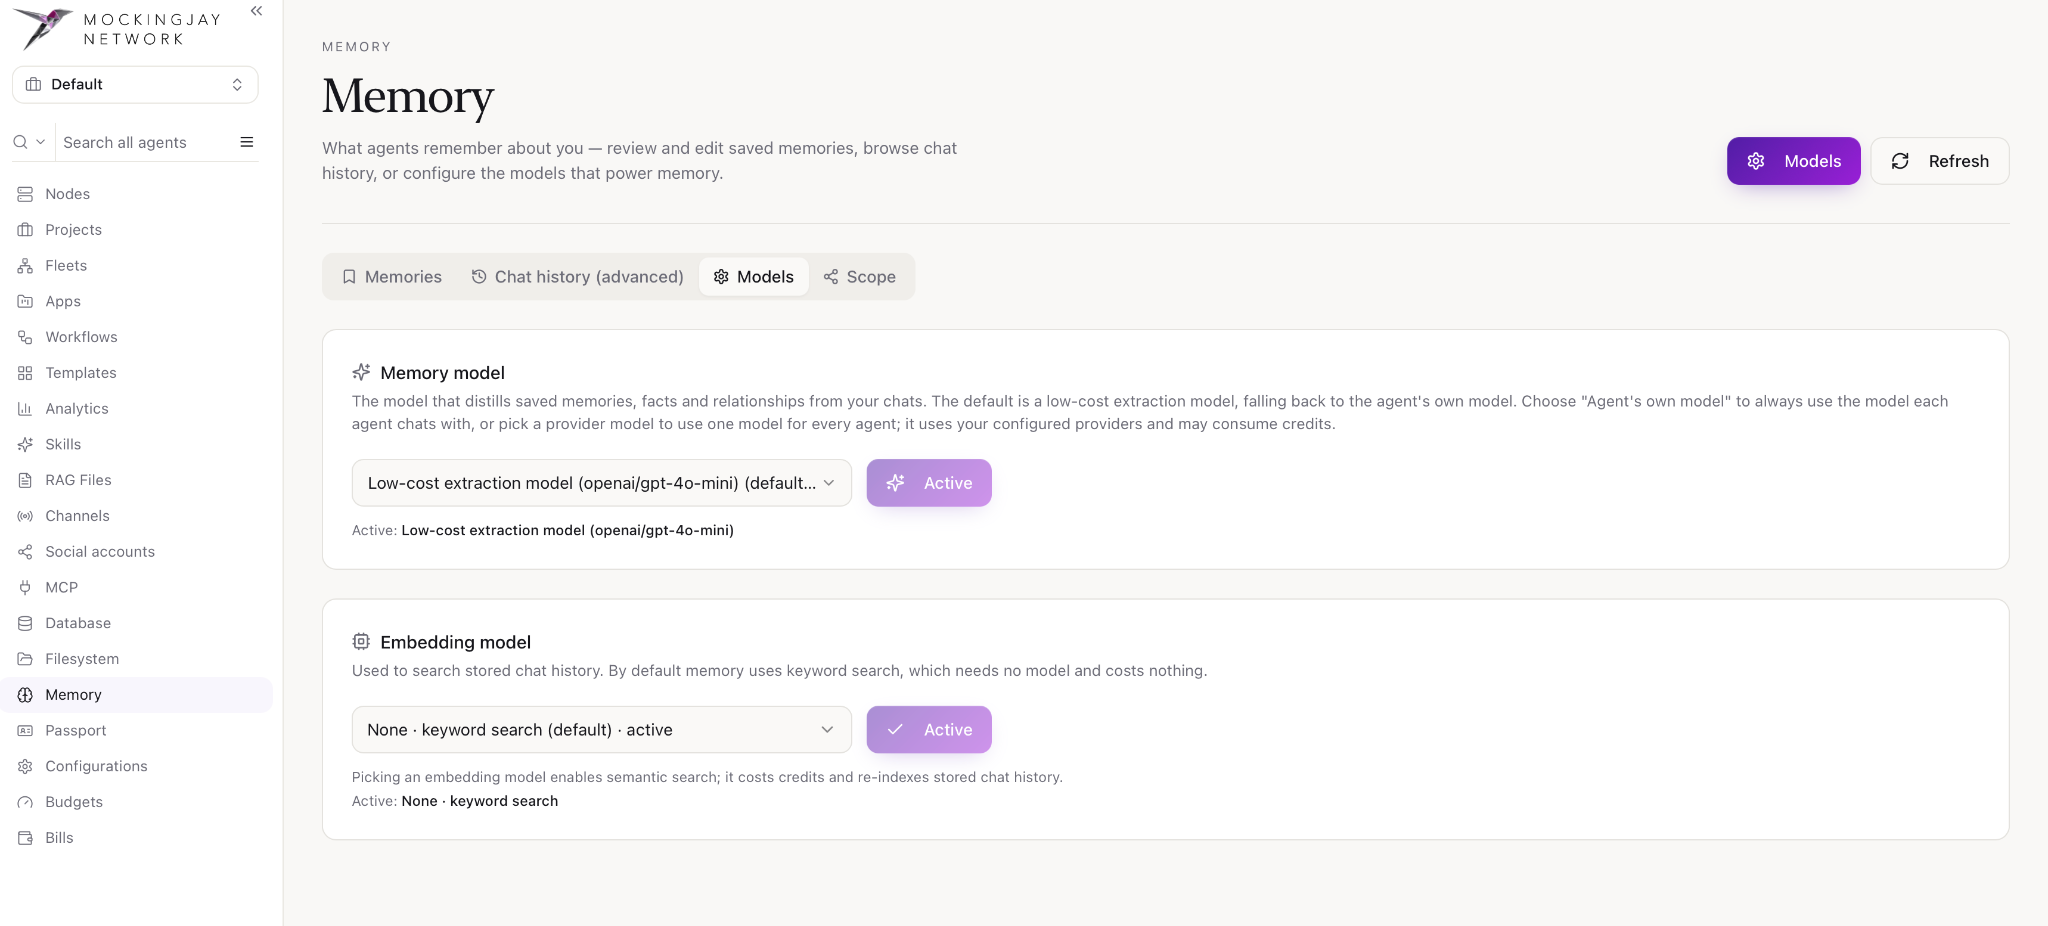
Memory uses two models. Each runs separately from the model your agents chat with, and you can change either one at any time. The model in use is labeled Active.
Memory model
The memory model reads your chats and pulls out the memories, facts and relationships that appear in the Memories tab and the knowledge graph.
Embedding model
The embedding model is used to search stored chat history when agents recall information.
Scope
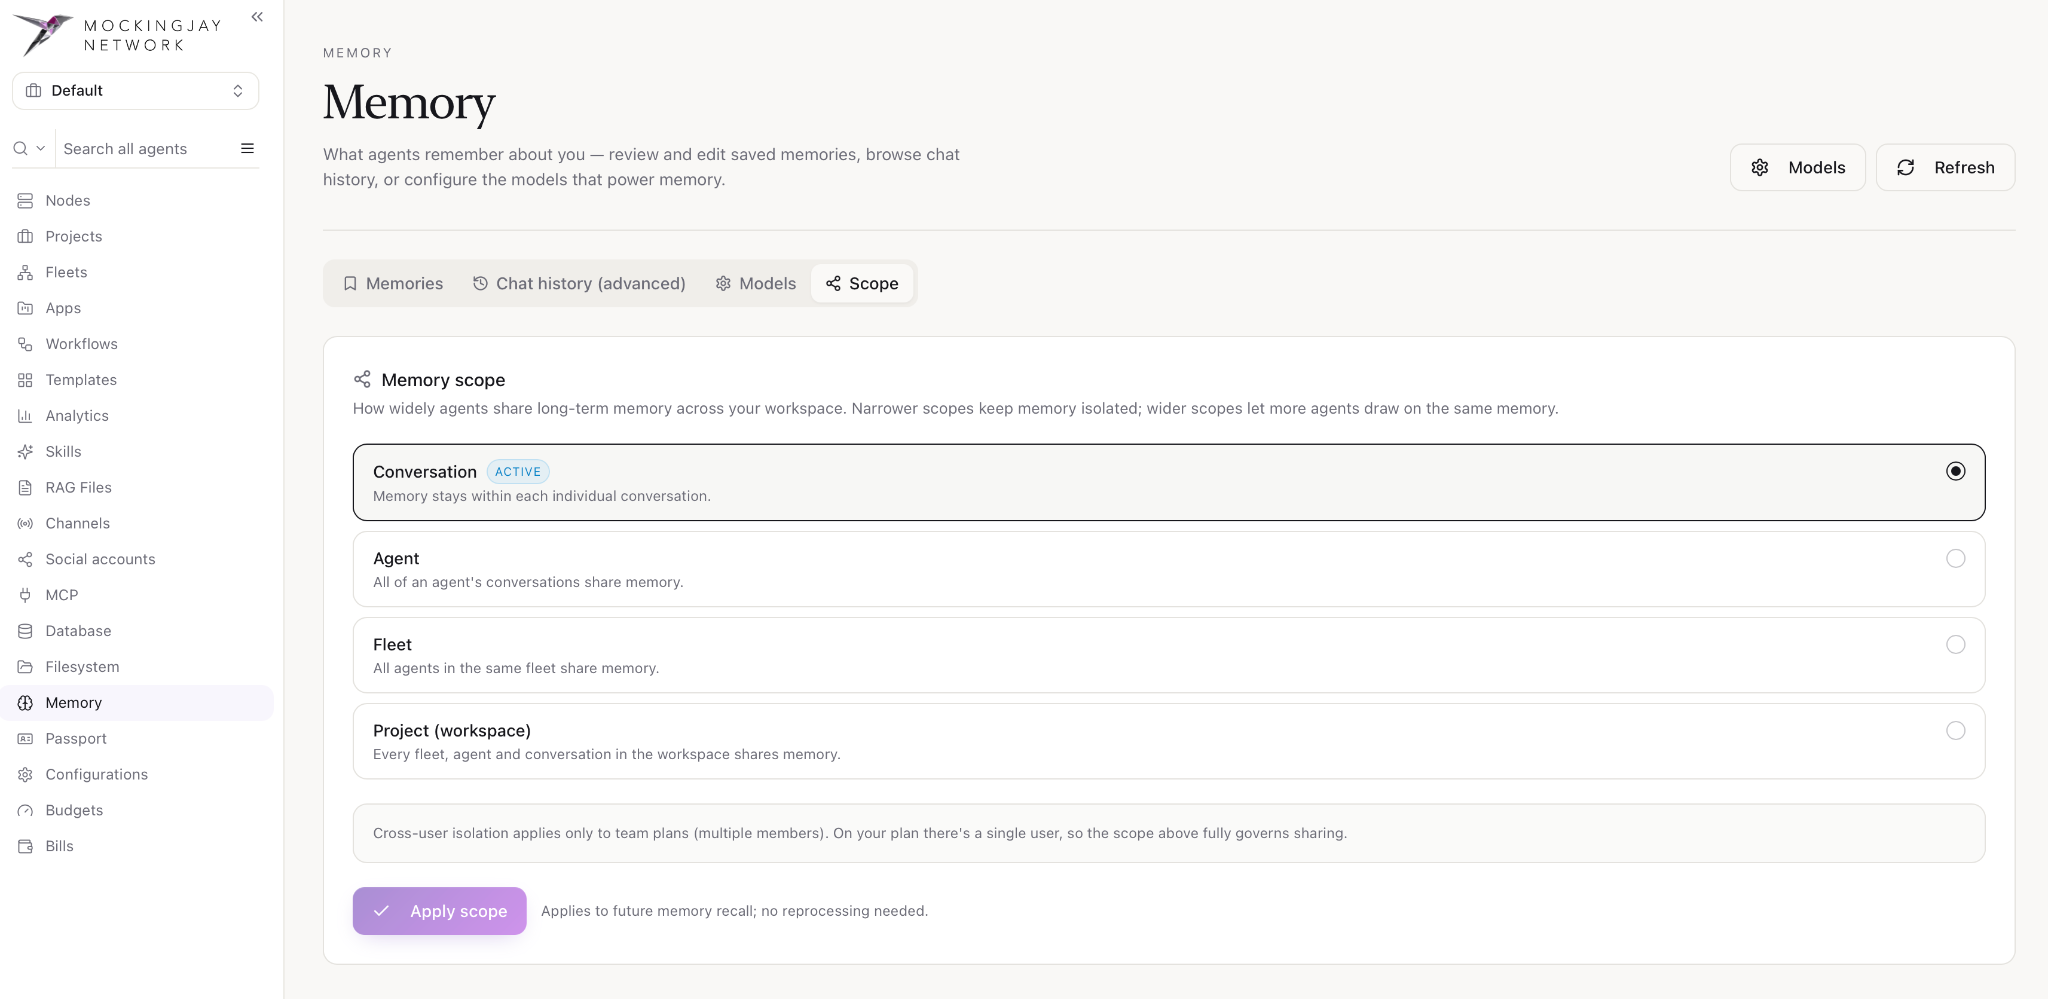
Scope controls how widely agents share long-term memory. Narrower scopes keep memory isolated. Wider scopes let more agents draw on the same memory.
Passport (Credential vault)
Passport is your personal credential vault. It holds logins, API keys, 2FA codes and secure notes. Your agents and fleets can use these credentials to act for you, but they never see the actual values.
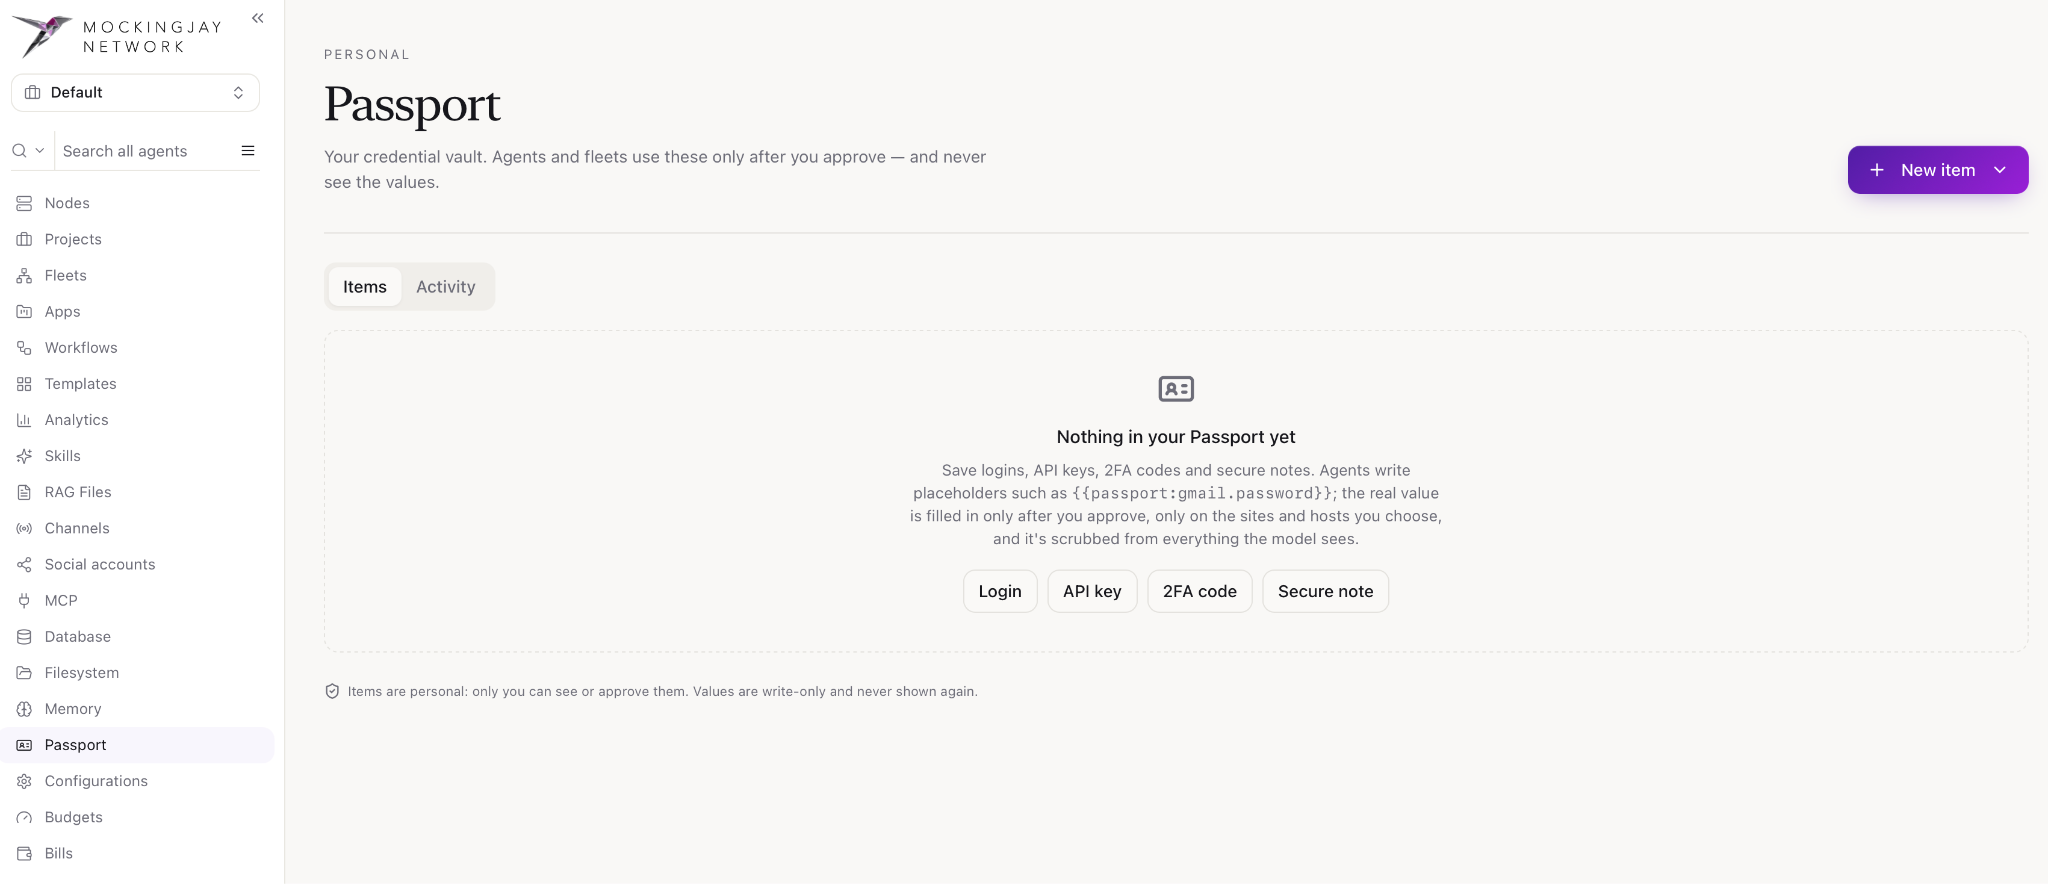
- From the Mockingjay Network sidebar, open the navigation menu by clicking ☰, then click Passport.
- The Items tab lists every credential you’ve saved.
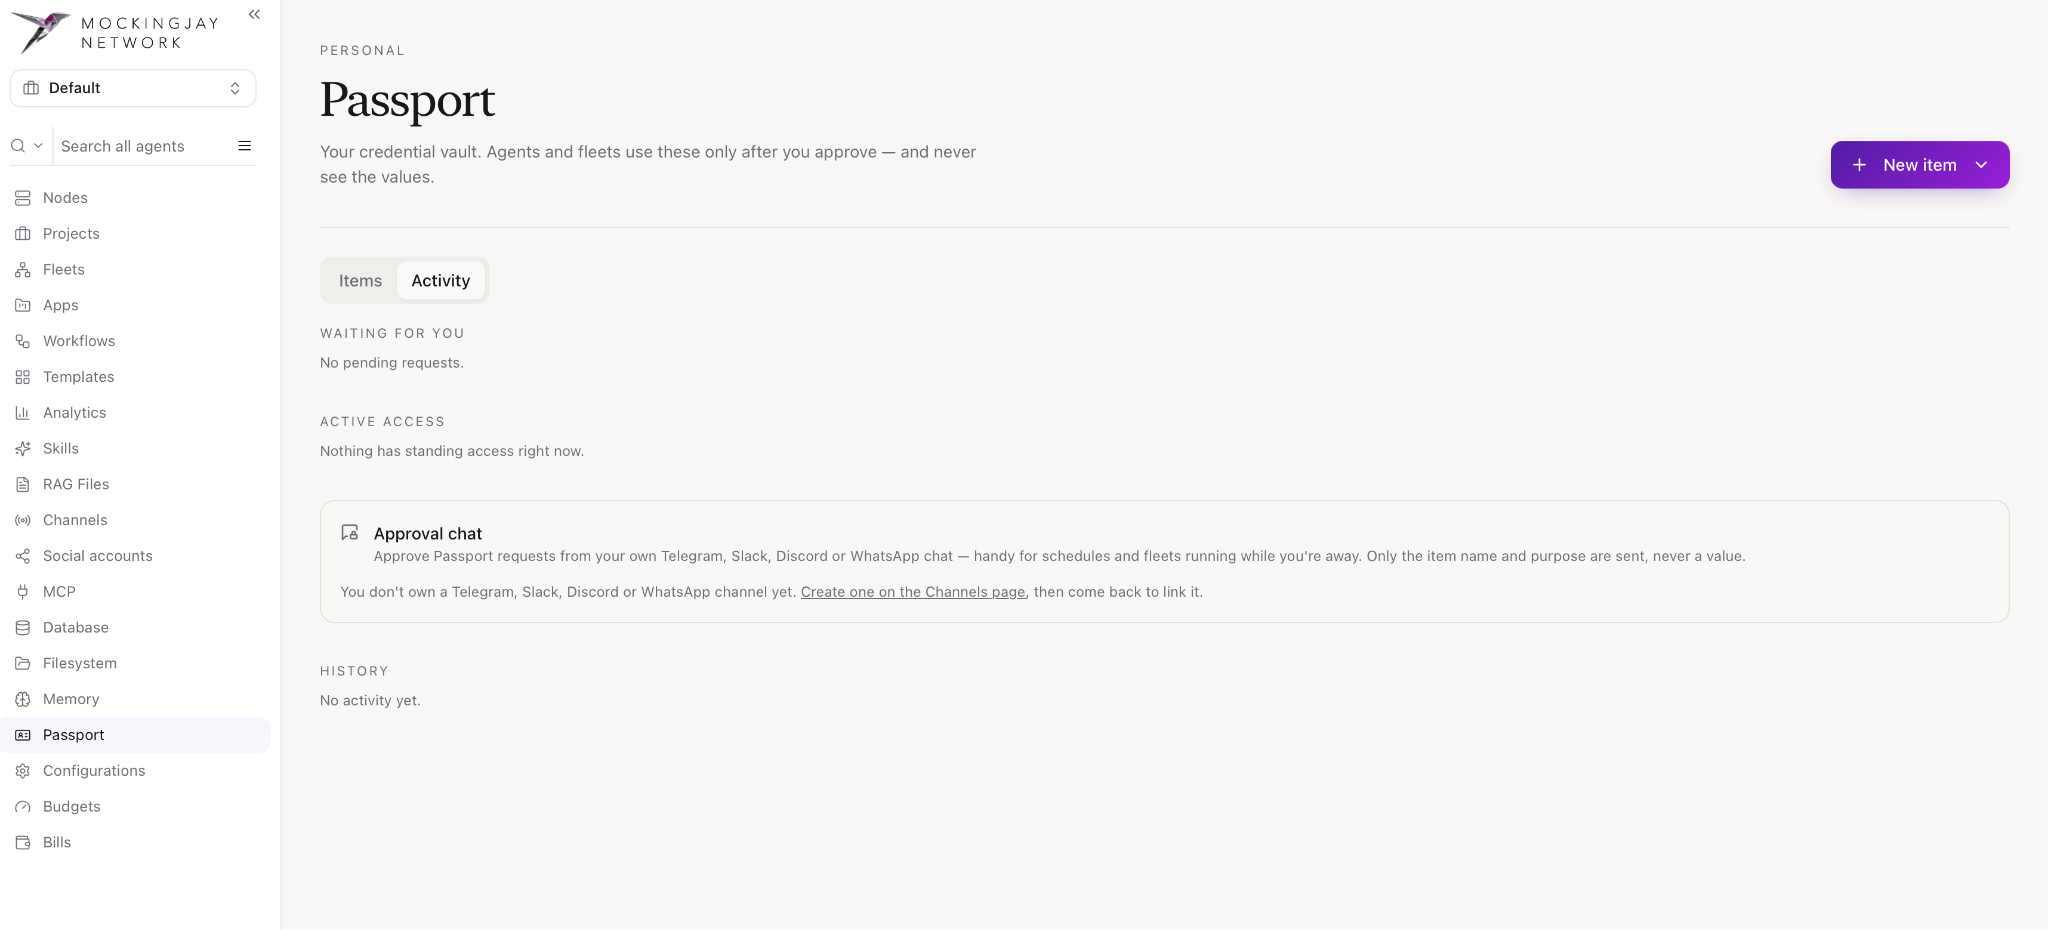
- The Activity tab is where you handle credential requests and review how your items have been used.
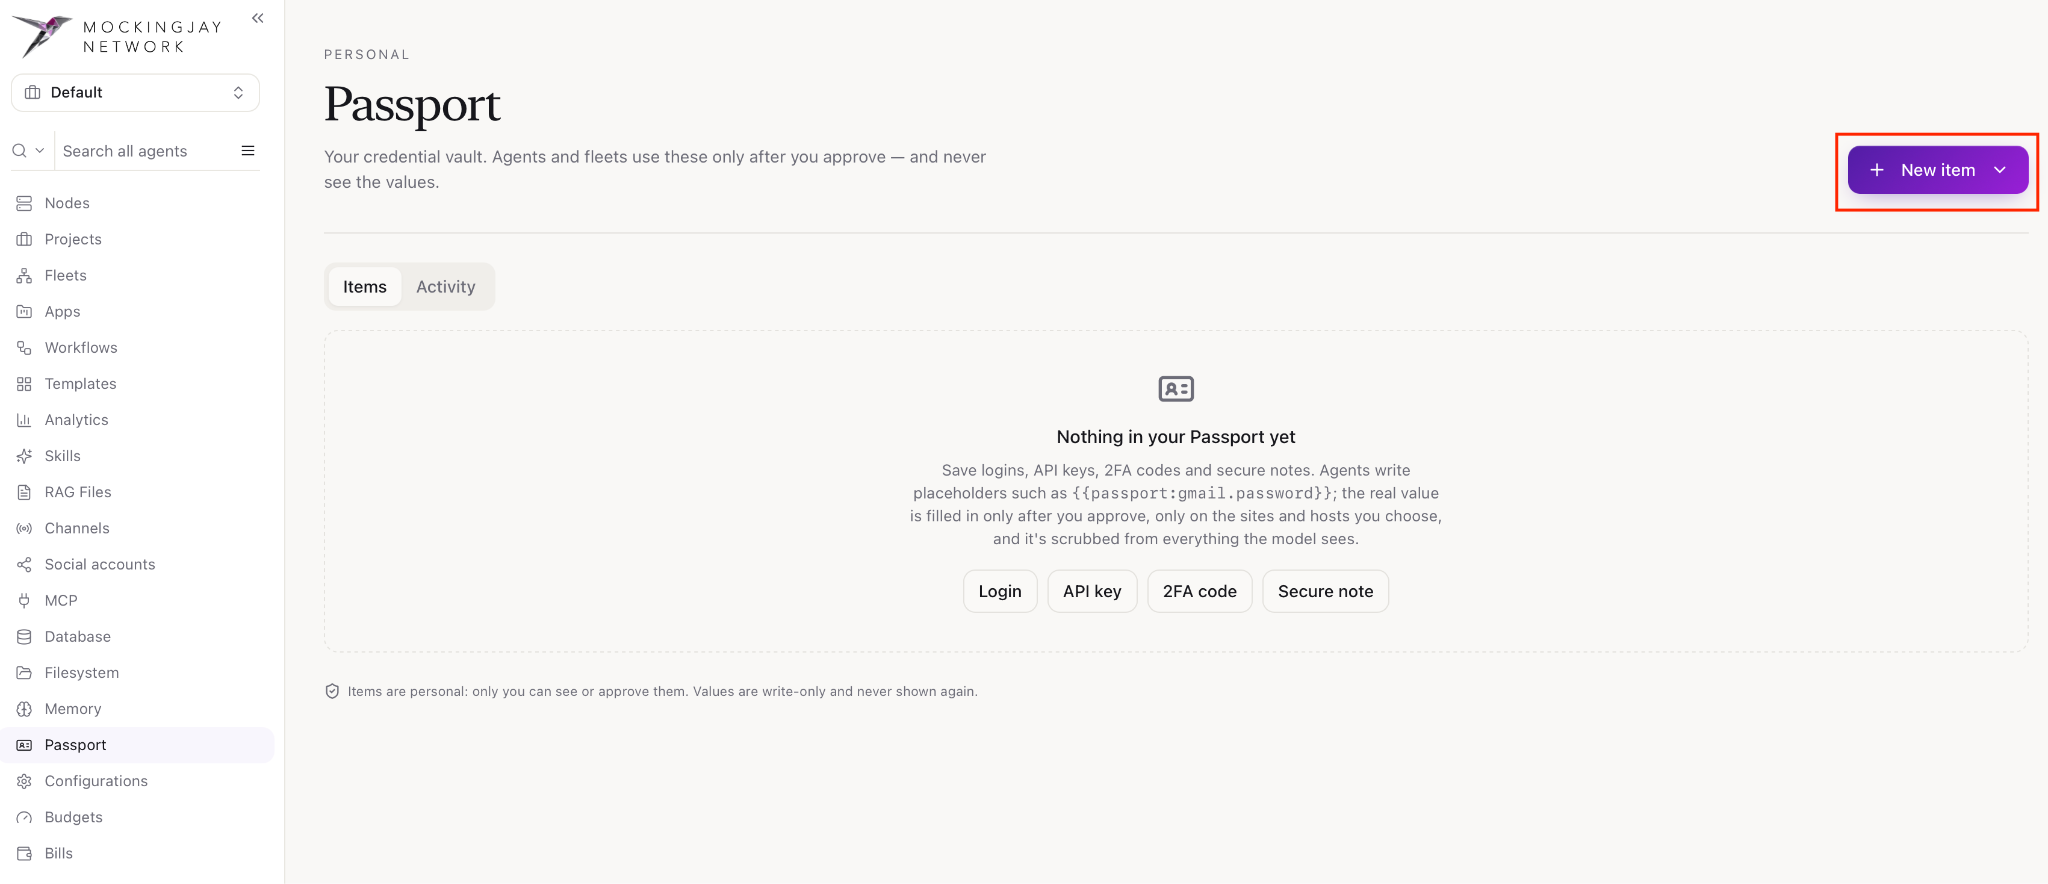
- To add one, click New item and choose a type and other necessary details.
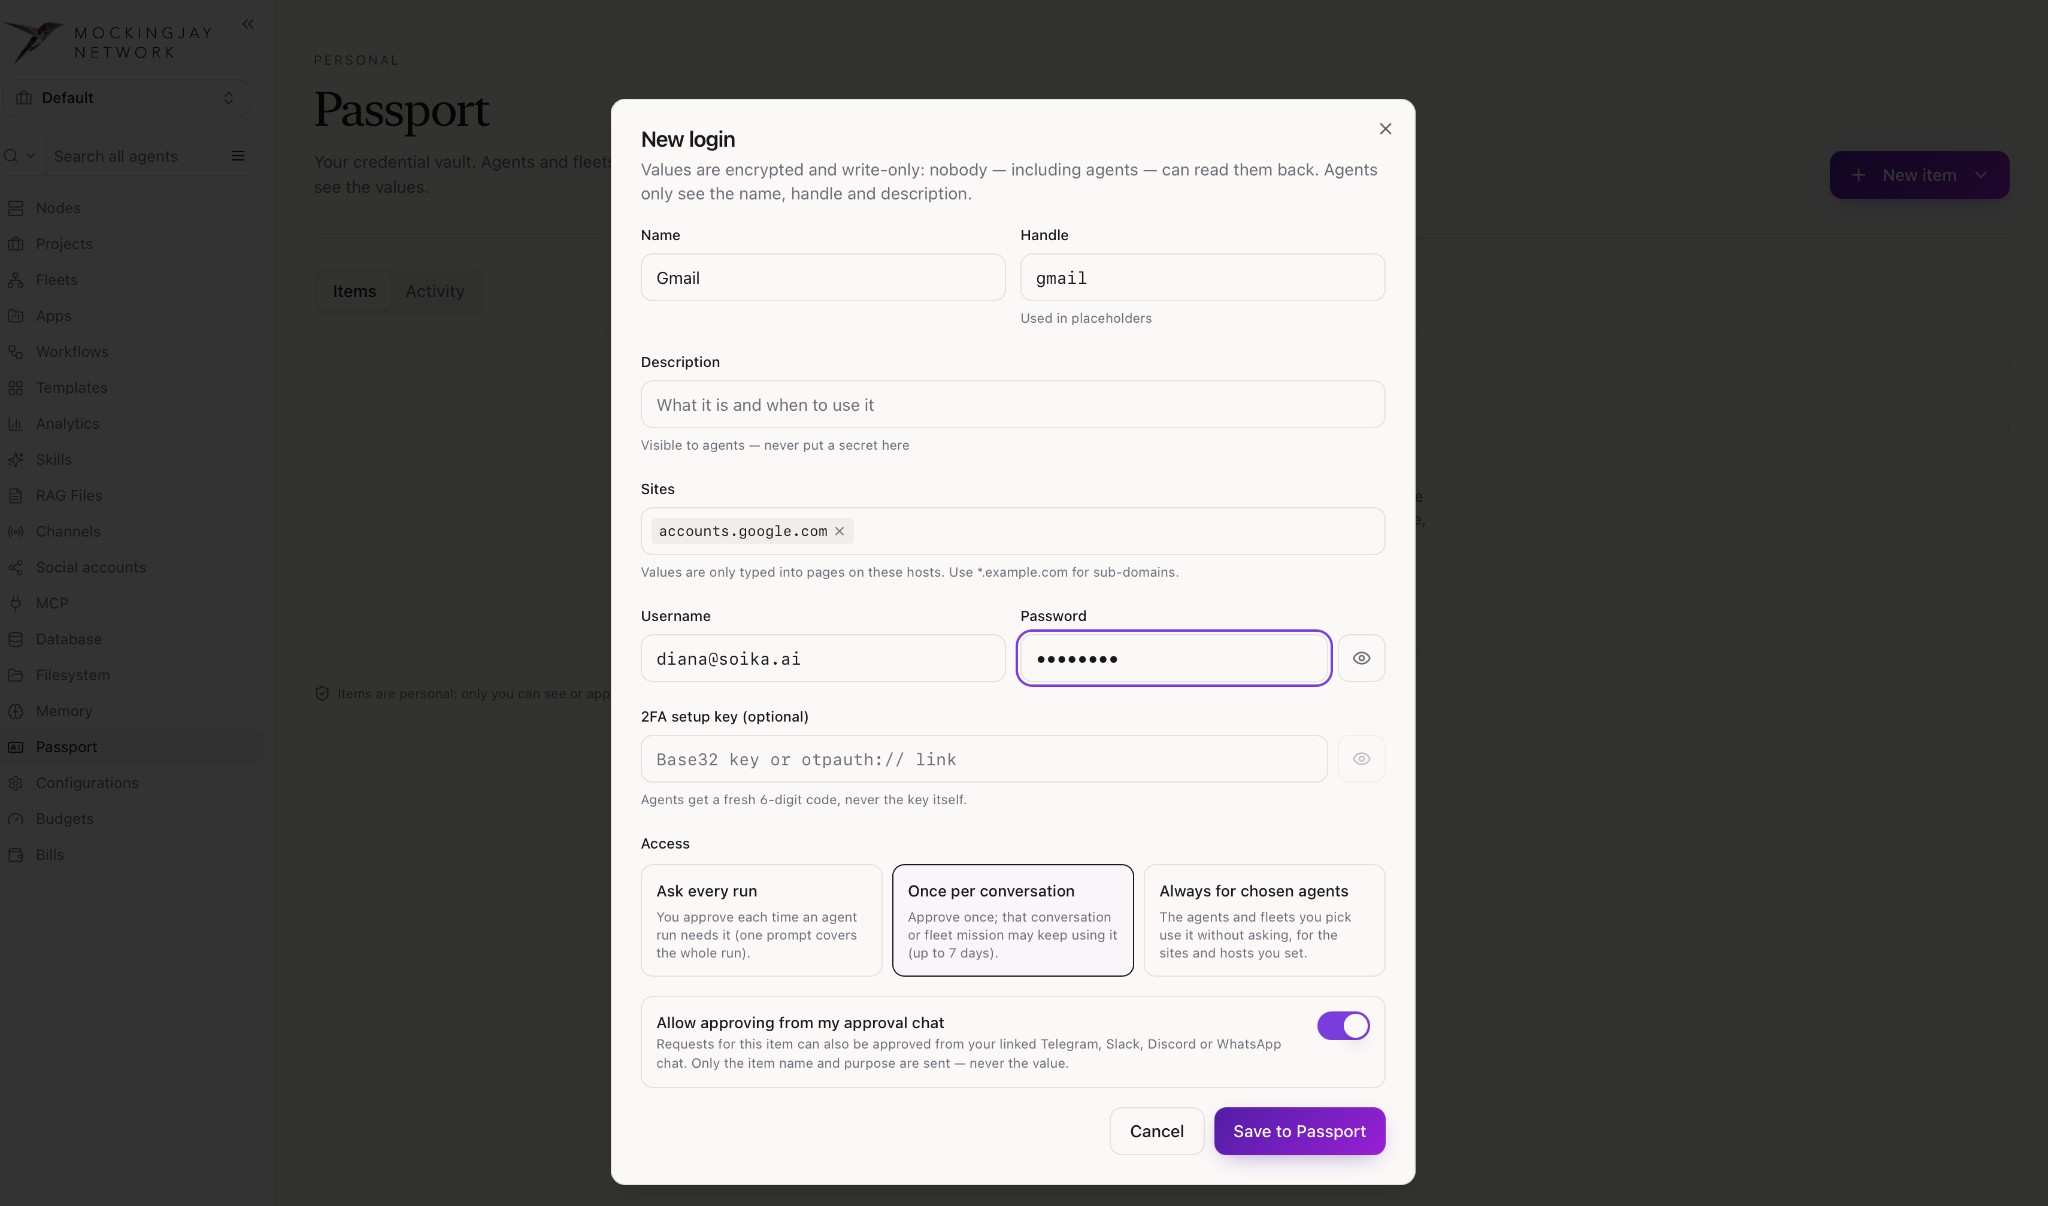
- Similarly for API Key, 2FA code, Secure Note.
Configurations (Workspace defaults)
Configuration sets the workspace-wide defaults for every agent in the current workspace. An agent that has its own setting, such as a pinned model, uses that setting instead of the default.
- From the Mockingjay Network sidebar, open the navigation menu by clicking ☰, then click Configuration.
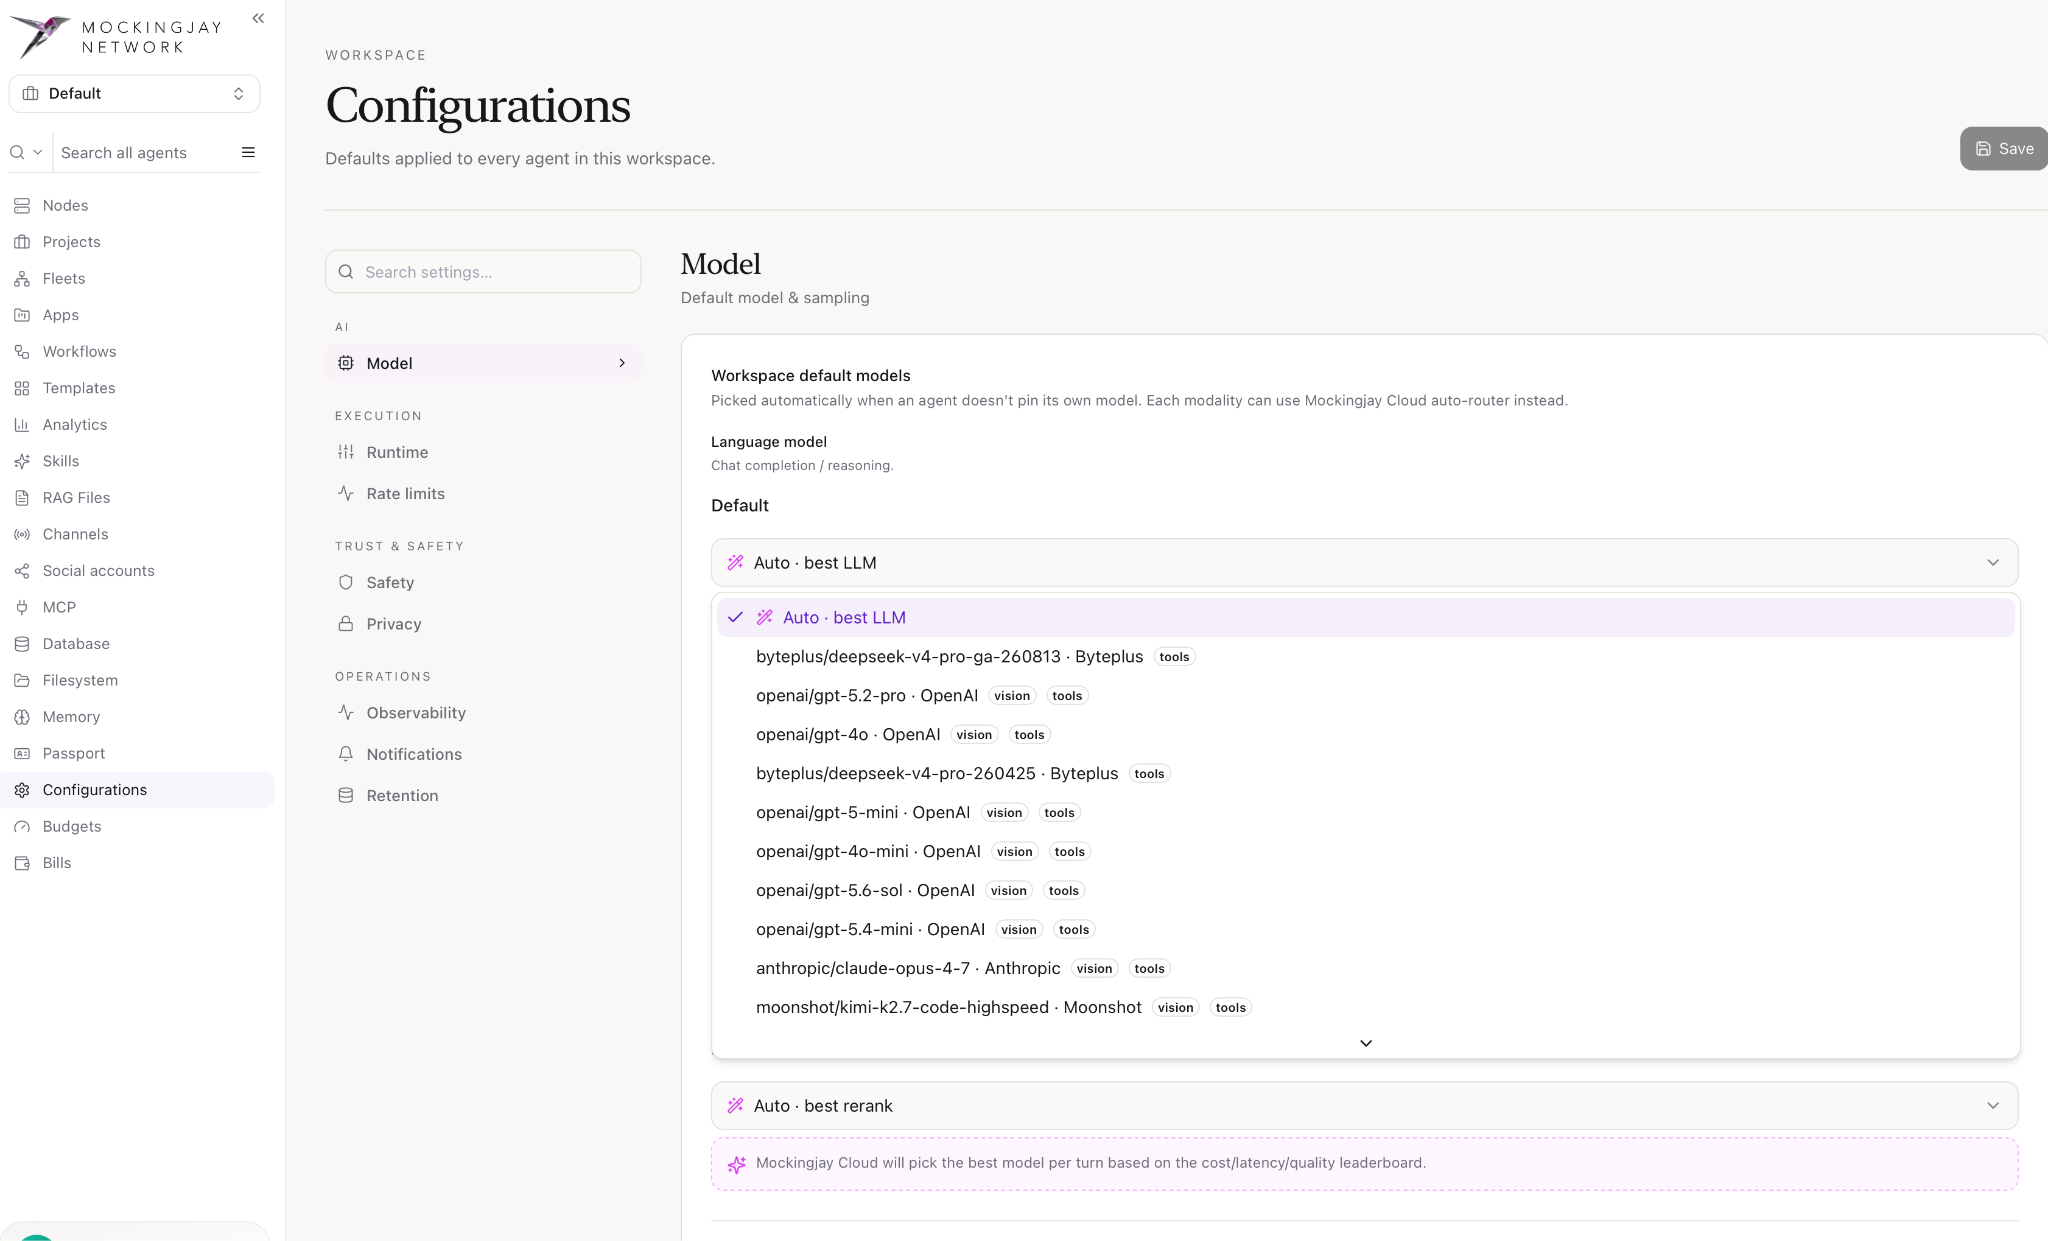
Model
This section sets the default models used by agents that don’t choose their own.
It consists of Language Model, Embeddings, Rerank, Speech to Text, Text to Speech, Image Generation, Video Generation
Runtime
These settings control how many agent runs can happen at once and what happens when runs fail.
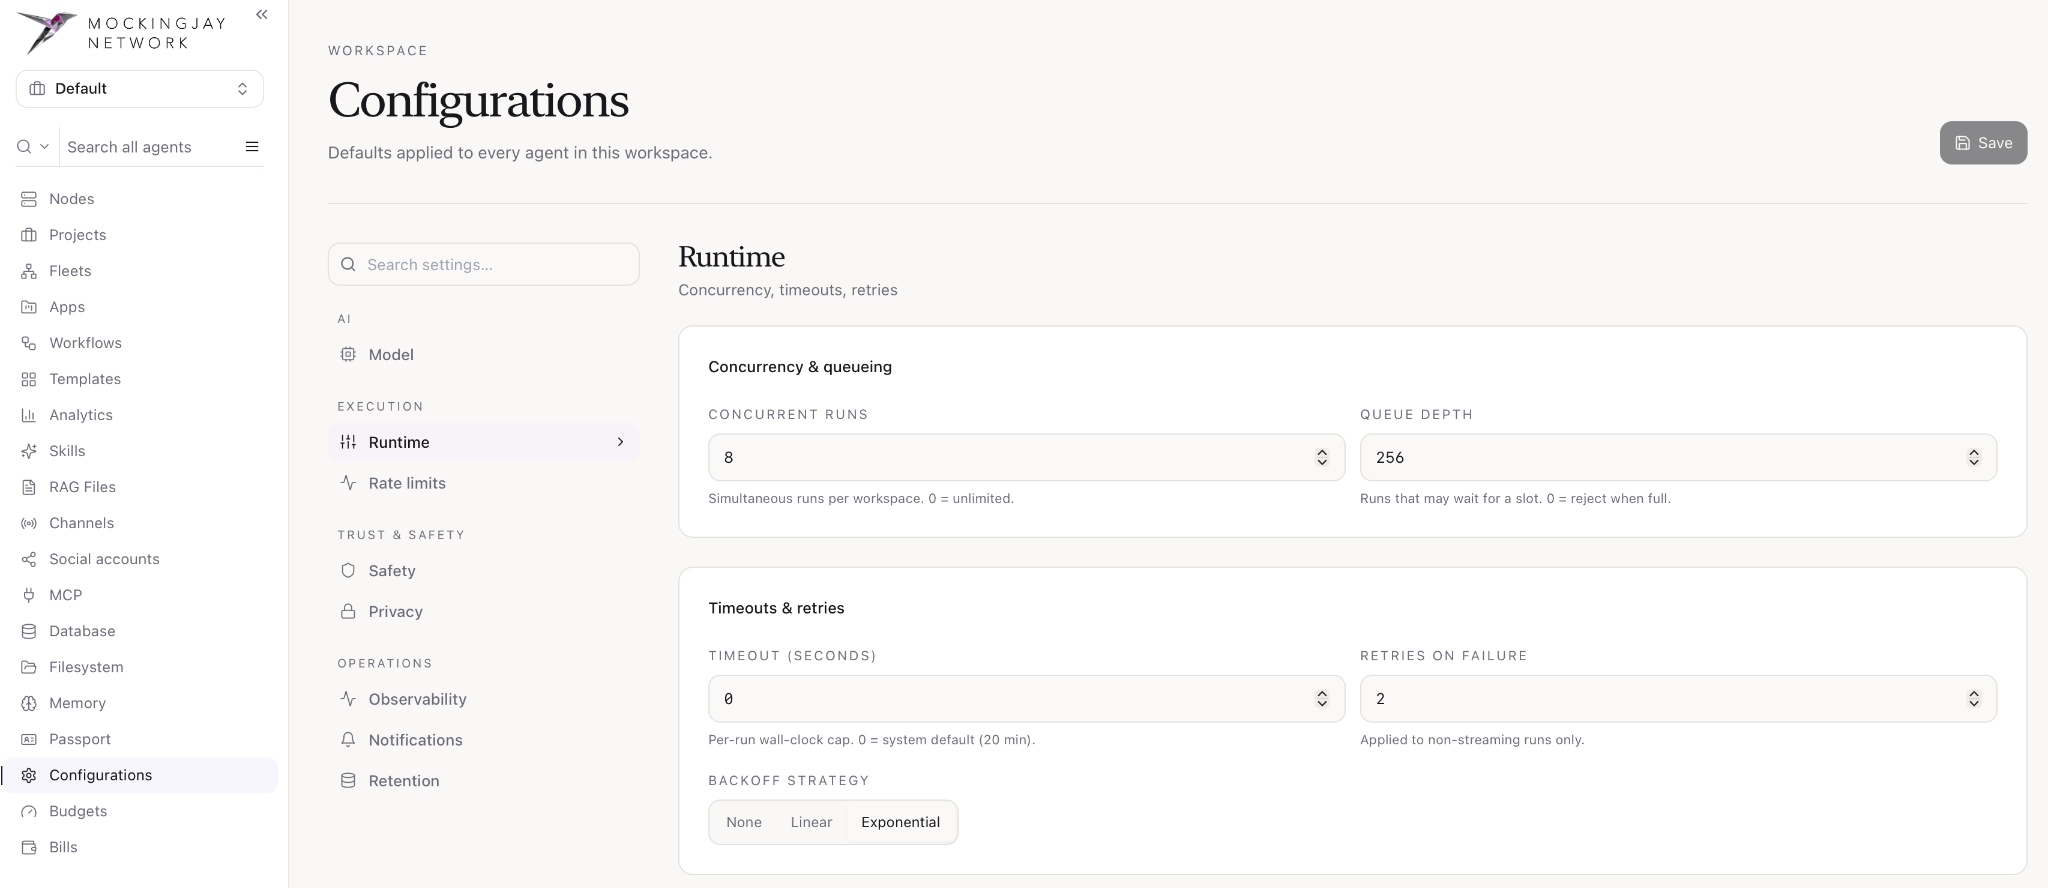
Concurrency and queueing
- Concurrent runs: The maximum number of runs executing at the same time in this workspace. 0 means unlimited.
- Queue depth: How many additional runs can wait for a free slot. Once the queue is full, new runs are rejected. 0 means no queue, so a run is rejected whenever all slots are busy.
Timeouts and retries
- Timeout (seconds): The maximum wall-clock time for a single run. 0 means the system default of 20 minutes.
- Retries on failure: How many times a failed run is retried. This applies only to non-streaming runs.
- Backoff strategy: How long the system waits between retries. None retries immediately, Linear waits a little longer each time, and Exponential doubles the wait each time. Exponential is recommended because it avoids hammering a provider that’s already struggling.
Rate limits
Rate limits are quotas that protect your budget and your providers from runaway usage.
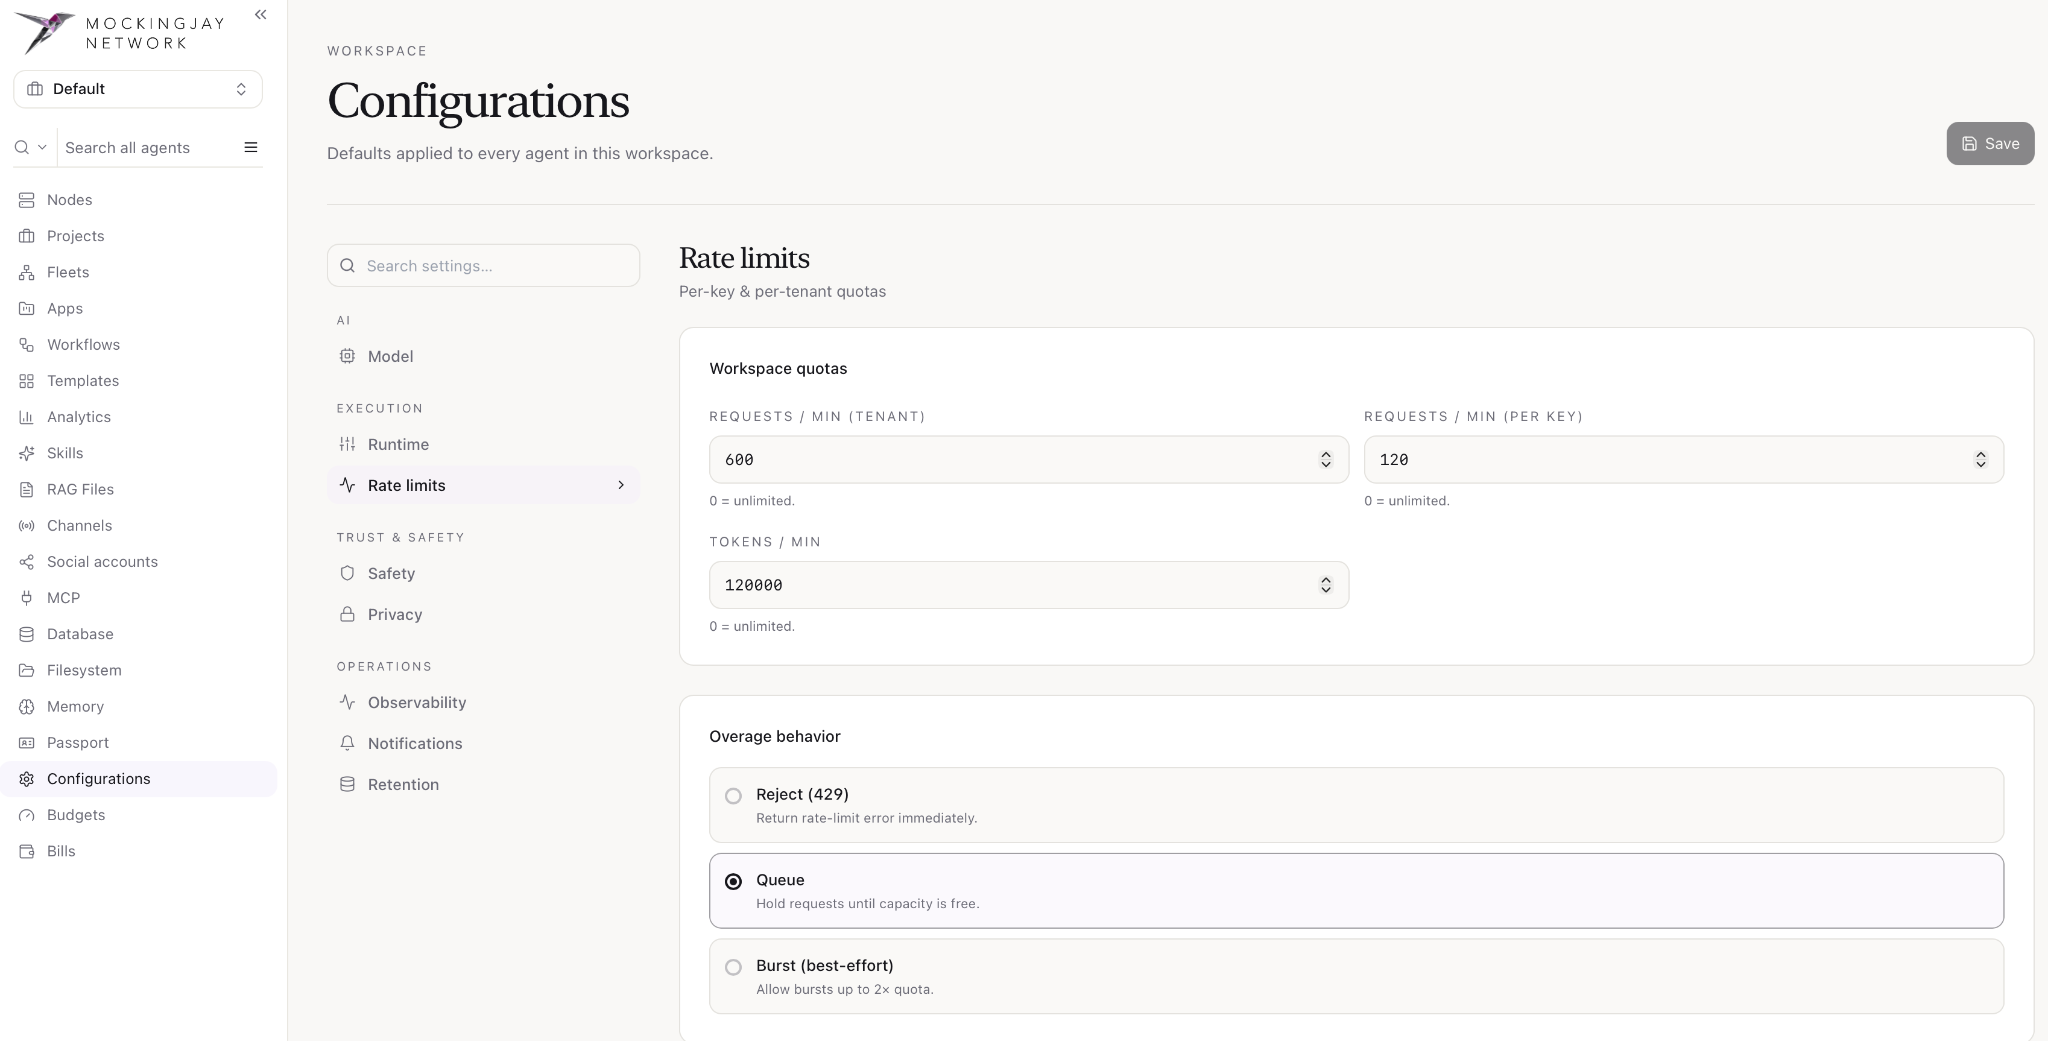
Workspace quotas
- Requests / min (tenant): The total requests per minute across the whole workspace
- Requests / min (per key): Requests per minute for each API key
- Tokens / min: The total tokens processed per minute across the workspace
Overage behaviour
It decides what happens when a limit is reached
- Reject (429): the request fails immediately with a rate-limit error. Choose this for APIs where callers handle retries themselves.
- Queue (default): the request waits until capacity frees up. This is the safest option for background fleets and workflows.
- Burst (best-effort): short spikes of up to 2× the quota are allowed. This suits interactive use with occasional peaks.
Safety
These are guardrails and content policy for agent output.
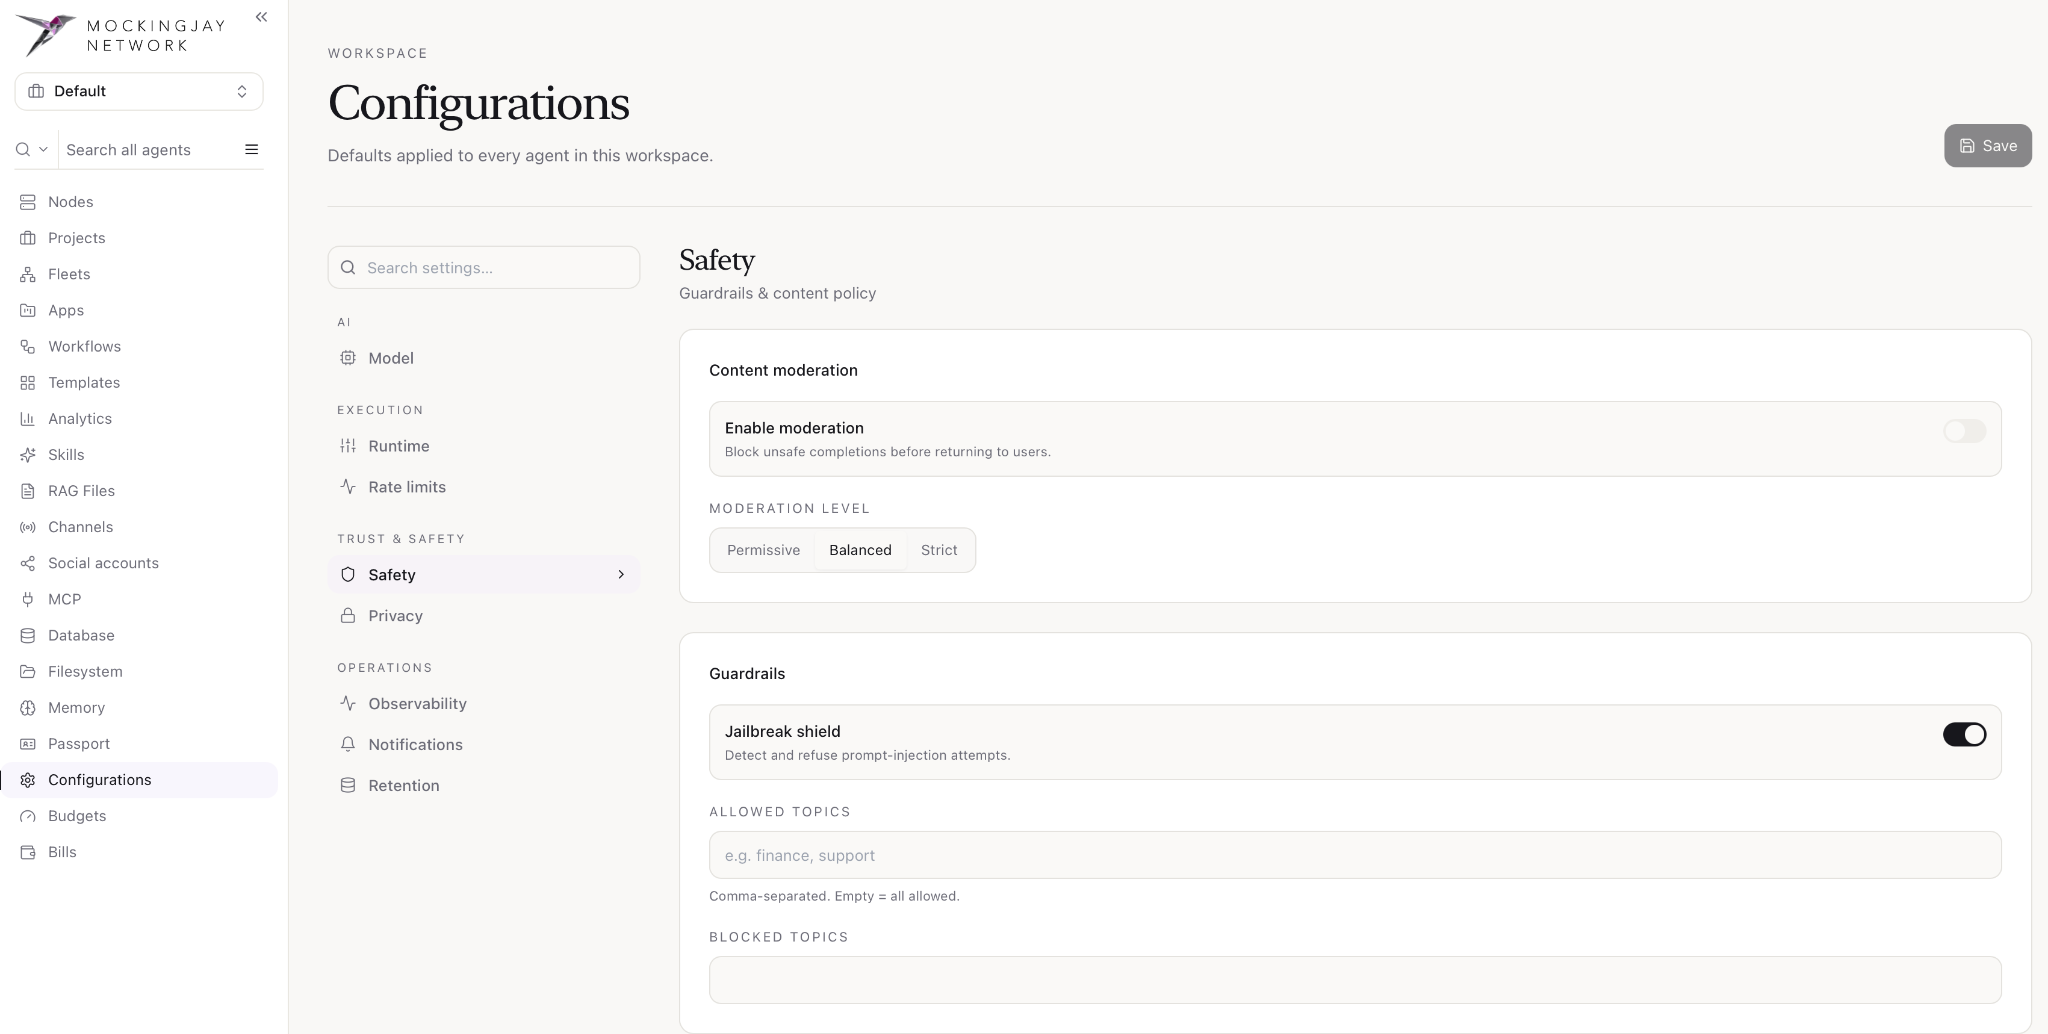
Content moderation
- Enable moderation: checks completions and blocks unsafe ones before they reach users. It’s off by default.
- Moderation level: this is Permissive, Balanced or Strict, and it only applies when moderation is on. Strict blocks more content but may produce false positives.
Guardrails
- Jailbreak shield (on by default): detects and refuses prompt-injection attempts, such as instructions hidden in web pages or documents an agent reads. Leave this on, especially for agents that browse or read untrusted files.
- Allowed topics: a comma-separated list of the only topics agents may discuss, for example finance, support. If you leave it empty, all topics are allowed.
- Blocked topics: a comma-separated list of topics agents must refuse.
Privacy
These settings cover personal data handling and encryption.
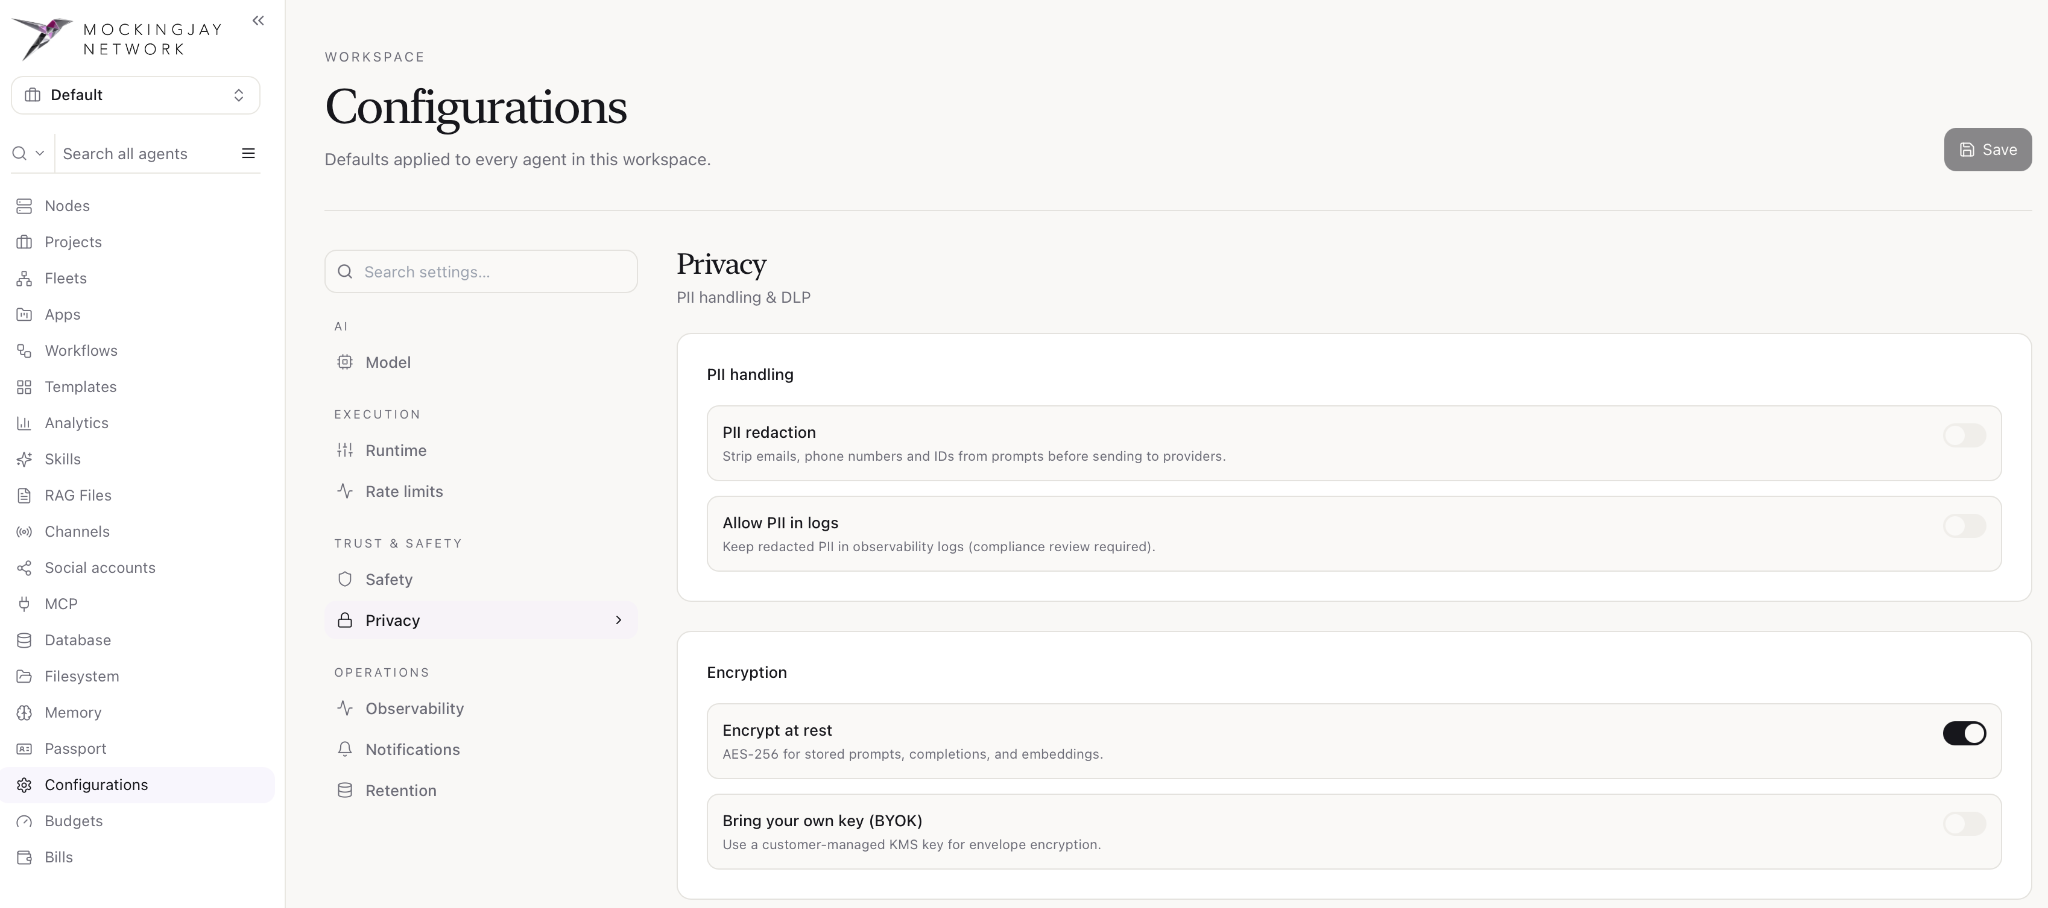
PII handling
- PII redaction: strips emails, phone numbers and ID numbers from prompts before they’re sent to model providers. It’s off by default. Turn it on if your agents handle customer data.
- Allow PII in logs: keeps the original PII in observability logs.
Encryption
- Encrypt at rest (on by default): stored prompts, completions and embeddings are encrypted with AES-256.
- Bring your own key (BYOK): use your own key from a key management service (KMS) for envelope encryption.
Observability
These settings control tracing and logging for debugging, auditing and evaluation.
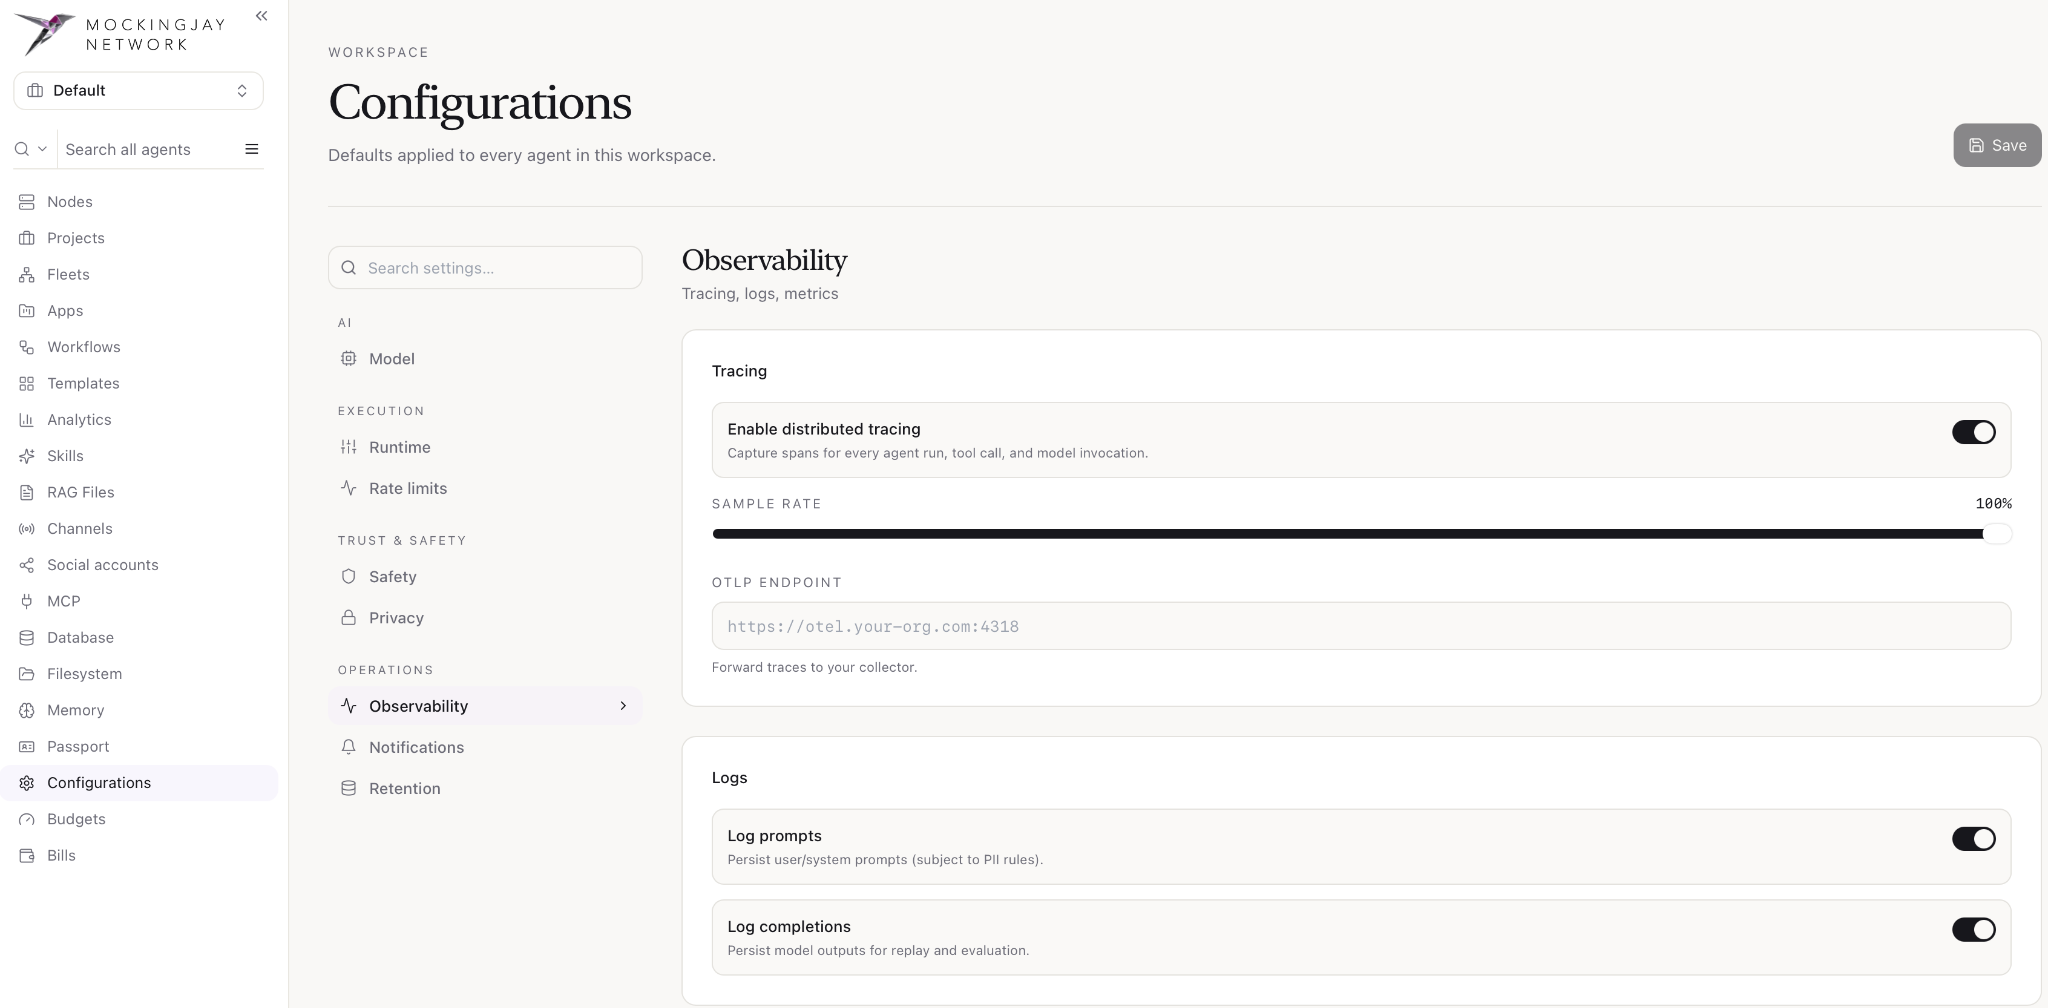
Tracing
- Enable distributed tracing (on by default): records a span for every agent run, tool call and model invocation.
- Sample rate: the percentage of runs that are traced. 100% captures everything. Lower it on high-volume workspaces to save storage.
- OTLP endpoint: forwards traces to your own OpenTelemetry collector, such as Datadog, Honeycomb or Grafana.
Logs
- Log prompts: stores user and system prompts. Your PII settings apply.
- Log completions: stores model outputs so you can replay and evaluate runs.
Notifications
These settings control alerts and where they’re sent.
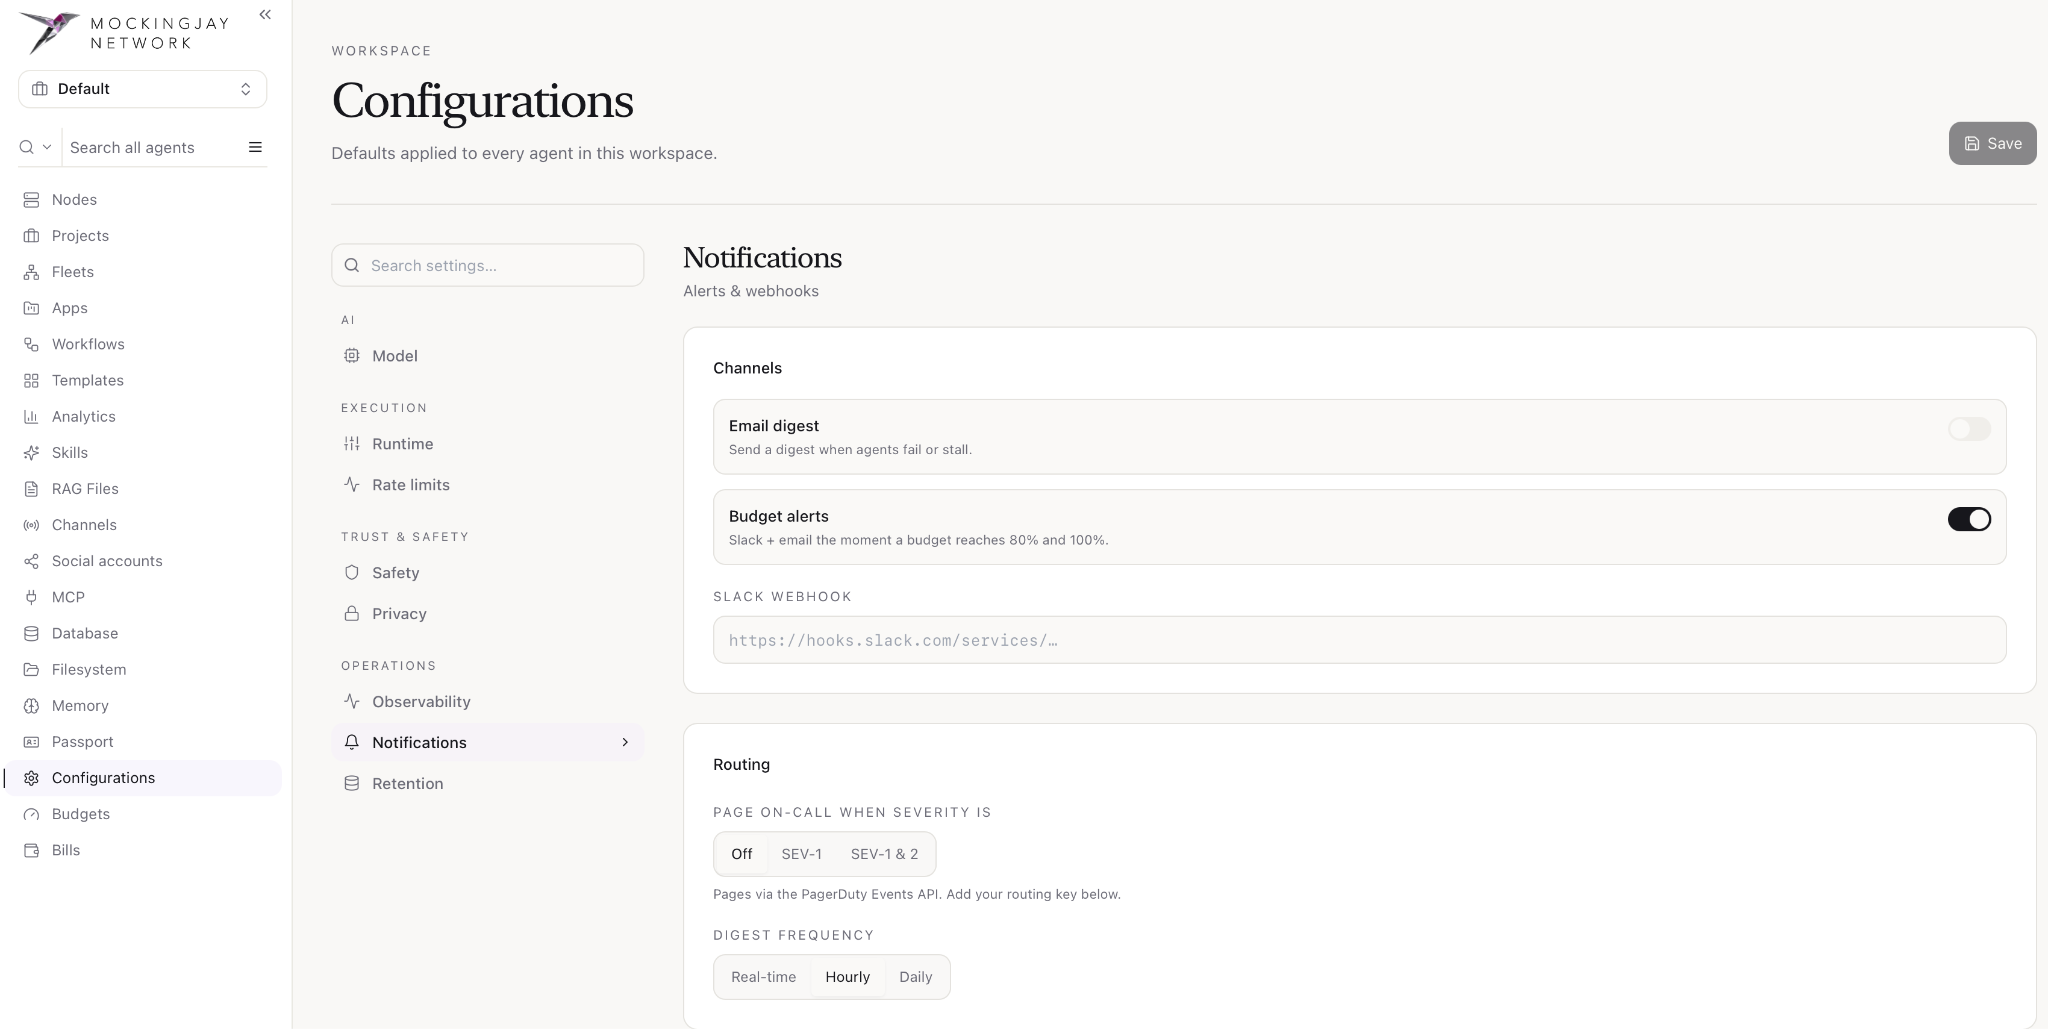
Channels
- Email digest: sends an email summarizing agents that failed or stalled.
- Budget alerts (on by default): sends a Slack message and an email when a budget reaches 80% and again at 100%. Budgets themselves are set on the Budgets page.
- Slack webhook: the incoming webhook URL that Slack alerts are posted to.
Routing
- Page on-call when severity is: choose Off, SEV-1, or SEV-1 & 2. Paging uses the PagerDuty Events API and needs your PagerDuty routing key.
- Digest frequency: controls how often the email digest is sent: Real-time, Hourly or Daily.
Retention
These settings control how long data is kept before it’s permanently deleted.
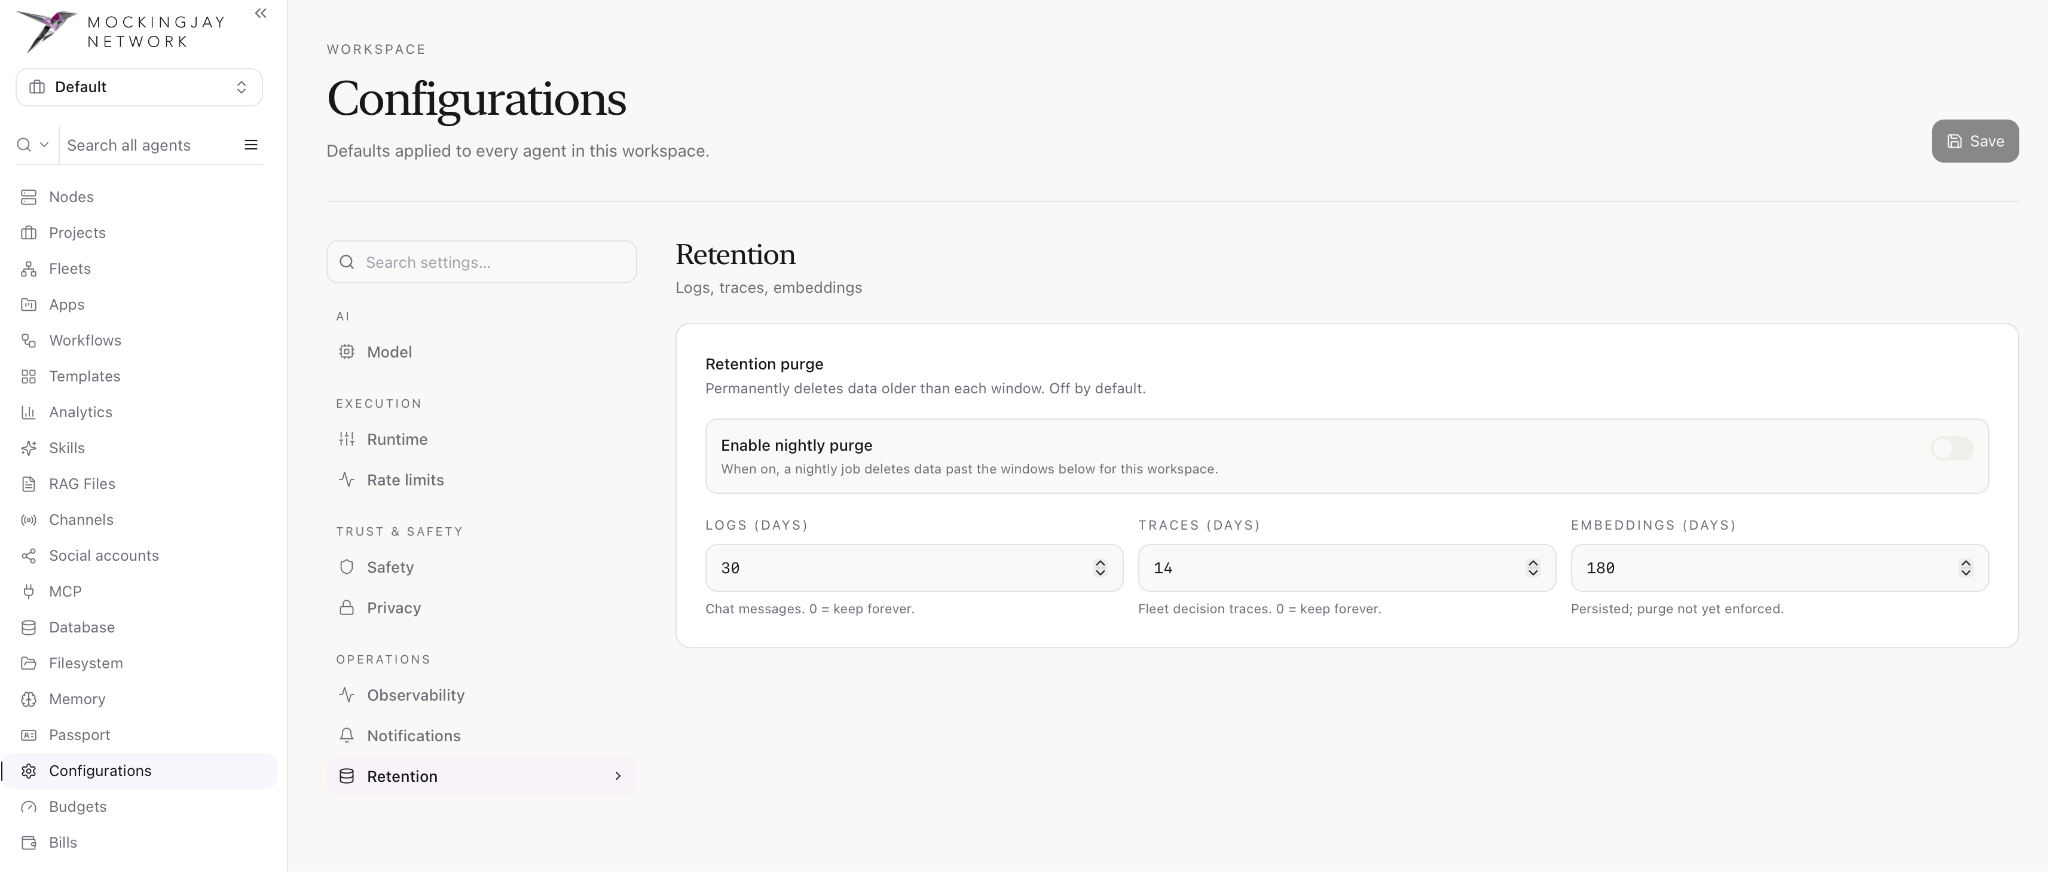
- Enable nightly purge: when this is on, a nightly job permanently deletes data older than the windows below. It’s off by default, which means nothing is deleted automatically.
- Logs(days): Chat messages
- Traces (days): Fleet decision traces
- Embeddings (days): Stored vectors
Budgets (Spend limits)
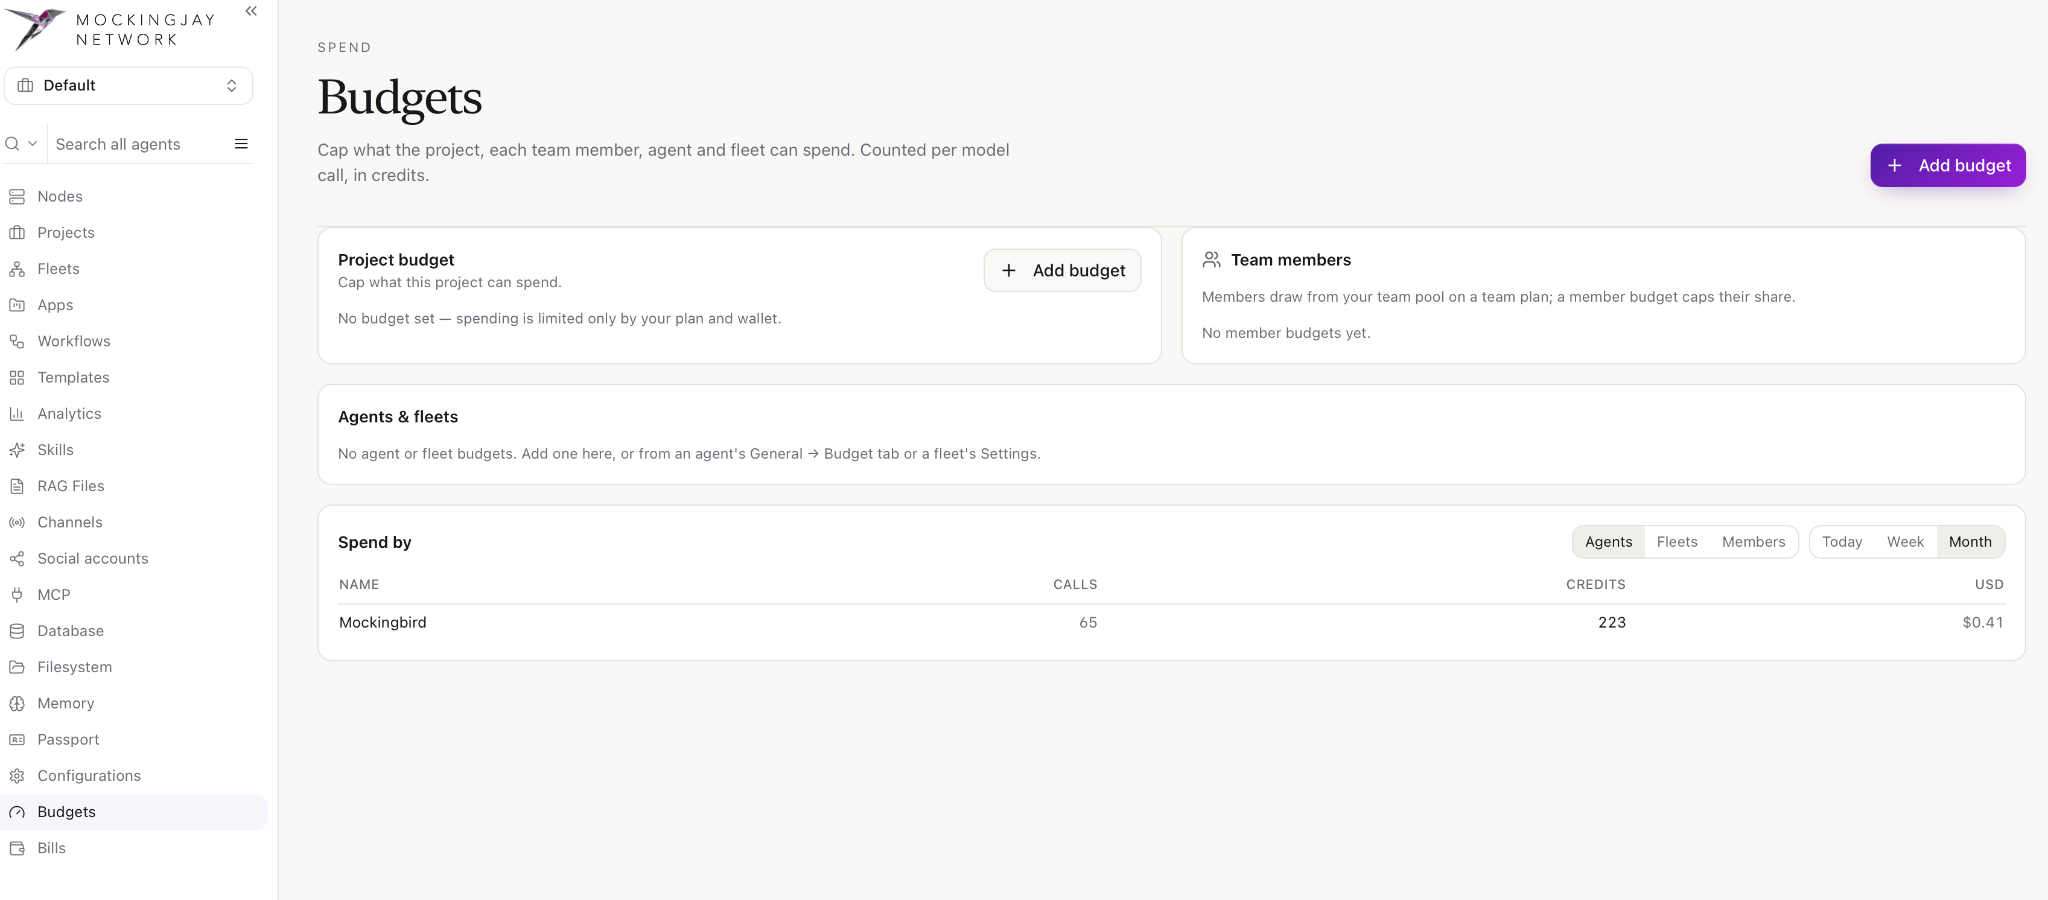
Budgets cap how much your project, team members, agents and fleets can spend. Spend is measured in credits and counted for every model call.
- Project: Total spend for the whole project
- Team member: Each member’s share of the team pool (team plans only)
- Agent&Fleet: One agent’s spend and combined spend of all agents in a fleet
- Spend by: This table shows how much has been spent and by whom.
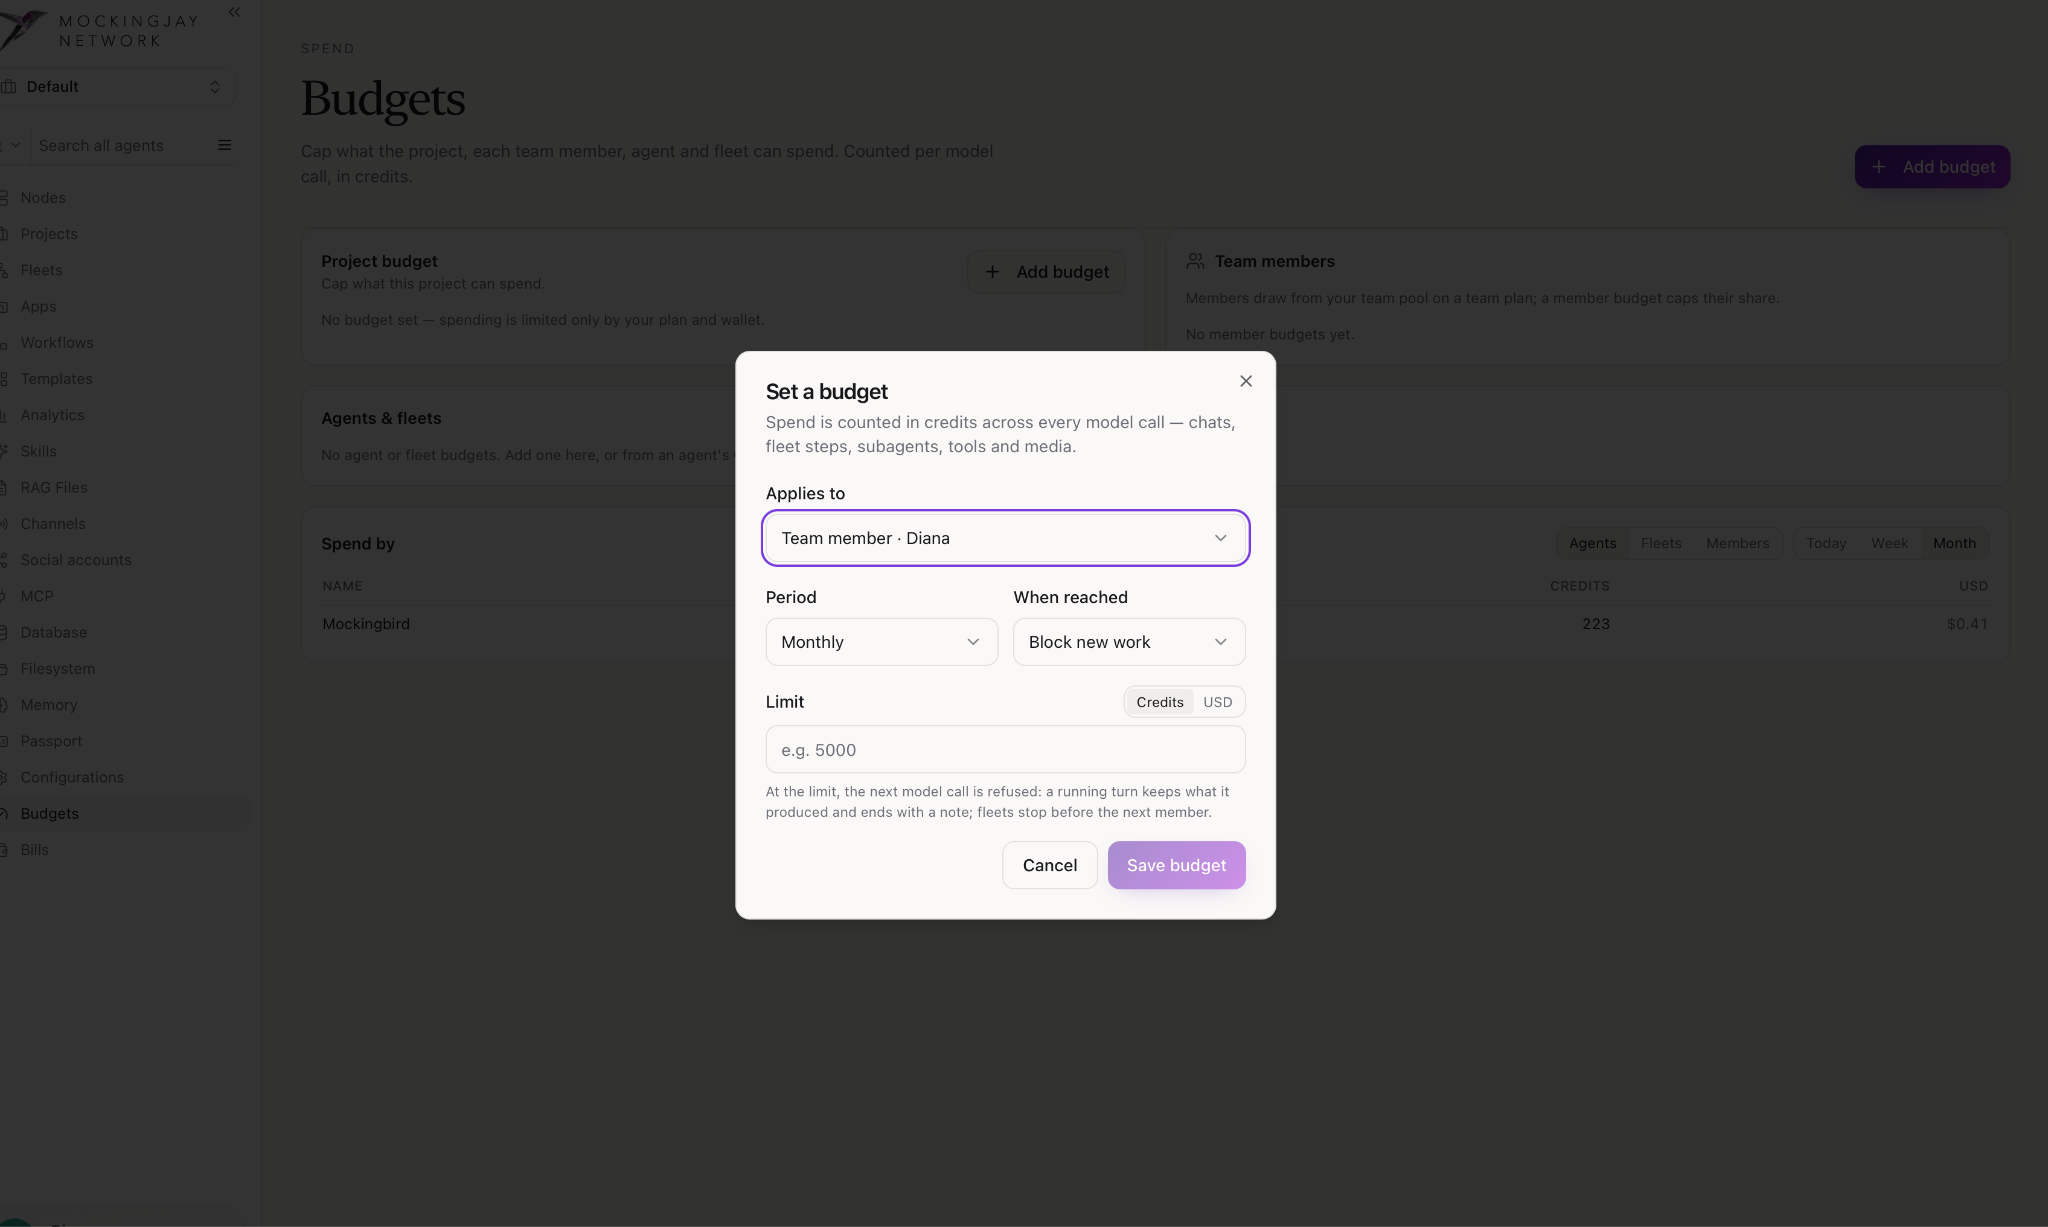
- Add Budget: Dialog box opens to set a budget.
Bills (Billing)
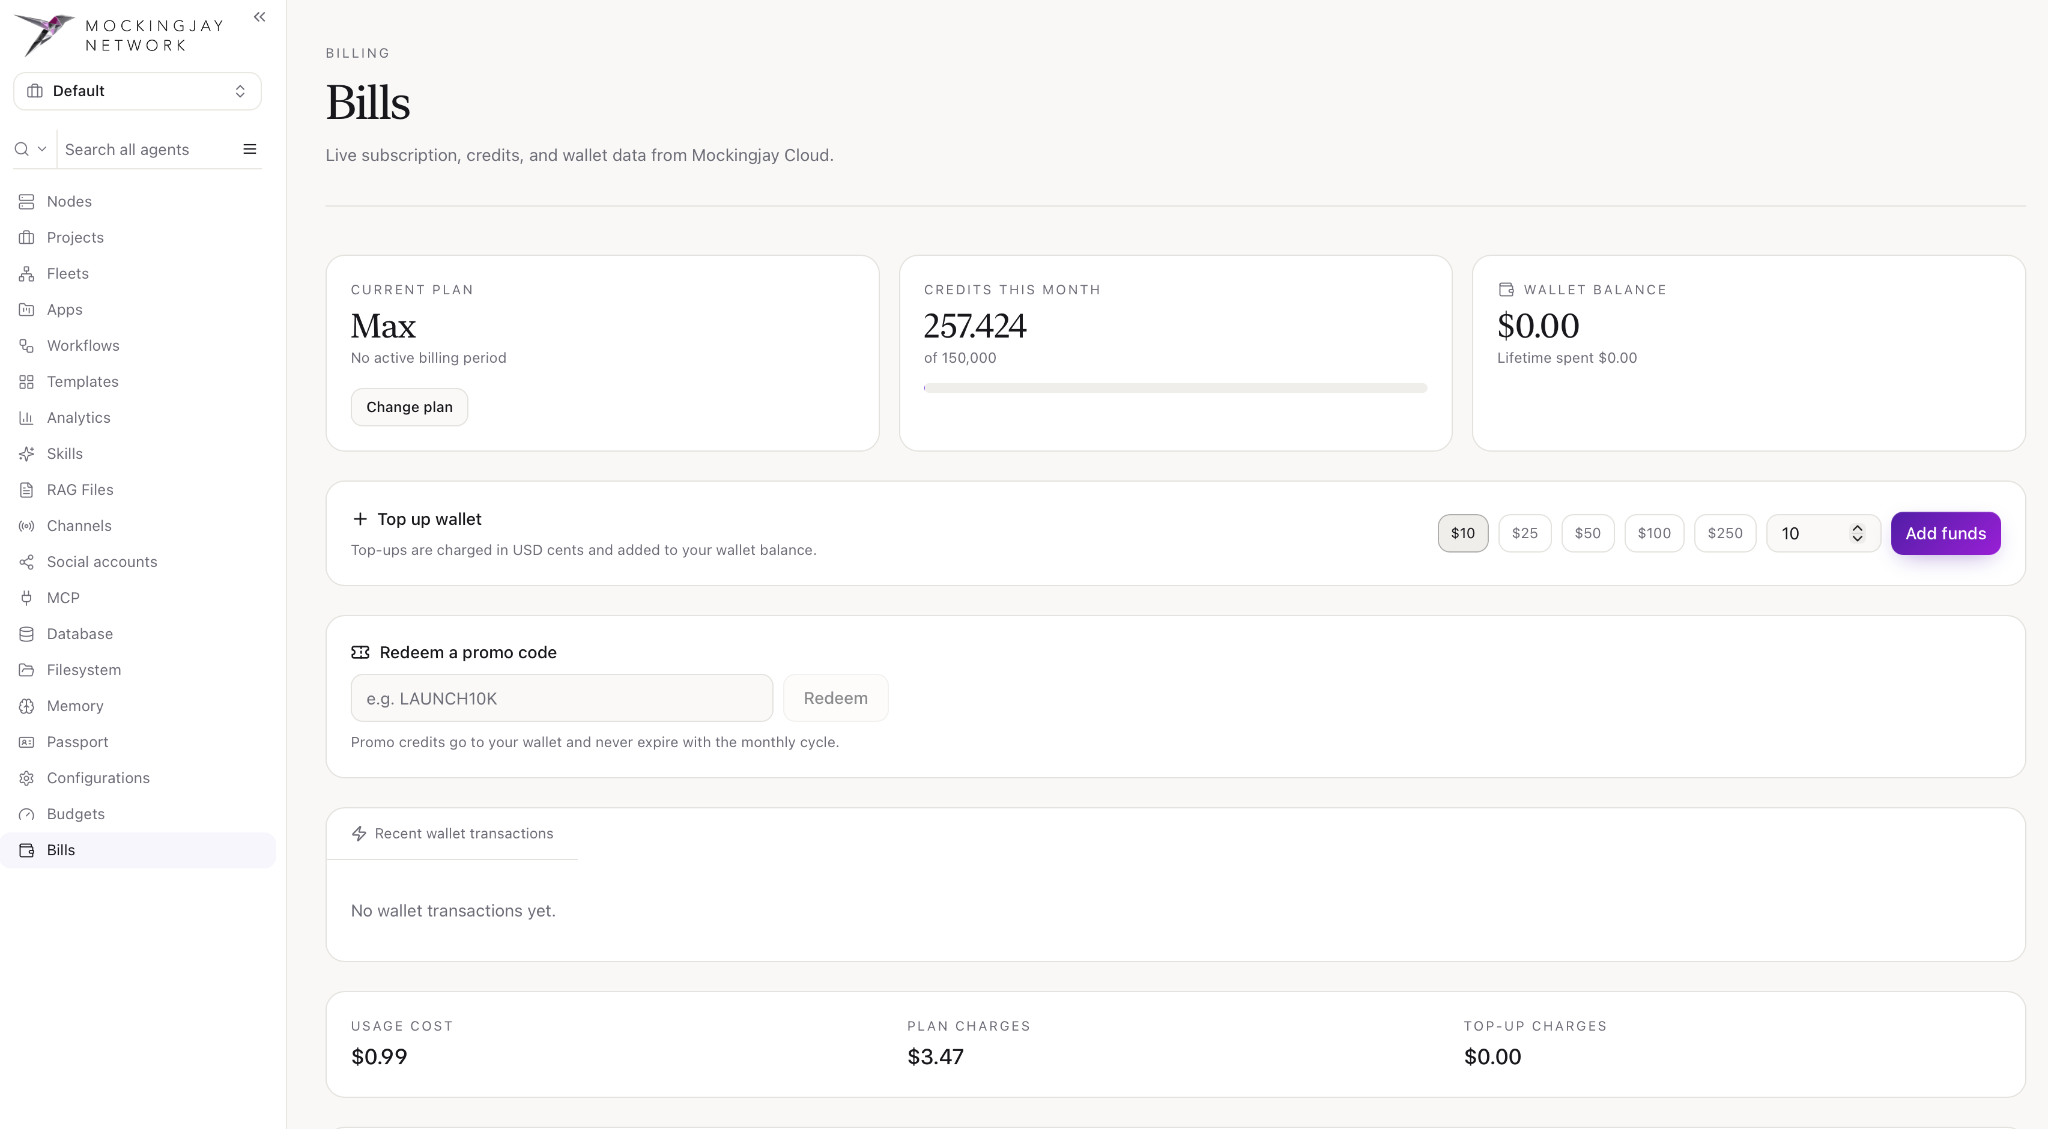
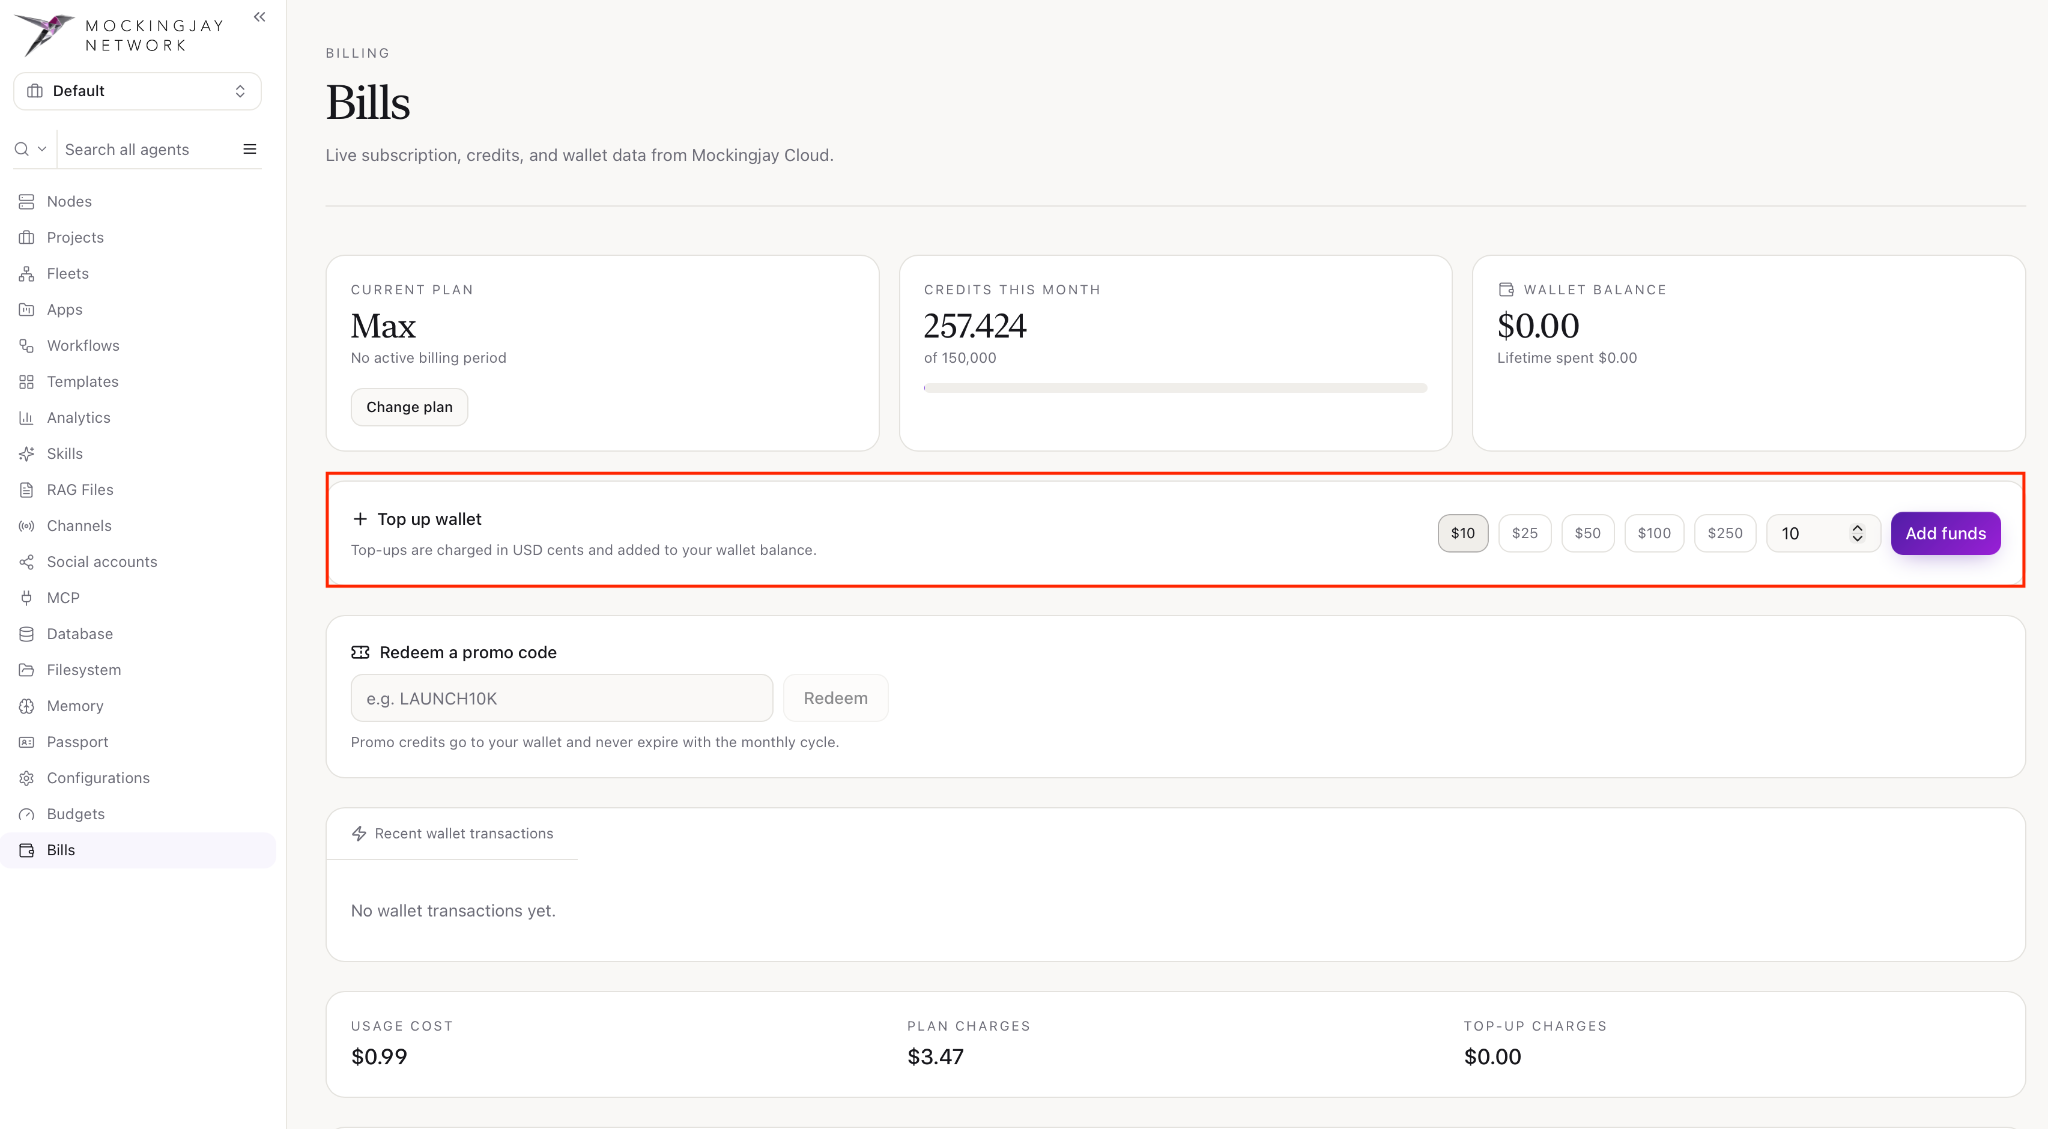
Bills shows your subscription plan, how many credits you’ve used, your wallet balance and your charges. The data comes live from Mockingjay Cloud.
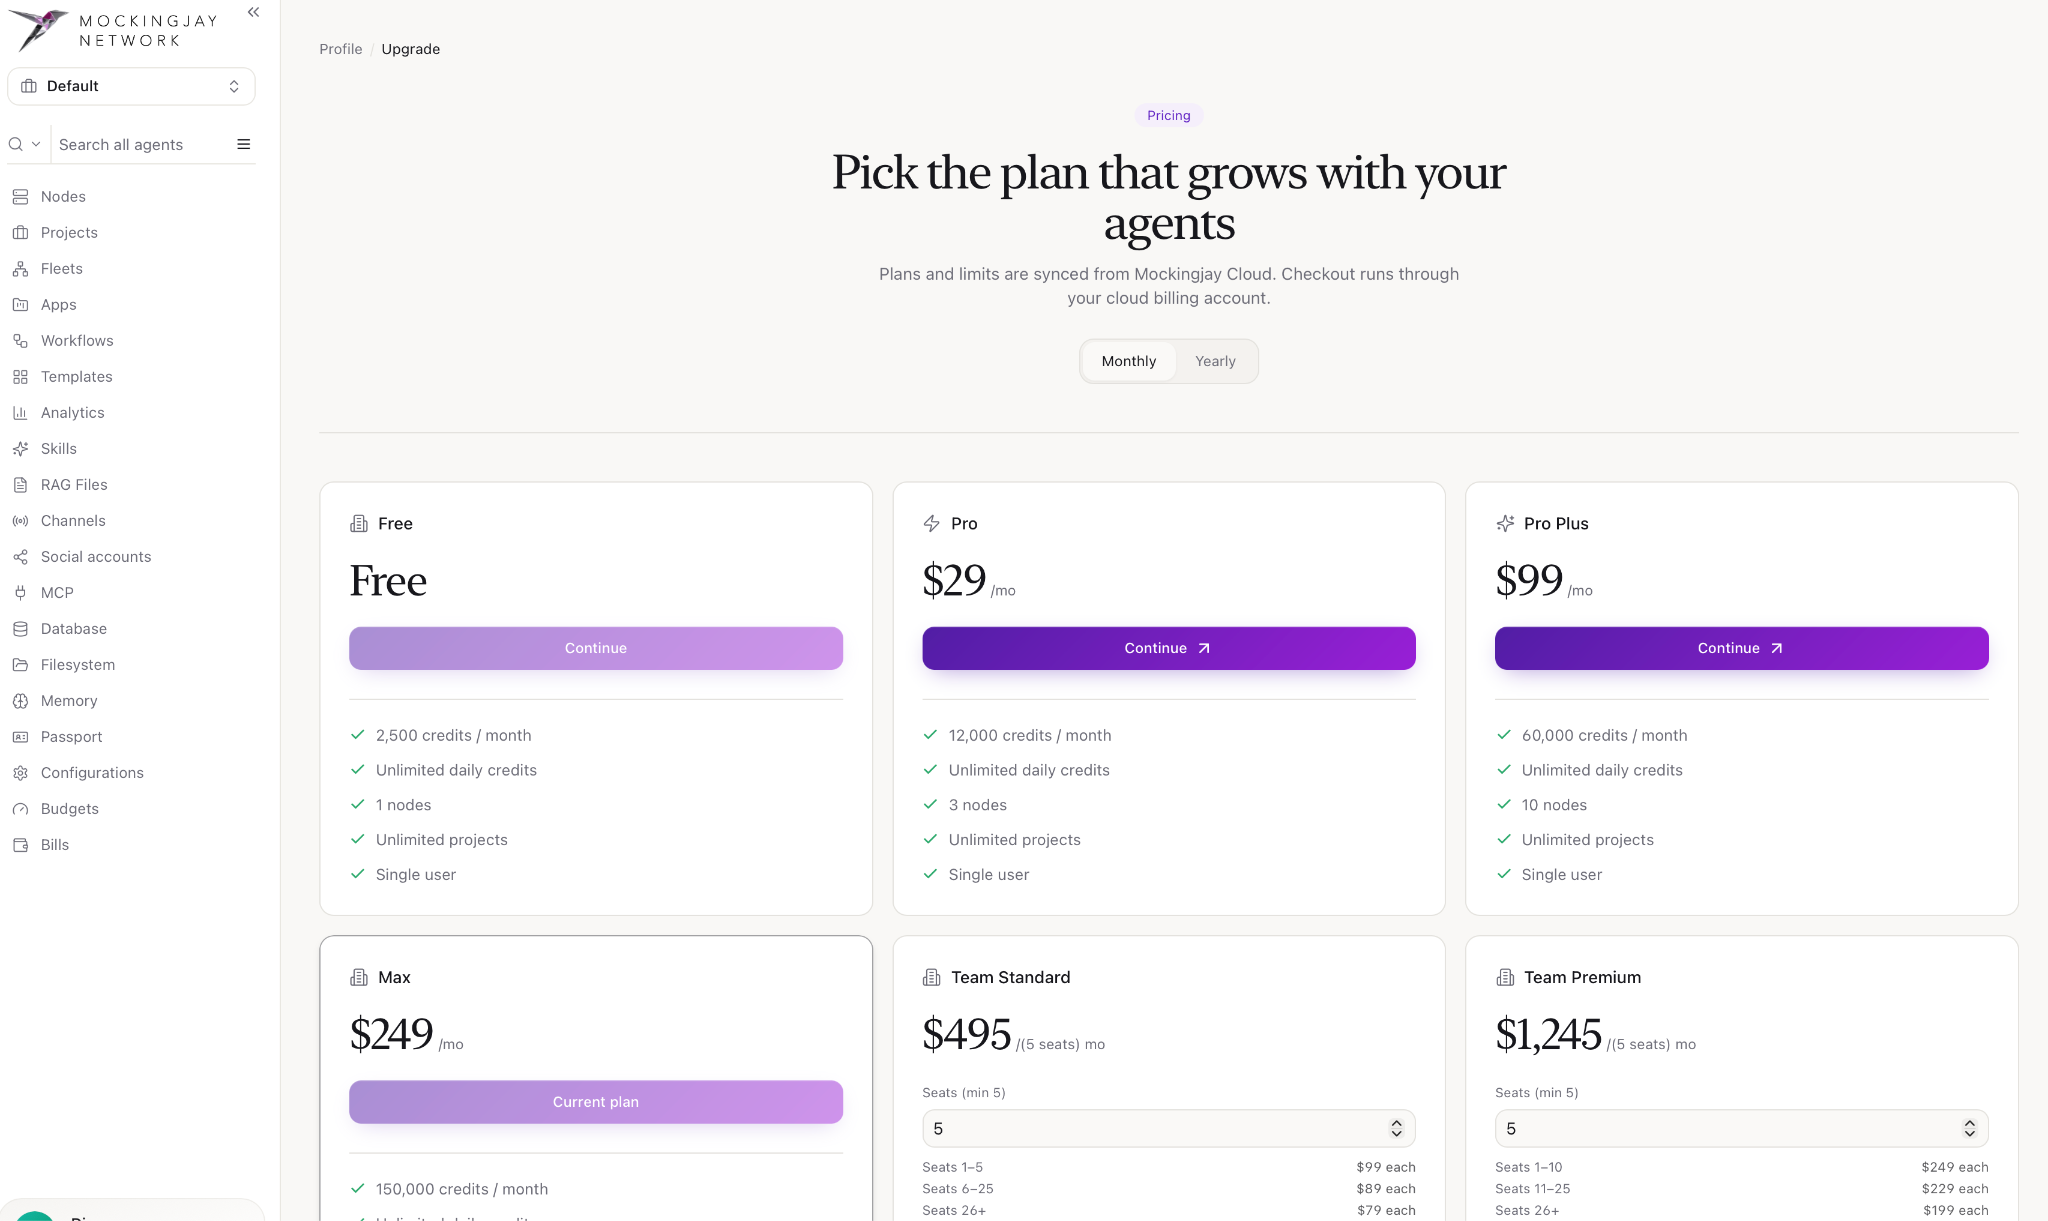
Change plan
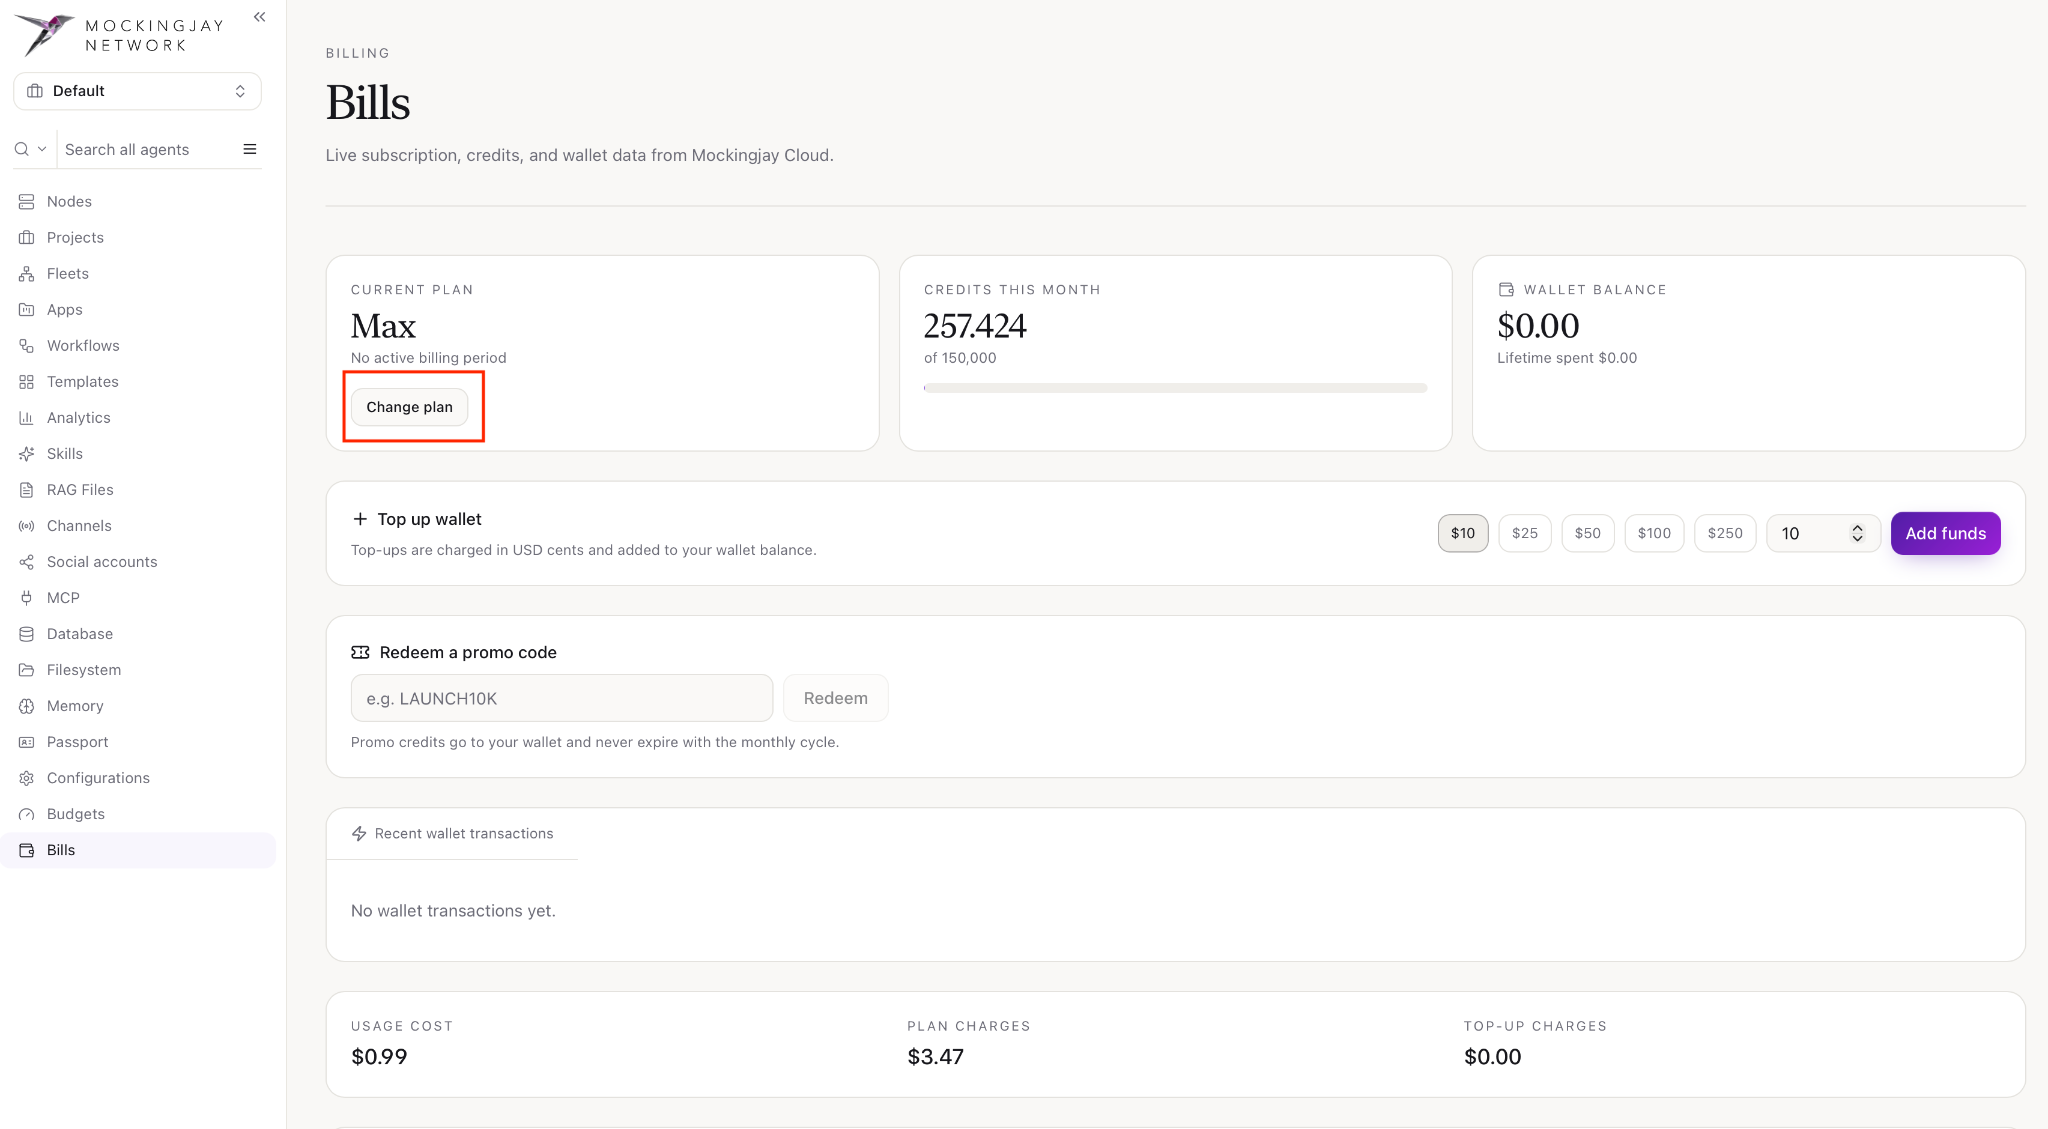
Click Change plan on the Bills page to open the pricing page. On it you can compare plans, switch between monthly and yearly billing, and upgrade or downgrade.
Plans and their limits are synced from Mockingjay Cloud. Checkout runs through your Mockingjay Cloud billing account, so clicking Continue on a paid plan opens checkout in a new tab.
Top up wallet
To add funds to your wallet:
- Choose a preset amount ($10, $25, $50, $100 or $250), or type your own amount in the box.
- Click Add funds and complete the payment.
Guide version 2.1.73 · October 2026. Still stuck? Write to service@soika.ai or use the contact form.